background image


SlimPAR PRO Q USB User Manual Rev. 3 

Page 11 of 19 

DMX Personality 

and Starting 

Address 

When selecting a starting DMX address, always consider the number of DMX channels 
the selected DMX mode uses. If you choose a starting address that is too high, you 
could restrict the access to some of the product’s channels. 
The SlimPAR PRO Q USB uses up to 10 DMX channels in a 10CH DMX mode, which 
defines the highest configurable address to 

503

If you are not familiar with the DMX protocol, download the DMX Primer from 

www.chauvetdj.com

. 

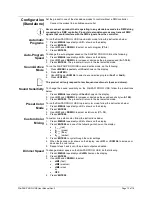
To select the starting address, do the following: 
1.  Press 

<MENU>

 repeatedly until 

4-CH

5-CH

, or 

10CH 

shows on the display. 

2.  Press 

<ENTER> 

and 

d  1–512

 will show on the display. 

3.  Use 

<UP>

 or 

<DOWN>

 to select the starting address. 

4.  Press 

<ENTER>


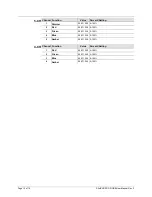
DMX Channel Assignments and Values 


10CH 

Channel  Function 

Value 

Percent/Setting 

Dimmer 

000 

ó

 255  0–100% 

Red


000 

ó

 255  0–100% 

Green 

000 

ó

 255  0–100% 

Blue 

000 

ó

 255  0–100% 

Amber 

000 

ó

 255  0–100% 

Color Macros 

(Overrides Ch. 2–5) 

000 

ó

 010  No function 

011 

ó

 255  Color macros 

Strobe 

000 

ó

 010  No function 

011 

ó

 255  Strobe, slow to fast 

Auto Program 

000 

ó

 031  No function 

032 

ó

 069  Auto program 1 

070 

ó

 106  Auto program 2 

107 

ó

 143  Auto program 3 

144 

ó

 180  Auto program 4 

181 

ó

 217  Sound-active mode 1 

218 

ó

 255  Sound-active mode 2 

Speed


(when CH8 is 032–180) 

000 

ó

 255  Slow to fast 

Sound Sensitivity


(when CH8 is 181–255) 

000 

ó

 010  Off 

011 

ó

 255  Control the sound sensitivity level 

10 

Dimmer Speed 

000 

ó

 051  Default dimmer speed set from menu 

052 

ó

 101  Dimmer speed mode off 

102 

ó

 152  Dimmer speed mode 1 (fast speed) 

153 

ó

 203  Dimmer speed mode 2 (medium speed) 

204 

ó

 255  Dimmer speed mode 3 (slow speed) 


Summary of Contents for SlimPAR Pro Q USB

Page 1: ...User Manual...

Page 2: ...ontrol Panel Operation 9 Menu Map 9 DMX Linking 10 Configuration DMX 10 D Fi USB Connectivity 10 Configuration D Fi USB 10 DMX Personality and Starting Address 11 DMX Channel Assignments and Values 11...

Page 3: ...peration information Not following these instructions may make the product not work cause damage to the product or cause harm to the operator Important installation or configuration information The pr...

Page 4: ...outlet to which you are connecting the product is within the range stated on the decal or rear panel of the product The product is for indoor use only IP20 To prevent risk of fire or shock do not exp...

Page 5: ...erview WARNING DO NOT plug anything other than a D Fi USB into the USB port Doing so may cause damage to the product DMX In Out Power In Microphone D Fi USB Port Power Out Safety Cable Pass Through Fu...

Page 6: ...Page 6 of 19 SlimPAR PRO Q USB User Manual Rev 3 Product Dimensions 10 in 253 mm 11 4 in 290 mm 3 9 in 98 mm...

Page 7: ...e rheostat or dimmer channel serves only as a 0 to 100 switch Fuse Replacement 1 Wedge the tip of a flat head screwdriver into the slot of the fuse holder 2 Pry the fuse holder out of the housing 3 Re...

Page 8: ...curely to a rigging point whether an elevated platform or a truss When rigging the product onto a truss use a mounting clamp of appropriate weight capacity When power linking multiple products mount t...

Page 9: ...ress to activate a menu option or a selected value Menu Map Main Level Programming Levels Description 4 CH d001 512 4 channel DMX mode 5 CH d001 512 5 channel DMX mode 10CH d001 512 10 channel DMX mod...

Page 10: ...uvet DJ Simply set the product s DMX Personality and DMX Address set the DIP switch D Fi receiving transmitting channel then plug it into the D Fi USB port WARNING DO NOT plug anything other than a D...

Page 11: ...r DOWN to select the starting address 4 Press ENTER DMX Channel Assignments and Values 10CH Channel Function Value Percent Setting 1 Dimmer 000 255 0 100 2 Red 000 255 0 100 3 Green 000 255 0 100 4 Bl...

Page 12: ...nction Value Percent Setting 1 Dimmer 000 255 0 100 2 Red 000 255 0 100 3 Green 000 255 0 100 4 Blue 000 255 0 100 5 Amber 000 255 0 100 4 CH Channel Function Value Percent Setting 1 Red 000 255 0 100...

Page 13: ...active program Snd1 or Snd2 4 Press ENTER The product will only respond to low frequencies of music bass and drums Sound Sensitivity To change the sound sensitivity on the SlimPAR PRO Q USB follow th...

Page 14: ...ess SENSITIVITY on the IRC 6 2 Press or to increase or decrease the sound sensitivity Manual Color Control To choose a specific color with the IRC 6 1 Press MANUAL on the IRC 6 2 Press any number betw...

Page 15: ...rom the master Do not connect more than 31 slaves to the master Master Slave Mode D Fi USB The D Fi USB allows a single SlimPAR PRO Q USB product the master to control the actions of one or more SlimP...

Page 16: ...y To clean the product follow the instructions below 1 Unplug the product from power 2 Wait until the product is at room temperature 3 Use a vacuum or dry compressed air and a soft brush to remove dus...

Page 17: ...urrent products 8 A 7 products 8 A 13 products Fuse F 2 A 250 V F 2 A 250 V Power I O U S Worldwide UK Europe Power input connector IEC IEC Power output connector Edison IEC Power Cord plug Edison U S...

Page 18: ...tdj com for contact details Call the corresponding Chauvet Technical Support office and request a Return Merchandise Authorization RMA number before shipping the product Be prepared to provide the mod...

Page 19: ...ishoutem Belgium Voice 32 9 388 93 97 Email BNLtech chauvetlighting eu Website www chauvetdj eu France Address 3 Rue Amp re 91380 Chilly Mazarin France Voice 33 1 78 85 33 59 Email FRtech chauvetlight...

Reviews: