background image

A P P E N D I X  

TFX-48C Users Manual Version 2.03 

20 

Appendix 

Maintenance 

To maintain optimum performance and minimize wear, device should be cleaned frequently.  Usage and environment 
are contributing factors in determining frequency. As a general rule, device should be cleaned at least twice a month. 

Dust build up can cause overheating. This can lead to increased mechanical wear. Be sure to power off device before 

conducting maintenance. 

Unplug device from power. Use a vacuum or air compressor and a soft brush to remove dust collected on external vents 

and internal components. 

DMX Primer 

There are 512 channels in a DMX-512 connection. Channels may be assigned in any manner. A fixture capable of 

receiving DMX 512 will require one or a number of sequential channels. The user must assign a starting address on the 

fixture that indicates the first channel reserved in the controller. There are many different types of DMX controllable 

fixtures and they all may vary in the total number of channels required. Choosing a start address should be planned in 

advance. Channels should never overlap. If they do, this will result in erratic operation of the fixtures whose starting 

address is set incorrectly. You can however, control multiple fixtures of the same type using the same starting address as 

long as the intended result is that of unison movement or operation. In other words, the fixtures will be slaved together 
and all respond exactly the same.  

DMX fixtures are designed to receive data through a serial Daisy Chain. A Daisy Chain connection is where the DATA OUT of one 

fixture connects to the DATA IN of the next fixture. The order in which the fixtures are connected is not important and has no 
effect on how a controller communicates to each fixture. Use an order that provides for the easiest and most direct cabling. Connect 
fixtures using shielded two conductor twisted pair cable with three pin XLR male to female connectors. The shield connection is pin 
1, while pin 2 is Data Negative (S-) and pin 3 is Data positive (S+). CHAUVET carries 3-pin XLR DMX compliant cables, DMX-10 

(33’), DMX-4.5 (15’) and DMX-1.5 (5’) 

Returns Procedure 

Returned merchandise must be sent prepaid and in the original packing, call tags will not be issued. Package must be 

clearly labeled with a Return Merchandise Authorization Number (RA #). Products returned without an RA # will be 

refused. Call CHAUVET and request RA # prior to shipping the fixture. Be prepared to provide the model number, 

serial number and a brief description of the cause for the return. Be sure to properly pack fixture, any shipping damage 

resulting from inadequate packaging is the customer’s responsibility. CHAUVET reserves the right to use its own 

discretion to repair or replace product(s). As a suggestion, proper UPS packing or double-boxing is always a safe method 

to use. 

Claims 

Damage incurred in shipping is the responsibility of the shipper; therefore the damage must be reported to the carrier 

upon receipt of merchandise. It is the customer's responsibility to notify and submit claims with the shipper in the event 

that a fixture is damaged due to shipping.  Any other claim for items such as missing component/part, damage not 

related to shipping, and concealed damage, must be made within seven (7) days of receiving merchandise.  

Summary of Contents for Stage Designer 48

Page 1: ...T E C H N I C A L R E F E R E N C E M A N U A L Stage Designer 48 TFX 48CON CHAUVET 3000 North 29th Ct Hollywood FL 33020 Tel 954 929 1115 Fax 954 929 5560 www CHAUVETlighting com ...

Page 2: ... Programs 12 Clear a Scene or Scenes 12 Delete a Step or Steps 12 Insert a Step or Steps 13 Modify a Step or Steps 13 Running the Show 14 Running Chase Programs 14 Running a Program in Audio 14 Running a Program with the Speed Slider 15 Running a Program with the Standard Beat 15 Change the Speed Mode between 5 Minutes and 10 Minutes 16 MIDI IN 16 Setting MIDI IN 16 Setting MIDI OUT 16 Exit MIDI S...

Page 3: ...S Issue Date January 2004 Rev No Version Date Description 1 2 03 March 2004 TFX 48C Users Guide version 2 02 Revised V M at CHAUVET APPENDIX 20 Maintenance 20 DMX Primer 20 Returns Procedure 20 Claims 20 General Troubleshooting 21 ...

Page 4: ...ariable resistor or dimmer circuit even if the rheostat or dimmer channel is used solely for a 0 to 100 switch Before applying power to a fixture check that the source voltage matches the fixture s requirement All fixtures must be connected to circuits with a suitable Earth Ground Check the fixture or device carefully to make sure that if a voltage selection switch exists that it is set to the cor...

Page 5: ...t 3 pin male XLR MIDI In Out Thru 5 pin interface Fuse internal F 05A 250V 5x20mm Dimensions 710mm x 266mm x 90mm 27 95 x 10 47 x 3 54 Shipping 7 3Kg 16Lbs Features 48 DMX Channel on faders 48 programs 4 200 steps 4 pages of 48 scenes Mix and match chases Override chases on the fly Beat activation tap sync auto run midi Polarity selector Auto run Midi In Out Blackout Warranty 2 Year Limited Warran...

Page 6: ...l and or program the intensities of channel 25 through 48 7 Flash Buttons 25 48 Flash buttons are used to bring an individual channel up to full intensity These are also used for programming 8 Dark Button This button is used to momentarily blackout overall output of the controller 9 DOWN Down functions to modify a scene in Edit mode BEAT REV Is used to reverse the chasing direction of a program wi...

Page 7: ...ctivate Record mode or program a step SHIFT Shift functions only used with other buttons 19 MASTER A Brings channel 1 12 to full of current setting 20 PARK Used to select Single Mix Chase bring Channel 13 24 to full of current setting or momentarily program a scene into Master B slider depending on the current mode 21 HOLD This button is used to maintain current scene 22 STEP This button is used t...

Page 8: ...Data 3 Data 1 Ground 2 Data 3 Data T HRU OUT IN DC 12V 20V 500 mA min LINEIN DMX polarity select 1 4 stereo jack Full on S tand By or Black Out GND 100mV 1Vp p 2 3 1 ON OFF 35 Power Switch Turns power On or Off to device 36 DC Input DC 12 20V 500mA Min 37 Midi Thru Out In MIDI ports for connection to a sequencer or MIDI device 38 DMX Out Method of connection to DMX 512 compatible devices 39 DMX Po...

Page 9: ...de number sequence Enter the current Record Code sequence Flash buttons 1 6 6 and 8 Press and hold down the Record and Edit buttons at the same time While holding the Record and Edit button tap the desired Flash button to enter a new Record Code The Record Code consists of 4 Flash buttons any combination of buttons It must use 4 Flash buttons Enter your new Record Code a second time All channel LE...

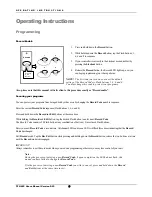
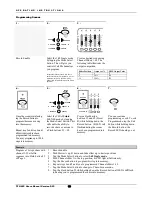
Page 10: ...may program up to 1000 steps into memory Select the CHASE SCENES mode by tapping the Mode Select button This will enable the ability to record a chase or a scene to a Flash buttons 25 48 Press a Flash button between 25 and 48 Preset B while holding down the Record button All LED will flash indicating the scenes have been programmed into memory You can continue programming or exit To exit Program m...

Page 11: ...p the Flash button that corresponds to program you wish to edit Release the Edit button the relevant scene LED should light indicating you are in the Edit mode Erase a Program 1 2 3 4 Record Enable Use the Page button to select the page the program you wish to erase is on While holding down the Edit button tap the Flash button 25 48 twice Release the two buttons all LEDs flash indicating the progr...

Page 12: ...p button to scroll to the step you wish to delete Tap the Delete button when you reach to the step you wish to delete all LEDs will flash briefly indicating the deletion of the step Continue steps 2 and 3 until all the unwanted steps have been deleted Tap the Rec Exit button while pressing and holding down the Record button the Scene LED goes out indicating the exit of Edit mode Example Delete the...

Page 13: ...button until Page 2 LED lights 5 Tap the Flash button 35 while holding down the Edit button the corresponding scene LED lights 6 Tap the Step button to scroll to the step 4 7 Tap the Insert button to insert the scene you ve created before Modify a Step or Steps 1 2 3 4 Enter Edit mode Tap the Step button to scroll to the step you wish to modify Press and hold the Up button if you want to raise the...

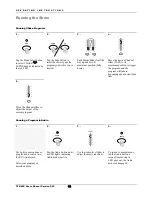
Page 14: ...will fade in depending upon current fade time 5 Move the Channel slider to adjust the output of the current program Running a Program in Audio 1 2 3 4 Use built in microphone or plug the audio source into the RCA Audio jack Select your program as described above Tap the Audio button until its LED lights indicating Audio mode is active Use the Audio level slider to adjust the music sensitivity To r...

Page 15: ... select CHASE SCENE mode Tap the Park button to select Mix Chase mode the LED lights indicating this selection Select your program as described above Move the Speed slider until Segment Display reads your desired value You may tap the Tap Sync button twice to define your beat time While pressing and holding down the Rec Speed button tap the Flash button 25 48 that stores the program The program wi...

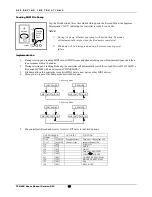
Page 16: ...Flash button numbered from 1 16 to assign MIDI OUT Channel 1 16 the relevant channel LED lights indicating MIDI OUT channel is set Press and hold down the Record button While holding down the Record button tap the Rec Exit button to exit MIDI setting Tap the Flash button 3 three time while holding down the Record button the Segment Display reads IN indicating the controller is ready to receive MID...

Page 17: ...y search for or send Device ID of 55h 85 a file named DC2448 with an extension of BIN SPACE 3 File dump allows this controller to send its MIDI data to next unit or other MIDI devices 4 Three are two types of file dump mode described as below 5 The controller will send and receive Note On Off data via the Flash buttons NOTE NUMBER VELOCITY FUNCTION Decimal Hex 22 69 16H 45H Program Master Turn on ...

Page 18: ...Master Slider control provides proportion level control over all channels and scenes with the exception of the Flash Buttons For example Whenever the Master slider control is at minimum all stage outputs will be at zero except for any resulting from a Flash Button or FULL ON Button If the Master is at 50 all outputs will be at only 50 of the setting of current channel or scenes except for any resu...

Page 19: ...Mode this button could temporarily record current output with Master Slider B to adjust Add and Kill 1 The ADD KILL Button changes the mode of the flash buttons Normally the flash buttons are in Add mode whereas pressing any flash button will not kill other scenes allowing multiple scenes to be on at a time 2 The Kill mode is activated by pressing the Add Kill button and illuminating the LED above...

Page 20: ...onnection is where the DATA OUT of one fixture connects to the DATA IN of the next fixture The order in which the fixtures are connected is not important and has no effect on how a controller communicates to each fixture Use an order that provides for the easiest and most direct cabling Connect fixtures using shielded two conductor twisted pair cable with three pin XLR male to female connectors Th...

Page 21: ...as dropped Clean with distilled water and vinegar Replace hose Lamps cuts off sporadically Possible bad lamp or fixture is overheating Lamp may be at end of its life Light will not come on after power failure Some discharge lamps require a cooling off period before the electronics in the fixture can kick start it again wait 5 to 10 minutes before powering up Loss of signal Use only DMX cables Inst...

Reviews: