background image

2

  Installing the Check Point IP690 Appliance

32

Check Point IP690 Security Platform Installation Guide

Summary of Contents for IP690 - Flash Based Sys

Page 1: ...Part No N450000890 Rev 001 Published March 2009 Check Point IP690 Security Platform Installation Guide...

Page 2: ...n are subject to change without notice RESTRICTED RIGHTS LEGEND Use duplication or disclosure by the government is subject to restrictions as set forth in subparagraph c 1 ii of the Rights in Technica...

Page 3: ...Security Platform 16 Check Point IP690 Security Platform Overview 17 Four Port 10 100 1000 Ethernet NIC 17 PMC Expansion Slots 18 Console Port 18 Auxiliary Port 19 System Status LEDs 19 Logging Optio...

Page 4: ...ernet NIC Features 48 Ethernet NIC Connectors and Cables 49 Two Port and Four Port Copper Gigabit Ethernet NIC 50 Copper Gigabit Ethernet NIC Features in the IP690 50 Copper Gigabit Ethernet NIC Conne...

Page 5: ...86 Configuring Software to Use Hardware Acceleration 90 Replacing a Fan Unit 91 Before You Begin 91 Replacing a Power Supply 92 Before You Begin 92 Monitoring the IP690 Appliance Power Supply 94 Repla...

Page 6: ...6 Check Point IP690 Security Platform Installation Guide...

Page 7: ...39 Figure 11 Four Port 10 100 Ethernet NIC Front Panel Details 48 Figure 12 Output Connector for the Ethernet Cable 49 Figure 13 Ethernet Crossover Cable Pin Connections 50 Figure 14 Four Port Copper...

Page 8: ...8 Check Point IP690 Security Platform Installation Guide...

Page 9: ...ion Guide 9 Tables Table 1 Command Line Conventions 12 Table 2 Text Conventions 14 Table 3 Pin Assignments for Console Connector and Console Cable 18 Table 4 System Status LEDs 20 Table 5 Power Supply...

Page 10: ...10 Check Point IP690 Security Platform Installation Guide...

Page 11: ...to make the security platform available on the network Chapter 4 Installing and Replacing Network Interface Cards describes how to install monitor and replace network interface cards NICs and Accelera...

Page 12: ...f service Note Notes provide information of special interest or recommendations Command Line Conventions Table 1 describes the elements of commands that are available in Check Point business security...

Page 13: ...aming sonet or framing sdh flag A flag is usually an abbreviation for a function menu or option name or for a compiler or preprocessor argument You must enter a flag exactly as shown including the pre...

Page 14: ...e configure nat Key names Keys that you press simultaneously are linked by a plus sign Press Ctrl Alt Del Menu commands Menu commands are separated by a greater than sign Choose File Open The words en...

Page 15: ...firewall application The Check Point IP690 security platform is a high end multi port security platform that is ideally suited for the enterprise data center The IP690 is a one rack unit appliance tha...

Page 16: ...led through the Check Point IPSO operating system With Network Voyager you can manage monitor and configure the IP690 security platform from any authorized location within the network by using a stand...

Page 17: ...most port port 1 The remaining LEDs represent the remaining ports from top to bottom and left to right Note The Ethernet ports are intended for management or high speed traffic Figure 2 Four Port 10...

Page 18: ...oint products that use Check Point approved accessories For sales or reseller information contact the Check Point Support Center at http support checkpoint com Console Port The default configuration o...

Page 19: ...Auxiliary Port Use the built in serial AUX port shown in Figure 1 to establish a modem connection for managing the appliance remotely or out of band Use USB cables with a standard USB A style connecto...

Page 20: ...placing ADP Services Modules Note The Fault and Warning symbols in Table 4 are visible only if there is an alarm condition as specified Table 4 shows the system status LEDs and describes their meaning...

Page 21: ...0 When you purchase your IP690 you can order one or two hard disk drives for factory installation or order them later and install them yourself as described in Installing a Hard Disk Drive on page 82...

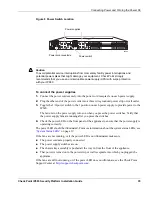
Page 22: ...t Locations Power Supplies The IP690 supports two redundant power supplies Each power supply is autosensing and can accept input voltages between 47Hz 64Hz and 85VAC 264VAC Figure 6 Power Supply Recep...

Page 23: ...nit see Replacing a Fan Unit on page 91 The system status LEDs on the front panel of the appliance show the status of the fan unit For more information about the system status LEDs see System Status L...

Page 24: ...onal If a cord set is not provided use a power cord rated at 10A 250V maximum 15 feet long made of HAR cordage and IEC fittings approved by the country of end use Caution Risk of explosion if battery...

Page 25: ...y handing it over to a designated collection point for the recycling of waste electrical and electronic equipment The separate collection and recycling of your waste equipment at the time of disposal...

Page 26: ...1 Overview 26 Check Point IP690 Security Platform Installation Guide...

Page 27: ...o place the chassis tray assembly Caution To help guard against electrostatic discharge damage make sure you are properly grounded by using a grounding wrist strap and following the instructions provi...

Page 28: ...any ventilation openings Doing so might result in damage to the appliance when it is turned on To rack mount the appliance Caution The appliance is heavy Use care when you remove it from the packagin...

Page 29: ...ve the power supplies from the rear of the appliance to reduce weight as follows a Locate the power supplies on the back of the IP690 b Grasp the handle and release lever as shown in the following fig...

Page 30: ...ward taking care to prevent damaging components press the release tab on the right side of the assembly and completely remove the chassis tray assembly to expose the motherboard components c Place the...

Page 31: ...can use the rear brackets for additional chassis support 7 Slowly slide the chassis tray assembly back into the appliance taking care to prevent damaging components and resecure the two chassis tray a...

Page 32: ...2 Installing the Check Point IP690 Appliance 32 Check Point IP690 Security Platform Installation Guide...

Page 33: ...Turning the Power On Performing the Initial Configuration Connecting Network Interfaces Using Check Point Network Voyager Using the Command Line Interface Using Check Point Horizon Manager For informa...

Page 34: ...front panel of the IP690 Use only the RJ 45 port labeled Console on the front panel the serial AUX port is an auxiliary port One RJ 45 termination has a retractable shroud that releases or secures the...

Page 35: ...pply turns on when you press the power switches Verify that the power supply fans are running after you press the switches 4 Check the power LED on the front panel of the appliance to ensure that the...

Page 36: ...all the way in from the front of the appliance and that the front panel retaining screws are tightened Make sure that power is turned on to the power strip or wall receptacle you plugged the applianc...

Page 37: ...r the version of IPSO you are using 5 After you complete the initial configuration you can use Network Voyager to configure the remaining network ports Connecting Network Interfaces Connect at least o...

Page 38: ...k that all cables are firmly connected For more information see the troubleshooting section in the installation guide for your appliance Viewing Check Point IPSO Documentation by Using Check Point Net...

Page 39: ...t over a TCP IP network as an admin cadmin or monitor user If you log in as a cadmin cluster administrator user you can change and view configuration settings on all the cluster nodes For information...

Page 40: ...r and improving productivity Using Check Point Horizon Manager a network security professional can manage multiple devices simultaneously perform parallel software upgrades device verifications device...

Page 41: ...onitoring Network Interface Cards For detailed information about specific network interface cards see Chapter 5 Connecting PMC Network Interface Cards For installation and other information about Acce...

Page 42: ...priate to each procedure Before You Begin To install a NIC you need the following A Phillips head screwdriver Physical access to the appliance Access to the appliance by using Check Point Network Voya...

Page 43: ...t damaging components press the release tab on the right side of the assembly and completely remove the chassis tray assembly to expose the motherboard components 5 Place the chassis tray assembly on...

Page 44: ...stalling a NIC in an unoccupied slot remove the blank bezel that occupies the space in the appliance front panel and retain it for future use If you are removing an installed NIC remove it by pulling...

Page 45: ...ning screws into the standoffs on the back of the NIC 9 From beneath the chassis tray assembly screw in the bezel retaining screws 10 Insert and close the chassis tray assembly until it clicks into pl...

Page 46: ...nd the related reference materials see Using Check Point Network Voyager on page 38 Monitoring Network Interface Cards You can asses the general operating condition of the NIC in your appliance by loo...

Page 47: ...Cards The NICs supported in the Check Point IP690 security platform operate at the peripheral component interconnect PCI frequency listed in Table 6 Caution To protect the IP690 and the memory modules...

Page 48: ...es Tracing through tcpdump High bandwidth Full duplex mode operation up to 100 Mbps Link speed auto advertising 10 100 PCI operation at 133 MHz Compliance with IEEE 802 3ab Gigabit Ethernet specificat...

Page 49: ...t 5 or Cat 5e unshielded twisted pair cable You can order appropriate adapter cables separately from a cable vendor of your choice Caution Cables that connect to the Ethernet NIC must be ANSI TIA EIA...

Page 50: ...add or replace a NIC see Chapter 4 Installing and Replacing Network Interface Cards Copper Gigabit Ethernet NIC Features in the IP690 The copper Gigabit Ethernet NIC supports Tracing through tcpdump H...

Page 51: ...IF4425 After the power is turned on and the cables are connected the Ethernet Link LEDs on both the IP690 and on the remote equipment illuminate to indicate the connection Note The Link LED on the NIC...

Page 52: ...t 5e type cable or as required by your network configuration Note You can use a straight through cable to connect the NIC to a Gigabit Ethernet hub or switch or a crossover cable to connect directly t...

Page 53: ...ts Check Point approved two port fiber optic Gigabit Ethernet NICs installed on a PMC expansion slot The IP690 can accommodate up to four Gigabit Ethernet NICs When you purchase a Gigabit Ethernet NIC...

Page 54: ...ipment illuminate to indicate the connection As data is transmitted the activity LEDs on the appliance illuminate Fiber Optic Gigabit Ethernet NIC Connectors and Cables For short range NICs to connect...

Page 55: ...define the fiber optic connector types LC connectors are smaller than SC connectors Depending on the product you order one or more LC to SC cables are included with fiber optic Gigabit Ethernet NICs...

Page 56: ...5 Connecting PMC Network Interface Cards 56 Check Point IP690 Security Platform Installation Guide...

Page 57: ...able PMC interface devices other than ADP modules Check Point IP690 ADP modules help to accelerate firewall and VPN throughput ADP is a technology designed to forward packets at the highest possible r...

Page 58: ...uration process Use these instructions to install an ADP module in your appliance Before You Begin To install a Check Point ADP module you need the following A Phillips head screwdriver Physical acces...

Page 59: ...Release Notes that you received with your appliance 3 Use Network Voyager or the command line interface CLI to perform an orderly shutdown of the IP690 appliance For information about how to use Netw...

Page 60: ...ure use If the slots you are using for the ADP module are occupied remove the NICs or ADP modules that occupy the spaces in the appliance front panel and retain them for future use Note Remove any SFP...

Page 61: ...eck Point IP690 Security Platform Installation Guide 61 Note It is important that you reinstall the two baffle screws for proper motherboard operation SLOT 1 SLOT 2 00648 Remove the two baffle screws...

Page 62: ...o screws that secure the screen and remove the screen 11 Insert the ADP module Note Remove any SFP transceivers that are installed in the ADP module first to make the procedure easier a Angling the AD...

Page 63: ...d is installed you should remove it to provide access the retaining screw hole at the right side of the module 13 From the top of the chassis tray assembly screw the two retaining screws into the stan...

Page 64: ...at sink slide the chassis tray assembly into the chassis until it clicks into place 18 Tighten the retaining screws that secure the chassis tray assembly 19 Turn the power on 20 Use either Network Voy...

Page 65: ...ivers or to release them for removal You do not need to change the interface type in Network Voyager or the CLI as the system makes the configuration changes automatically To identify whether a fiber...

Page 66: ...eiver by rotating the latch lever Pull out the transceiver Note that if you install any ADP transceivers that are not supported by Check Point they are not recognized by IPSO the system rejects the tr...

Page 67: ...interface names and configuration information as explained below If you install an ADP module in an IP690 appliance the names and configuration information for the interfaces previously installed in...

Page 68: ...ou install an ADP module in an IP690 appliance that are also relevant to the interaction of ADP interfaces and NIC interfaces When you install an ADP module in an IP690 appliance Check Point recommend...

Page 69: ...iance with VRRP configured The following figure shows the Interface Configuration page of the appliance before an ADP module is installed Interfaces are installed in slots 1 2 and 4 For this example l...

Page 70: ...terfaces and VRRP to accommodate the ADP interfaces Deleting VRRP Configurations After you physically remove PMC NICs that you are replacing with ADP modules you need to delete the configuration infor...

Page 71: ...master Reconfiguring Interfaces After you install the ADP module you need to reconfigure interface information as described below To reconfigure interfaces for ADP modules 1 Log into the appliance usi...

Page 72: ...ation Guide The interfaces you removed from slot 2 are still listed on this page and you see a blue indicator next to each of them in the Up column 3 Delete the interface names and configuration infor...

Page 73: ...RP configuration before you installed the ADP module 4 Click a physical interface name Network Voyager displays the Physical Configuration page for that interface 5 In the Physical Status area click t...

Page 74: ...emoved interfaces has been deleted 9 If appropriate configure the ADP interfaces to use the IP addresses previously assigned to the removed interfaces In this example you need to assign the address 10...

Page 75: ...P690 Security Platform Installation Guide 75 In this example you need to recreate the VRRP configuration using the new interfaces eth s1p5c0 and eth s1p6c0 The following figure shows the example syste...

Page 76: ...6 Installing Using and Replacing ADP Services Modules 76 Check Point IP690 Security Platform Installation Guide...

Page 77: ...a Fan Unit Replacing a Power Supply Replacing the Battery For information about how to add or replace NICs see Chapter 4 Installing and Replacing Network Interface Cards For information about how to...

Page 78: ...sh Memory Card Slot Caution To protect the appliance and the compact flash memory from electrostatic discharge damage make sure you are properly grounded before you touch these components Use a ground...

Page 79: ...f the power to the IP690 appliance Note Make sure you turn off power on the power supplies 3 Loosen the two front panel retaining screws 4 Slowly slide the chassis tray assembly forward taking care to...

Page 80: ...t out of the slot 7 Gently insert the new compact flash memory card into the slot 8 Slowly slide the chassis tray assembly back into the appliance taking care to prevent damaging components 9 Resecure...

Page 81: ...ng Network Voyager A var directory is created on the card and log files configuration files monitoring information and tmp directory are subsequently stored in this directory 4 Reboot the IP690 5 Use...

Page 82: ...Installing a Hard Disk Drive The IP690 is a flash based appliance that also supports one or two optional hard disk drives that plug into connectors on the motherboard Each hard disk drive contains 40...

Page 83: ...orderly shut down of the system before attempting to remove the chassis tray assembly You must replace the hard disk drive with a drive that has a capacity equal to or larger than the drive you are re...

Page 84: ...on the right side of the assembly and completely remove the chassis tray assembly to expose the motherboard components 5 Place the chassis tray assembly on a table top Figure 22 Location of Hard Disk...

Page 85: ...P690 Security Platform Installation Guide 85 6 Remove the four screws from the base of the hard disk drive and remove the hard disk drive 7 Slide the new hard disk drive onto the mounting locations 8...

Page 86: ...cryption accelerator card has no external connections and requires no cables The encryption accelerator card software package is part of IPSO so the appliance automatically detects and configures the...

Page 87: ...n safely disconnect power when you remove the chassis tray assembly from the front of the appliance Any servicing of the appliance should be completed with the chassis tray assembly fully removed from...

Page 88: ...ng components press the release tab on the right side of the assembly and completely remove the chassis tray assembly to expose the motherboard components 5 Locate the PMC encryption accelerator card...

Page 89: ...e front of the motherboard for the encryption accelerator card Those connectors are for NICs and ADP modules 7 Position the three male PMC connectors on the card over the three female PMC connectors o...

Page 90: ...are to Use Hardware Acceleration The Check Point encryption accelerator software package is part of the Check Point IPSO operating system so the appliance automatically detects and configures the Chec...

Page 91: ...a single unit made up of four individual fans to provide the air flow required to maintain a proper operating temperature The fan unit can provide proper airflow for a short time even if an individual...

Page 92: ...the new fan unit into the chassis 7 Tighten the two retaining screws on the new fan unit 8 Turn on the power Replacing a Power Supply The appliance supports redundant 250 watt power supplies Each pow...

Page 93: ...ge damage by making sure you are properly grounded before you touch any component To replace a power supply 1 Use Check Point Network Voyager or command line interface CLI to perform an orderly shutdo...

Page 94: ...the power supply out of the chassis 7 Insert the new power supply into the empty bay until the release lever latches 8 Replace the grounding cable if being used 9 Plug the power cord into the new pow...

Page 95: ...ce Physical access to the appliance A Phillips head screwdriver A grounding wrist strap Optional Safety glasses Caution Risk of explosion if battery is replaced by an incorrect type Replace the batter...

Page 96: ...mponents 5 Place the chassis tray assembly on a table top 6 Locate the battery on the motherboard The battery is in a black battery holder secured with a battery retaining tab 7 Remove the old battery...

Page 97: ...screws 11 Turn on the power supplies at the back of the appliance The appliance should start up normally with the new battery installed If it does not repeat step 1 through step 11 If the appliance d...

Page 98: ...7 Installing and Replacing Components Other than Network Interface Cards NICs and Accelerated Data Path 98 Check Point IP690 Security Platform Installation Guide...

Page 99: ...690 If this is not possible using your laptop computer or terminal the problem is with the terminal or cable and not the appliance Problem You do not have a console connection to the IP690 Solution Fo...

Page 100: ...fore the appliance goes into multiuser mode you have about 10 seconds to do this 2 After the appliance boots up the following text appears Enter pathname of shell or RETURN for sh Press Enter 3 Type e...

Page 101: ...he contents of the drive and might be needed to restore or reload an IP690 This procedure erases any configuration database on the appliance For information about how to complete the full installation...

Page 102: ...e set the wrong speed Verify that the speeds match on each end of the Ethernet connection 10 Mbps or 100Mbps Problem Port not enabled Solution Verify from the Interface page in Network Voyager that th...

Page 103: ...r to delete the invalid entry For information about how to access Network Voyager and the related reference materials see Using Check Point Network Voyager on page 38 To delete the invalid entry 1 Cli...

Page 104: ...mmand ipsctl ifphys logical interface max_rxlabel Problem Encapsulation is not set to LLC SNAP Solution Set encapsulation to LLC SNAP Consult your 1483 device documentation Problem The MTU size is not...

Page 105: ...cs1 02 12 2001 102644 autoboot NO bootwait 5 boot file boot flags boot device No referenced boot file or boot device appears Setting the boot manager to defaults causes the boot manager to determine t...

Page 106: ...rovides a list of available commands hostname admin iclid hostname IP address hostname IP address exit get help quit show hostname IP address hostname IP address show address bgp igmp iphelper mfc rip...

Page 107: ...tached IP690 supports OSPF If the attached appliance does not support OSPF configure it with a protocol that the appliance supports and exchange routes with OSPF or set a default or static route Note...

Page 108: ...involves several configuration steps Follow the tasks in the Voyager Reference Guide to ensure that you follow all steps For information about how to access Network Voyager and the related reference...

Page 109: ...appliances Caution Do not block the ventilation holes on the IP690 The appliance might overheat and become damaged Other Specifications Dimensions Height 1 7 in 43 4 cm Width 17 0 in 43 2 cm without m...

Page 110: ...A Technical Specifications 110 Check Point IP690 Security Platform Installation Guide...

Page 111: ...this product complies with the requirements of the Low Voltage Directive 73 23 EEC and the EMC Directive 89 336 EEC with Amendment 93 68 EEC Manufacturer s Name Nokia Inc Manufacturer s Address 313 F...

Page 112: ...formation 112 Check Point IP690 Security Platform Installation Guide Christopher Saleem Compliance Reliability Engineering Manager Security Mobile Connectivity Enterprise Solutions Mountain View Calif...

Page 113: ...onment This equipment generates uses and can radiate radio frequency energy and if not installed and used in accordance with the instruction manual may cause harmful interference to radio communicatio...

Page 114: ...allation Guide interference in which case the user will be required to correct the interference at his own expense Caution Any changes or modifications not expressly approved by the grantee of this de...

Page 115: ...locations 17 configuring interfaces 46 connecting network interfaces 37 connections copper Gigabit Ethernet NIC 51 Ethernet NIC 49 fiber optic Gigabit Ethernet NIC 54 modem 19 power 34 console cable 3...

Page 116: ...M managing the appliance 16 memory flash 21 modem support 19 monitoring 19 power supplies 94 mounting brackets 31 multi mode fiber optic cable 54 N network interface cards copper Gigabit Ethernet 50 d...

Page 117: ...e requirements 109 specifications technical 109 standoffs motherboard 90 system logging with PC card 81 system status LEDs 19 T technical specifications 109 troubleshooting 99 V vertical space require...

Page 118: ...Index 118 Check Point IP690 Security Platform Installation Guide...

Reviews: