background image

to discover additional cameras. If the camera does not support ONVIF or if ONVIF discovery is blocked by the net-
work, you can use the + icon to add cameras by IP address or RTSP URL. 


Validation Tool User Guide: How to Steps 

o


Once cameras are discovered, this Tool will help test compatibility and configure new and existing 3

rd

 party 

cameras.  Detailed instruction for how to use the Validation Tool can be found at 

www.check-

video.com/support

. 

ONVIF Device Manager: 
 

An alternative to CheckVideo

’s

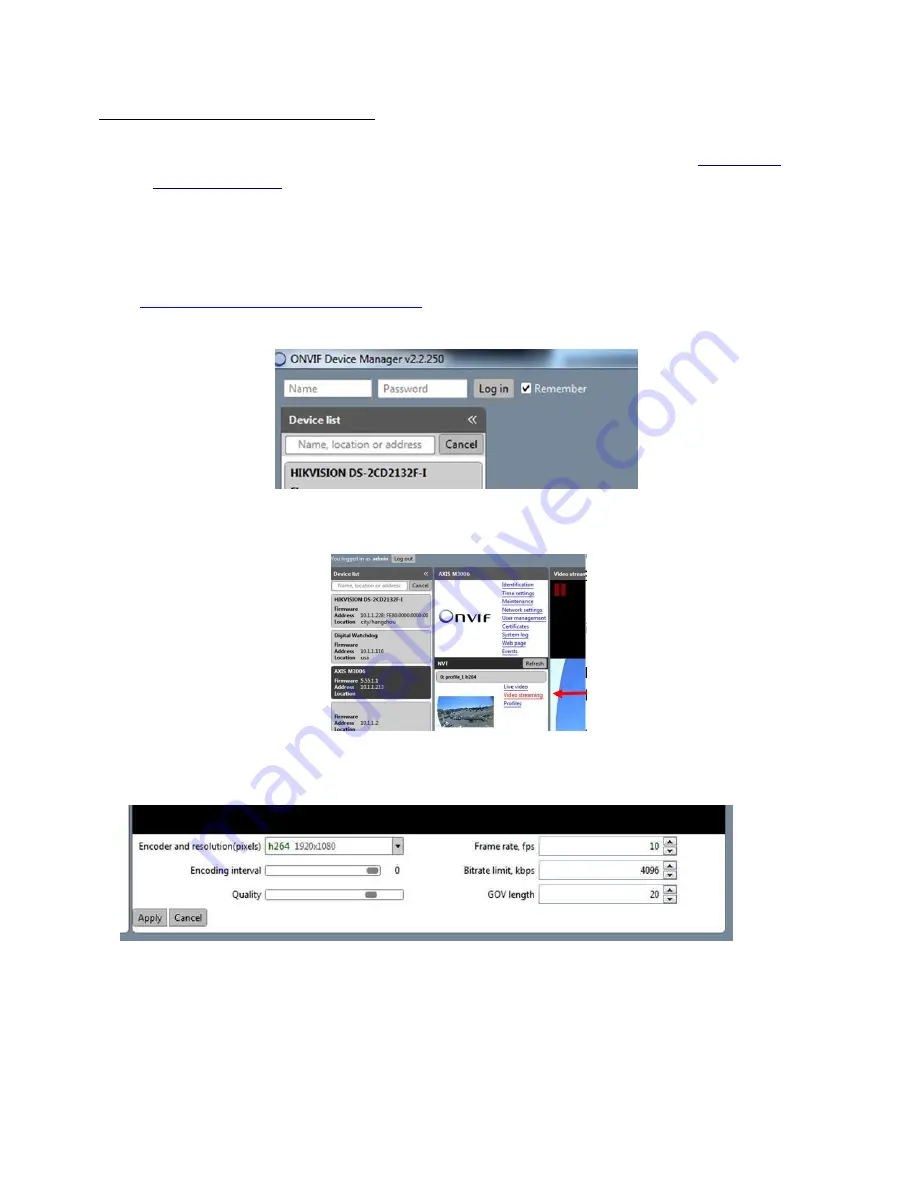
 IP Camera Validation tool is ONVIF Device Manager.  

If your camera’s management tools do 

not display the option to change all of the settings above, you may find the ONVIF Device Manager helpful. You can install 
this tool from 

http://sourceforge.net/projects/onvifdm/

. Once installed, start the program and enter the 3

rd


party camera’s 

admin access credentials in to the ONVIF Device Manager interface. You can get these credentials from the camera 
manufacturer.


Select the camera from the list of visible cameras on the left side of the screen.  Click on the Video Streaming link. 


Go to the Settings page where you can set the Resolution, Frame Rate and GOV length values as required by 
the Ruggedized Gateway. Select Apply to save these settings. 


Adding Cameras to the Gateway via the Configure IP Gateway Page: 


Now that the camera settings are updated, associate the Ruggedized Gateway to cameras on the same network. 
From the CheckVideo portal, go to Devices>Configure IP Gateway: 


Select the Gateway from the drop-down menu 


Enter the ONVIF credentials for the camera. If you have more than one set of ONVIF credentials for the cameras 
you wish to add, use those credentials that apply to the majority of cameras to be added. 


Click Discover Cameras. At this point, all cameras visible on the Gateway's network will appear at the top of 

Summary of Contents for G1002-16-XT

Page 1: ...s the connector closest to the side of the unit Back Panel To install the Gateway make the following connections for the G1002 16 XT Ethernet cable to the router WAN and switch with cameras LAN If camera network is not separated please use the WAN port Note Do not connect the CV4IP to a POE port on a router switch Power is provided by the included power supply Providing power via a POE port to the...

Page 2: ...to a multiple of 5 fps to a maximum of 30 fps o GOV length to 2X the frame rate OR i frame interval of 2 seconds o Resolution up to 1080p G1002 16 XT or 4MP G1004 8 LTE o Profile Main preferred or High The optimal settings are 2 or 4MP resolution respectively 10 fps 20 GOV and a bitrate of 2500 If you are adding cameras with different settings you may wish to use the IP Gateway calculator to enter...

Page 3: ...d party camera s admin access credentials in to the ONVIF Device Manager interface You can get these credentials from the camera manufacturer Select the camera from the list of visible cameras on the left side of the screen Click on the Video Streaming link Go to the Settings page where you can set the Resolution Frame Rate and GOV length values as required by the Ruggedized Gateway Select Apply t...

Page 4: ... updated your camera settings you will receive a reminder to do this before you continue Click the Assign button The CheckVideo portal will let you know if you are successful Should the camera assignment fail because the Gateway cannot configure the RTSP connection a warning message will appear First confirm that your camera s Video Settings have been adjusted to meet the Gateway requirements Next...

Page 5: ...igned to the Gateway go to Devices Configure Device Select the Gateway from the dropdown and begin setting the Event zones schedule and notifications for each camera Remember to Save at the completion of each camera s configuration ...

Reviews: