background image

4

1.   Carefully remove slicer from box.
2.  Carefully remove and discard plastic guards from blade and back support plate. 
     Remove any other plastic wrapping, shipping materials, and stickers.
3.  Carefully remove the blade as directed on page 8 in the User Guide. Carefully 
     wash blade with soapy water and dry well.
4.  Before returning the blade to the slicer, wipe the food carriage and housing with 
     a clean damp cloth.
5.  Return blade to slicer as directed on page 8 in the User Guide. 

Before 

FIRST USE

HOW To 

Operate Slicer

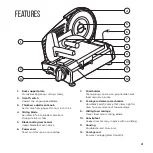
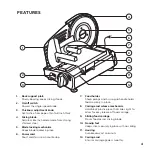
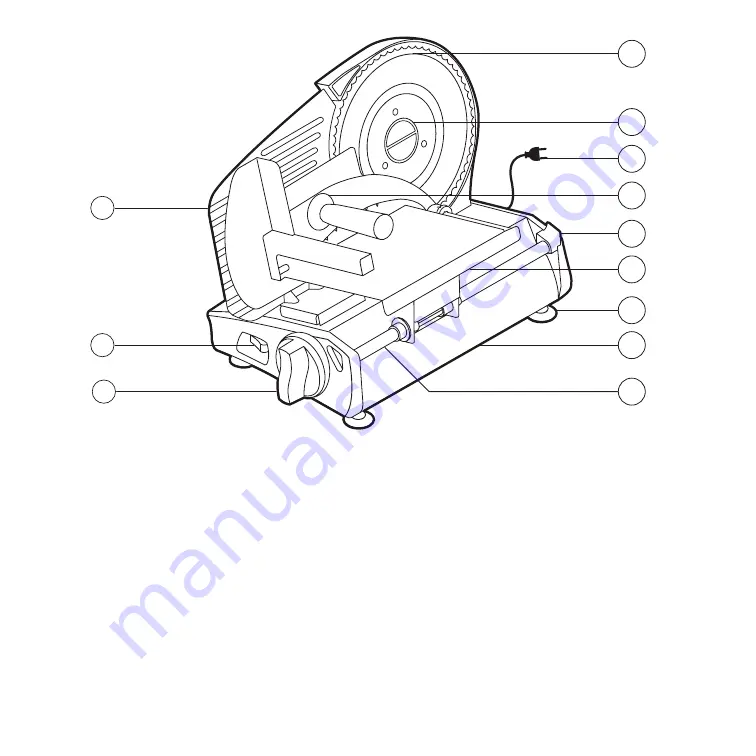
Features


7. 

Food holder  

Sharp prongs and a sure-grip handle holds 
food securely in place

8.  Carriage rod release mechanism  

Hard black plastic piece that slides right to 
allow for easy release of food carriage

9.  Sliding food carriage  

Moves food across slicing blade

10.  Nonslip feet  

Keeps slicer securely in place with no sliding

11.  Housing


Durable die-cast aluminum

12.  Carriage rod  

Ensures carriage glides smoothly

1. 

Back support plate

Sturdy backing keeps slicing steady

2.  On/off switch


Powers the single-speed blade

3.  Thickness adjustment knob


Set to slice from paper-thin to 

½

 inch thick

4.  Slicing blade  


strong stainless steel

5.  Blade locking mechanism


Keeps blade locked in place

6.  Power cord  

Short cord for use on countertop

1

4

5

6

7

8

9

10

11

12

2

3

Set the slicer on a hard, 
flat surface free from any 
obstructions or heating 
elements, and plug in 
power cord. 

STEP 

1

HOW To 

Operate Slicer

HOW To 

Operate Slicer

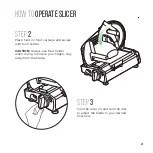
Place food on food carriage and secure 
with food holder. 

CAUTION:

 Always use food holder 

when slicing to ensure your fingers stay 
away from the blade. 

STEP 

2

Using the food holder, slide the food 
carriage back and forth across the blade. 

CAUTION:

 The slicer should only be 

run for 10 minutes at a time to avoid 
overheating the motor.  

STEP 

4

When you are done, turn the power switch to OFF and unplug the slicer; the blade 
will not immediately come to a stop.  

STEP 

5

Turn the slicer on and turn the dial 
to adjust the blade to your desired 
thickness.  

STEP 

3

Serrated, 8 

-inch blade made from 

5
Summary of Contents for RJ49-BLACK-V2-DS

Page 1: ...LINKS Quick Start Guide User Guide This is your one stop guide to using your product From the below links you can jump ahead to a specific document if desired DIE CAST ELECTRIC DELISLICER RJ49 BLACK...

Page 2: ...ve the blade as directed on page 8 in the User Guide Carefully wash blade with soapy water and dry well 4 Before returning the blade to the slicer wipe the food carriage and housing with a clean damp...

Page 3: ...on food carriage and secure with food holder CAUTION Always use food holder when slicing to ensure your fingers stay away from the blade STEP2 Turn the slicer on and turn the dial to adjust the blade...

Page 4: ...rriage back and forth across the blade CAUTION The slicer should only be run for 10 minutes at a time to avoid overheating the motor STEP4 When you are done turn the power switch to OFF and unplug the...

Page 5: ...securely in place with no sliding 11 Housing Durable die cast aluminum 12 Carriage rod Ensures carriage glides smoothly 1 Back support plate Sturdy backing keeps slicing steady 2 On off switch Powers...

Page 6: ...ike But don t stop there Slice vegetables quickly and consistently for delicious gratins and salads or make quick work of cutting a crusty loaf of bread into perfectly even pieces And because we ve eq...

Page 7: ...1 Safety Instructions 4 Features 5 Operating Instructions 7 Cleaning and Maintenance 10 Food Slicer Tips 11 Terms and Conditions 12 Chefman Warranty Registration CONTENTS...

Page 8: ...e for their safety 6 Children should be supervised to ensure that they do not play with the appliance 7 Avoid contact with all moving parts 8 Never put the unit near a hot burner in an oven or in a di...

Page 9: ...le the unit is running 21 Before using for the first time remove all packaging and stickers and wash and dry parts 22 Do not use the product for slicing frozen foods bones foods with large kernels or...

Page 10: ...Y TIPS 1 Never pull or yank on the cord or the appliance 2 To insert the plug grasp it firmly and guide it into the outlet 3 To disconnect appliance grasp the plug and remove it from the outlet 4 Befo...

Page 11: ...securely in place with no sliding 11 Housing Durable die cast aluminum 12 Carriage rod Ensures carriage glides smoothly 1 4 5 6 7 8 9 10 11 12 2 3 1 Back support plate Sturdy backing keeps slicing ste...

Page 12: ...de to the slicer wipe the food carriage and housing with a clean damp cloth 5 Return blade to slicer as directed on page 8 TO OPERATE SLICER Once you get the hang of it using the deli slicer is easy P...

Page 13: ...acts the blade Continue sliding until the carriage can go no further Make the next slice by sliding the carriage back to its starting point NOTE The slices will fall to the other side of the blade 8 C...

Page 14: ...and food carriage Handle both very carefully as parts are sharp The parts may also carefully washed by hand with soapy water rinse and dried 3 Wipe down the slicer s housing with a slightly damp clot...

Page 15: ...the blade to prevent it from falling as the mechanism is loosened 2 Carefully pull the blade off the unit Do NOT hold it by its edges To put slicing blade back on 1 Holding blade by pinching the cent...

Page 16: ...g it as the heavy food holder moves and has sharp areas on it To remove food carriage 1 Slide the black plastic carriage rod release mechanism to the right This will free the carriage rod from the uni...

Page 17: ...safety gloves when handling blade Keep the slicer unplugged when not in use For safe storage after use always return the slice thickness dial to the start position To put food carriage back on 1 If ne...

Page 18: ...oduct does not work as it should we will send you a new one If the product is no longer available we will replace it with an identical product or one that is comparable THIS WARRANTY DOES NOT COVER Mi...

Page 19: ...RODUCT OR LOST SALES OR PROFITS OR DELAY OR FAILURE TO PREFORM THIS WARRANTY OBLIGATION THE REMEDIES PROVIDED HEREIN ARE THE EXCLUSIVE REMEDIES UNDER THIS WARRANTY WHETHER BASED ON CONTRACT TORT OR OT...

Page 20: ...13 CHEFMAN COM MYCHEFMAN CHEFMAN 2019...

Reviews: