background image

8

3. Thermostat positions

4. Recommended cooking times are given in cooking table.

5. Turn the “oven heating control” switch clockwise to adjust cooking time for the

meal you desire to cook, refer to cooking table.

6. Before cooking, pre-heat the oven for 10 minutes. The front cover of the oven

should be open. Put the dish in the oven after pre-heating.

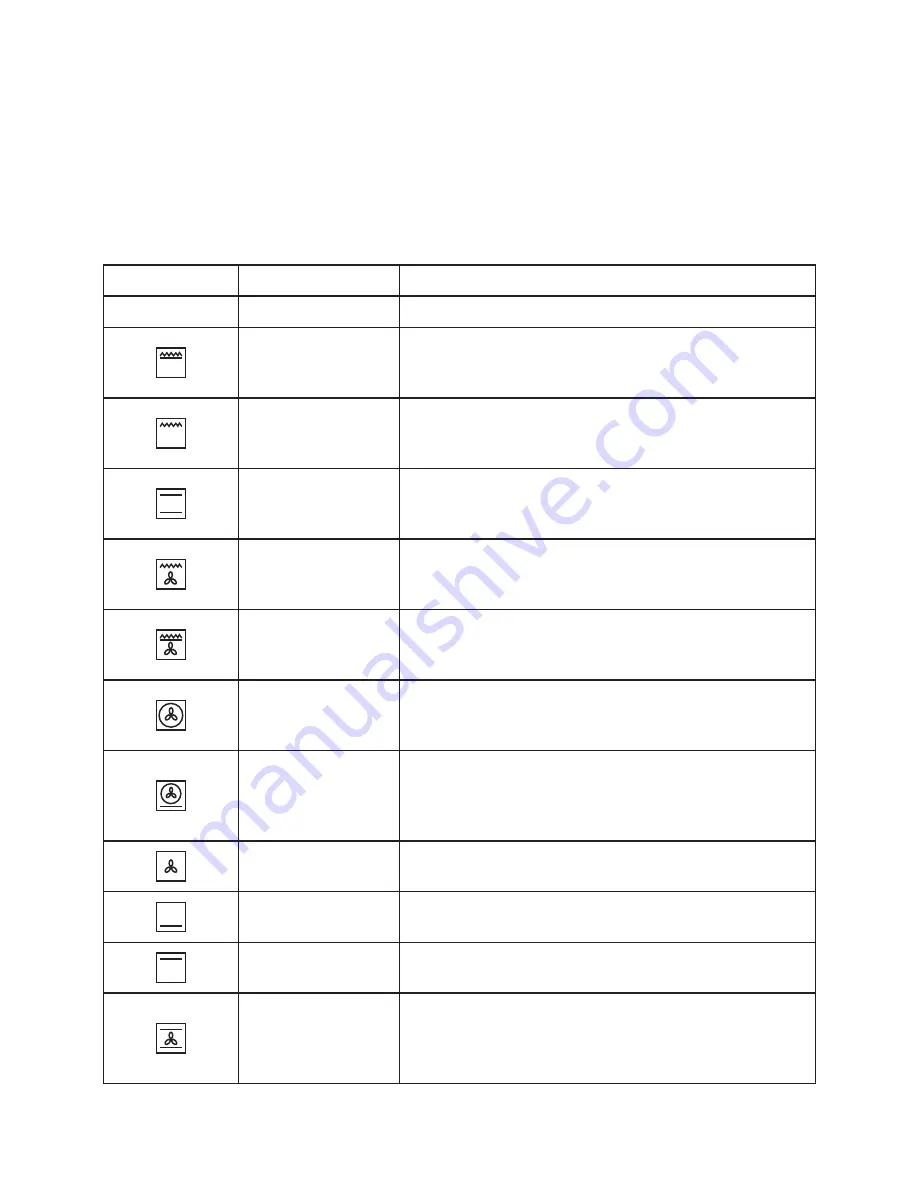
OVEN FUNCTIONS:


LEVEL

FUNCTION

DESCRIPTION

O

Close

Oven is not working

Oven Lamp

Double Grill

Outer Heating Element and Grill Heating

Element works together.Recommends to use

.for big and powerfull grill

Oven Lamp

Grill Heating Element

.Oven Lamp and Grill heater works

Recommend to use for frying.Thermostat must

be at maximum position

Oven Lamp

Top&Bottom Heating

Elements

Hot air comes from up and down heats the tray

from both side. Top and bottom sides of meals

.cooked equally

Oven Lamp

Grill Heating Element

Turbo Fan

Oven Lamp, Grill heater and Turbo Fan work

.together. Recommend to use for frying

.Thermostat must be at maximum position

Oven Lamp

Double Grill

Turbo Fan

Oven Lamp, Double Grill and Turbo Fan work

.together. Recommend to use for frying

.Thermostat must be at maximum position

Oven Lamp

Turbo Heating Element

Turbo Fan

Oven Lamp, Turbo Fan and Turbo Heating

.Element work.Recommend to use fast cooking

Oven Lamp

Turbo Heating Element

Turbo Fan, Bottom

Heating Element

,Oven Lamp, turbo heating element

turbo fan and bottom

.heating element work together

.Recommed to use for pizza

Oven Lamp

Turbo Fan

.Only Oven Lamp and Turbo Fan work

.Recommend to use for defrosting

Bottom

Heating Element

,Bottom heating element

.Recommed to use cake and bread

Top

Heating Element

Top Heating Element for keeping cooked food

.warm or gently reheating

Oven Lamp

Top&Bottom Heating

Elements

Turbo Fan

Hot air comes from up and down heats the tray

from both side. Top and bottom sides of meals

.cooked equally with Turbo Fan

Summary of Contents for EH-BO1107S

Page 1: ... instructions carefully before attempting to install or use this product It is advisable to keep these instructions in a safe place for future reference Installation and Operating Instructions EH BO1107S EH BO1112B EH BO7030S EH BO9090B ...

Page 2: ... a damage sourced by transportation please contact with sales department that you bought product or region store that sent product to you TABLE of CONTENTS SECTION 1 Technical Features Sectons of Oven SECTION 2 Important Safety Notices SECTION 3 Installation of Built In Oven SECTION 4 Introducton of Control Panel SECTION 5 Usage of Oven SECTION 6 Grill Function of Oven SECTION 7 Adjustment of Time...

Page 3: ...50 60 Hz A A A 594 594 594 540 540 540 595 595 595 0 82 Kwh 0 79 Kwh 0 82 Kwh 0 94 Kwh 0 82 Kwh 0 79 Kwh 67 Liter 67 Liter 67 Liter 3350 Watt 220 240 V 220 240 V 220 240 V Electrical 1 3350 Watt 3200 Watt Yes 3350 Watt 0 285 C 160 C 50 60 Hz A 594 540 595 0 82 Kwh 0 79 Kwh 67 Liter 220 240 V Touch Control Full Touch Control 11 Functions EH BO7030S EH BO1107S 3350 Watt 3200 Watt Yes 3350 Watt EH BO...

Page 4: ... the electric cooker to its power supply please use a cord size 3 x 2 5 mm2 For isolation safety length of power cord must not exceed 2 meters Connection sheme is being on oven s back wall Please adjust timer when electricity cut off If timer is not adjusted oven side will not work Children Safety This appliance is designed to be operated by adults Do not allow children to play near or with the ap...

Page 5: ...Keep the door seal areas clean Pressing on open cover of oven with heavy matters can cause damage on cover hinges So please do not sit or load heavy matters on open cover of oven Do not use aluminium foil to cover the grill pan or put items wrapped in foil under the grill as this creates a fire hazard The high reflectivity can also damage the elements Do not use the oven with the door inner glass ...

Page 6: ... that used for isolation must affix strongly to prevent taking out by any tool It is not recommend you to install your appliance near refrigator or deepfrost Otherwise performance of these appliances effected badly because of heat spreaded If a cooker installed on your oven electrical cables of cooker and oven must be seperated due to safety and to make dismantling easy if it requires Install your...

Page 7: ...lement can be adjustable Buttons can turn clockwise or opposite to clockwise directions Please bring the control button to required cooking position and do not forget big numbers on button print means high heat outlet For first cooking it recommended to use highest cooking position 1 2 3 EH BO7030S EH BO9090B EH BO1112B EH BO1107S ...

Page 8: ...efore use 1 The meals that can be cooked 2 Positions of trays SECTION 5 USAGE of OVEN 3 Thermostat positions 4 Recommended cooking times are given in cooking table 5 Turn the oven heating control switch clockwise to adjust cooking time for the meal you desire to cook refer to cooking table 6 Before cooking pre heat the oven for 10 minutes The front cover of the oven should be open Put the dish in ...

Page 9: ...n Lamp Grill Heating Element Turbo Fan Oven Lamp Grill heater and Turbo Fan work together Recommend to use for frying Thermostat must be at maximum position Oven Lamp Double Grill Turbo Fan Oven Lamp Double Grill and Turbo Fan work together Recommend to use for frying Thermostat must be at maximum position Oven Lamp Turbo Heating Element Turbo Fan Oven Lamp Turbo Fan and Turbo Heating Element work...

Page 10: ...prevent your grilling food from sticking on grill ATTENTION For preventing command buttons on control panel from heating please set its sheet centered between front cover and oven body without have blank Our company is not responsible for damage made by not using this sheet GRILL Shelf Time min Lamb Meat 4 5 15 Lamb Chops 4 5 15 Calf Chop 4 5 15 25 Sheep Chops 4 5 15 25 NOTE The values given in co...

Page 11: ...180 25 35 20 25 Leavened Pie 18 Person Big Tray 2 3 3 200 220 35 45 25 35 Biscuit 10 Persons Big Tray 2 3 3 170 180 20 30 18 22 Cake 20 Person Big Tray 2 3 3 150 160 25 35 20 25 Spaghetti 8 Persons Small Deep Tray or 30 cm thin Deep Metal Tray 2 3 3 170 180 40 50 30 40 Pizza 8 Persons Big Tray 2 3 3 200 220 30 35 25 30 Veal 8 People Small Deep Tray belongs to meat volume 2 3 3 250 110 120 120 Lamp...

Page 12: ... upwards within menu items or for increasing any numerical parameter on the screen during editing Long press during a cooking activates the RAPID HEAT UP function Used to scroll downwards within menu items or for decreasing any numerical parameter on the screen during editing Long presses except being in any adjustment mode will turn on and off the lamp Used for selecting a highlighted menu item o...

Page 13: ...he lowest 280C at the top level The color will be red when heating elements are active or the cavity Temperature is above 60C otherwise it is blue Cooking Appears when a cooking is in progress Waiting for the cooking start time Appears when a delayed cooking is programmed and waiting for the time to start cooking Rapid Heat Up Alarm Appears steady when an alarm is or being set flashes when the set...

Page 14: ...ck Analog Screeen Clock When oven cavity Temperature 60C When the Temperature of the oven cavity is above 60C the screen will appear as red on black INFO The symbol appearing on the bottom right of the screen indicates that the button has a shortcut function to enter the cooking menu directly The function and Temperature settings indicated on the screen will be the ones used in the last cooking pe...

Page 15: ...the oven is inoperative Press M to return to manual mode and adjust the time of day using up and down buttons MANUAL MODE Touching at the same time manual m ode is entered Any previous cooking program will be cancelled ADJUSTING TIME OF DAY Time of day adjustment is onl y allowed when no c ooking program is in progress First enter manual mode as descr ibed above The point bet ween the hours and mi...

Page 16: ...o start cooking immediately you just have to give in the cooking time Example We placed our food into the oven and want it to be cooked for 2 hours and 15 minutes 1 Current time is 18 30 2 Switch into cooking time 3 Adjust the cooking time mode using the or buttons Now you have programmed your oven to cook the food for 2 hours and 15 minutes Please do not forget to bring the function and or temper...

Page 17: ...y at 21 30 Since the cooking time was preprogrammed as 2 hours 15 minutes your oven will start cooking at 19 15 so that the food is ready at 21 30 Screen just when cooking starts Screen just when cooking ends When automatic cooking is completed a buzzer alarm is heared and will sound if not stopped for 7 minutes 1 Switch your oven OFF 2 Reset the timer Note Your oven will be inoperative until you ...

Page 18: ... by beep tones Touching the button for 5 seconds a double beep tone will be heard and nt which stays for no tone will appear on the screen Now no touch tones will be produced any more Doing the same until bt appears on the screen which stays for button tone brings you back to touch tones 3 Screen Brightness Adjustment Touching button for 1 second until you hear a double beep tone brings you into t...

Page 19: ...90 minutes MECHANICAL TIMER PRODUCT OVERVIEW 1 GENERAL INFORMATION lectronic oven control unit User entries are made by a special function selector with encoder ENC F00 which is located at the center and is not a part of the board and six touch buttons OVEN CONTROL WITH TOUCH BUTTONS Touch button symbols Timer Buttons Temperature Buttons Timer Minus Temperature Minus Timer Menu Temperature adjustm...

Page 20: ...e connected Bell Minute Minder Adjustment Status Lit up Minute Minder Alarm in progress Flashing Minute minder adjustment active or end of minute minder Cooking Duration Half Automatic Cooking Adjustment Mode Flashing cooking duration time adjustment menu currently active End Of Cooking Time Automatic Cooking Adjustment Mode Flashing end of cooking time adjustment menu currently active Key Key Loc...

Page 21: ...ly 3 5 TEMPERATURE DISPLAY Temperature Display Bars Cooking In Progress After Auto Cooking residual heat Oven cavity temperature 1 6 of set point Oven cavity temperature 60 C Oven cavity temperature between 1 6 and 2 6 of set point Oven cavity temperature between 60 C and 100 C Oven cavity temperature between 2 6 and 3 6 of set point Oven cavity temperature between 100 C and 150 C Oven cavity temp...

Page 22: ...than 10 seconds while cooking is in progress oven will get inoperative any preprogrammed timer and temperature setting will be cleared Press the M or both timer minus and plus buttons to return to the manual mode and activate the oven 4 2 SELECTING A COOKING FUNCTION Turn the Cooking function selector to the position until the desired cooking function is displayed on the Cooking Function Display T...

Page 23: ...nged permanently as follows 1 Adjust the cooking Temperature performing the 2 steps described in the above paragraph 2 Press and hold the Temperature adjustment button C for 3 seconds until a beep sound is heard The value seen on the Temperature display is now assigned to the active cooking function permanently Note To reactivate the factory settings press and hold the Temperature plus and minus b...

Page 24: ...reached 3 Adjust the desired meat temperature for cooking end by timer minus or timer plus buttons Values from 2 degrees the current measured value minimum 20 C to 99 C are allowed 4 After a few seconds following the last button press the flashing C will get stable adjustment is completed The actual meat temperature is displayed on the left the adjusted Temperature of the meat probe when cooking s...

Page 25: ...leaning of the oven the door can be removed via the hinges as follows Hinges with movable bolt The hinges A are provided with two movable bolts B When bolt B is raised the hinge is released from its housing Having done this the door must be lifted upwards and removed sliding it towards the outside grip the sides of the door near the hingeswhen performing these operations To refit the door firstly ...

Page 26: ...your oven with original box Obey carrying signs on box To keep your oven door from damage that may occur during transportation by wire grate and trays stick 11 5 cm thin cardboard or paper on oven front door inner glass with sticky tape at level of trays Stick oven door to side walls with sticky tape To place packaging materials look at figures below SECTION 9 INFORMATION ABOUT TRANSPORTATION bolt...

Page 27: ...odels Please check that heat button adjusted Please check fuse of oven plug s socket or main fuse to see if damaged or not If inner oven lamp isn t lighting Check if electricity is on If lamp is damaged read the manual to know how to change it Upper and lower heaters don t cook equally Check raw Positions thermostat positions and cook ing time list in your user s manual If there is still any probl...

Page 28: ......

Reviews: