background image

6

InStruCtIonS

read thIS Before You Start to Sharpen

The Chef’sChoice

®

 Model 314 is designed to sharpen either Straight edge or Serrated  

edge blades.
1. 

Sharpen Serrated Blades Only in Stage 2.

 Do not sharpen serrated blades in 

Stage 1 until you read section titled Procedure for Sharpening Serrated Blades.

2. 

Straight Edge blades are sharpened in Stages 1 and 2.

 Start in Stage 1 if the 

knife is being sharpened for the first time or if the knife is very dull. See following 
Section for more details.

proCedure for SharpenIng StraIght edge BladeS

StraIght edge BladeS: SharpenIng fIrSt tIme

Always clean the blade free of dirt, oil and food before inserting into sharpener. 

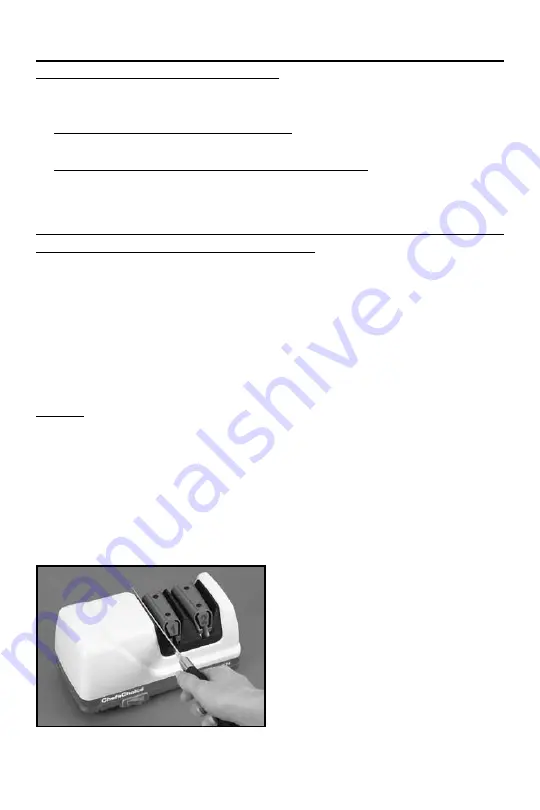
Before you turn on the power, slip a knife blade smoothly into the slot between the  
left angle guide of Stage 1 and the elastomeric spring. Do not twist the knife. (See  
Figure 3.) 
Move the blade down in the slot until you feel it contact the diamond disk. Pull it towards 
you lifting the handle slightly as you approach the tip. This will give you a feel for the spring 
tension. Remove the knife and press the Power Switch. A red “indicator” on the switch  
appears when this switch is turned “ON.”

Stage 1:

 If you are sharpening a straight-edge knife for the first time, start in Stage 

1. Pull the knife once through the left slot of Stage 1 (Figure 3) by slipping the blade 
between the left plastic angle guide and the polymeric spring while pulling the 
blade toward you and simultaneously moving the blade downward in the slot until it  
engages the diamond coated disk. You will hear it make contact with the disk. If the blade  
is curved, lift the handle slightly as you sharpen near the tip of the knife, keeping the 
blade edge approximately parallel to the table. Sharpen the entire blade length. For an 
eight (8) inch blade each pull should take about 6 seconds. Pull shorter blades through 
in 3-4 seconds. 

Figure 3.  Stage 1. Inserting blade in slot between 
guide and elastomeric spring. Alternate individual 
pulls in left and right slots.

Summary of Contents for DiamondHone 314

Page 1: ...MODEL 314 Instructions Diamond Hone Sharpener Read these instructions before use It is essential that you follow these instructions to achieve optimum results 2011 EdgeCraft Corp ...

Page 2: ...ause special tools are required Please consult your Chef sChoice distributor 7 CAUTION This appliance may be fitted with a polarized plug one blade is wider than the other To reduce the risk of electric shock this plug will fit in a polarized outlet only one way If the plug does not fit fully in the outlet reverse the plug If it still does not fit contact a qualified electrician Do not modify the ...

Page 3: ...t thoroughly before you use the sharpener in order to optimize your sharpening results Gourmet cooks world wide acknowledge the value of a fine cutting edge for elegant food preparation As an owner of the Chef sChoice 314 you have the means to create edges of high perfection sharpness and durability You will find it is a joy to sharpen and use your knives Remember a sharp knife is a safe knife bec...

Page 4: ...roscopically thin straight and polished edge The honing action simultaneously polishes and sharpens the boundaries of those microgrooves created by the diamond abrasives in Stage 1 adja cent to the edge until they become sharp micro flutes that will assist the cutting action with difficult to cut materials This unique two stage design gives you an extremely sharp edge and because of the second ang...

Page 5: ...niform rate as it contacts the sharpening or honing disk You will be able to feel and hear the contact with the disk as it is made Always keep the blade moving uniformly through each stage do not stop the pull in mid stroke The time for each sharpening stroke can be less for shorter blades and more for longer blades Never operate the sharpener from the back side Use just enough downward pressure w...

Page 6: ...ou feel it contact the diamond disk Pull it towards youliftingthehandleslightlyasyouapproachthetip Thiswillgiveyouafeelforthespring tension Remove the knife and press the Power Switch A red indicator on the switch appears when this switch is turned ON Stage 1 If you are sharpening a straight edge knife for the first time start in Stage 1 Pull the knife once through the left slot of Stage 1 Figure ...

Page 7: ...side of the edge To check for the burr move your forefinger carefully across the edge as shown Do not move your finger along the edge to avoid cutting your finger If the last pull was in the right slot the burr will appear only on the right side of the blade as you hold it when sharpening and vice versa The burr when present feels like a rough and bent extension of the edge the opposite side of th...

Page 8: ...tage 2 alternating left and right slots If after a number of resharpenings it is taking too long to resharpen or to develop the keenest edge you can speed the process by resharpening again in Stage 1 following the procedures detailed and then resharpen in Stage 2 This procedure for sharpen ing unlike conventional sharpening will give you extraordinarily sharp knives every day while removing very l...

Page 9: ...d through use first make just one fast pull 2 3 seconds for an 8 blade in each of the right and left slots in Stage 1 then make a series of slow pulls in Stage 2 alternating right and left slots Excessive use of Stage 1 will remove more metal along the edge than is necessary in order to sharpen the teeth Because serrated blades are saw like structures the edges will never appear to be as sharp as ...

Page 10: ...tely and be certain no water remains in sharpener before turning on power Reassemble the plastic spring and fasten in place with the two plastic spring pins 2 To increase your proficiency with the Chef sChoice Model 314 take the time to learn how to detect a burr along the edge as described on p 6 While you may sharpen well without using this technique it is the best and surest way to determine wh...

Page 11: ...the entire blade length NORMAL MAINTENANCE NOlubricationisrequiredforanymovingparts motor bearings orsharpeningsurfaces Do notwetabrasivesurfacesexceptinthecleaningprocedureasdiscussedinitem 1under Suggestions The exterior of the sharpener may be cleaned by carefully wiping with a damp cloth Do not use detergents or abrasives on exterior surfaces Once a year or so as needed you can remove metal du...

Page 12: ... your protection against loss in shipment Assembled in the U S A www chefschoice com This product may be covered by one or more EdgeCraft patents and or patents pending as marked on the product Chef sChoice EdgeCraft Diamond Hone and the overall design of this product are registered trademarks of EdgeCraft Corporation Avondale PA Conforms to UL Std 982 Certified to CAN CSA Std C22 2 No 64 Certifie...

Reviews: