background image


www.chenbro.com                                                         


9

ES34069 Chassis User’s Manual    Rev. A1 


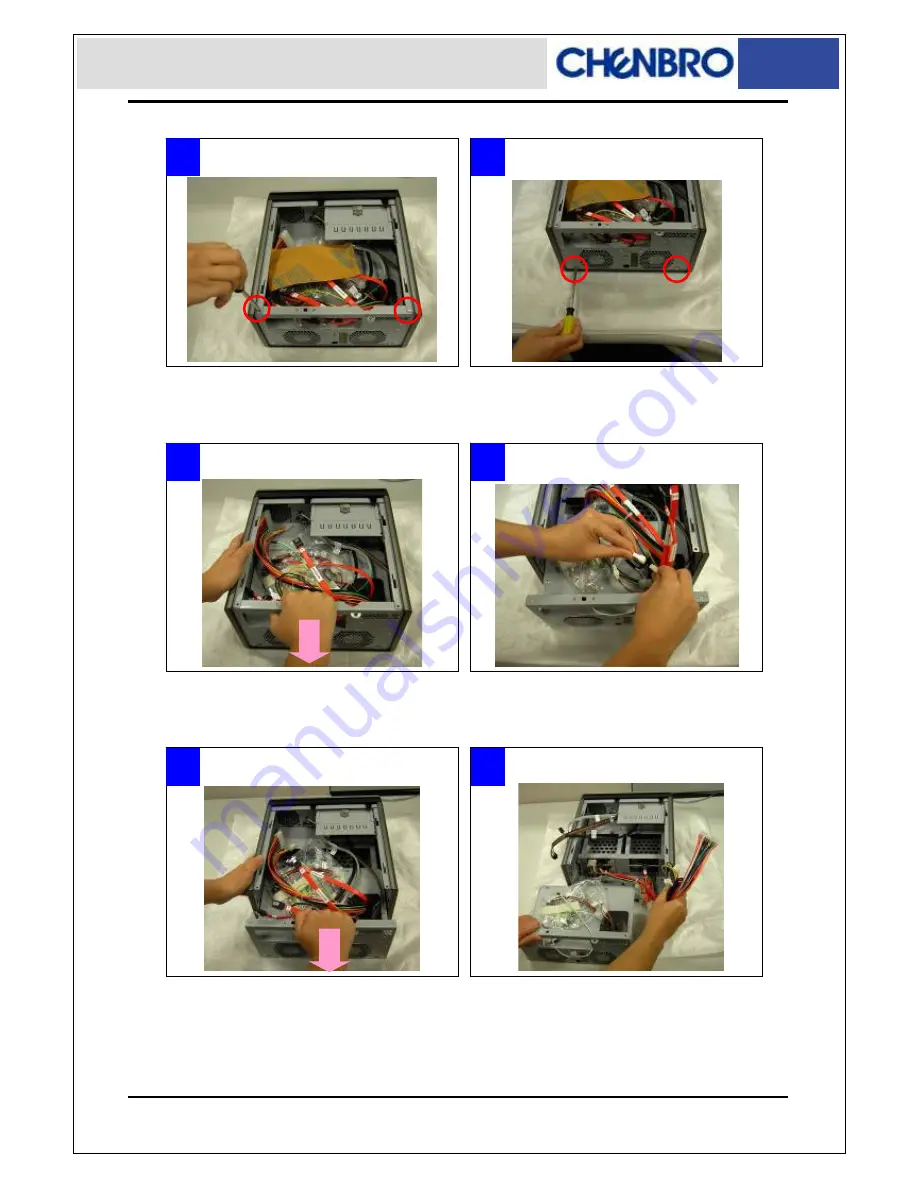
Motherboard Cage Removal 


 Release two secure screws on the M/B cage   

 Release two screws around the rear fans 

 Remove the motherboard cage   

 Disconnect the extension fan cables 

 Detach the motherboard cage with System Cables   

(SATA, Power, Fan cables) through the cable routing hole 

 Finish detaching the M/B cage and make sure all the 

connection on backplane and PDB are still tight before 
assembly back the M/B cage 

Summary of Contents for ES34069

Page 1: ...www chenbro com 1 ES34069 Chassis User s Manual Rev A1 Chenbro ES34069 Chassis User Manual December 22 2009...

Page 2: ...eliable However Chenbro Micom Co Ltd assumes no responsibility for its use nor for any infringements upon the rights of third parties which may result from its use Technical Support Chenbro works hard...

Page 3: ...ion 10 Installing Mini ITX or Mini DTX M B 10 Installing Slim Optical Drive 10 Installing 3 5 SATA II Hard Drive 11 Installing Card Reader 12 Installing Dedicated AMD Intel Heatsink 13 Installing Rise...

Page 4: ...ckplane 2 USB 2 0 Cables 1 SATA 7 pin Cable 260mm 2 Power Distribution Board 1 Hot swap HDD Carrier 4 Slim CDROM Carrier 1 SATA 7 pin Cable 360mm 2 Intrusion Switch 1 Split Power Cable Type I 1 Split...

Page 5: ...y Pack Cable Tie 1 Screw Pack for M B 1 IDE SATA Slim ODD Adaptor 1 Front Bezel Key 1 Power Cable Big 4P to Small 4P 1 Screw Pack for HDD 1 Active Heatsink for AMD Intel LV CPU 1 PCI Add on Card Brack...

Page 6: ...i DTX Dimension DxWxH 260mm x140mm x260mm 10 24 x 5 51 x 10 24 Drive Bay Hot swap 3 5 x4 Internal 2 5 x1 optional Slim ODD 1 optional PSU Form Factor External Adapter 120W 180W Indicator LEDs Power HD...

Page 7: ...rd Reader Optional Support MS SD Mini SD MMC USB 2 0 ports x2 Slim CD ROM Cover Front Control Display Power Status LED Blue HDD Access LED Amber LAN 1 Activities LED Green LAN 2 Activities LED Green G...

Page 8: ...bezel Side Panel Removal Front Bezel Removal 1 2 1 2 Release the side panel thumb screw on the rear Push and slide the side panel toward rear to open the chassis 3 4 Lift up the latch along the side...

Page 9: ...lease two screws around the rear fans Remove the motherboard cage Disconnect the extension fan cables Detach the motherboard cage with System Cables SATA Power Fan cables through the cable routing hol...

Page 10: ...nk for AMD Intel CPU Installing Mini ITX or Mini DTX M B Installing Slim Optical Drive Before install the slim CD ROM the front bezel must be removed And the slim CD ROM carrier should be apart from t...

Page 11: ...and place the SATA II HDD into it Attach the HDD screws on both sides Slide in the assembled HDD into the chassis suggest install by the ID definition on the front panel No need to remove the front be...

Page 12: ...ront screw of Card Reader holder Pull out the Card Reader holder Remove the seal on the holder and make sure the sockets is right to the opening Attach screws to fix the Card Reader Connect the short...

Page 13: ...ktop LV Low Voltage CPU in universally Note the CPU power rating should not over 65W as maximum 1 2 3 4 Attach the heatsink retainer on to M B before install M B into the chassis Note AMD M B are prei...

Page 14: ...2 3 4 Place the 2 5 HDD underneath the Slim ODD Fix the 2 5 HDD with attached screws The PCI card mounting bracket must be detach and use special one for mounting Ex PCI RAID card Install the PCI card...

Page 15: ...cable 4 in 1 card reader Connecting SATA II Cables Note If there is no enough SATA port on M B users can either remove or keep the bundled P3 P4 SATA cable Connecting the Power 1 2 1 2 Check the bundl...

Page 16: ...connection 1 1 2 1 Front USB cable should be connected to on board USB header properly depends on different M B The fan out cable with different connection for Power on HDD LAN FAIL and the front swi...

Page 17: ...4P is connected to the Slim ODD adaptor board Use either standard IDE SATA cable from 3rd party M B or use optional cable from Chenbro to connect to the Slim ODD adaptor board 1 2 Due to limited spac...

Page 18: ...cy Range 47Hz to 63Hz Output Voltage Setting 18 05V 19 95V Efficiency 86 In regards of the protection characteristics this power adaptor will act as power shut down automatically base on z Over Curren...

Page 19: ...Adaptor may cause damage to the PDB or internal components Connection of DC harness Note Do not plug the DC cable in reverse direction it will cause serious system and power adaptor damage Connect ba...

Page 20: ...e Hot Swap Yes allows user to on line replace Hard Disk Drive Connectors 1 SATA II x2 to Host 2 SAS 22 7 x2 for HDD 3 Standard 4P Power connector x 1 for 5V 12V from power supply Dimension 232 L x 27...

Reviews: