background image


1.0 05/05/2013


20 

Mounting the dead centre: 

Verify that the dead centre and the tailstock bore are clean without any dirt, dust, grease or 

oil. If there is dirt or excessive oil on the equipment surfaces, the Morse drill chuck taper will not 

be locked tightly. 

Turn the tailstock handwheel to make the fixed component extending about 20MM.


Place the dead centre Into the tailstock bore and the dead centre will be fixed in its suitable   

central position.


When  taking  out  the  dead  centre,  rotate  the  turn  plate  on  the  tailstock  to  make  the  fixed 

component retracted into the tailstock and, in this way, the dead centre    will be jacked out of it.


4.3 Tool Post 


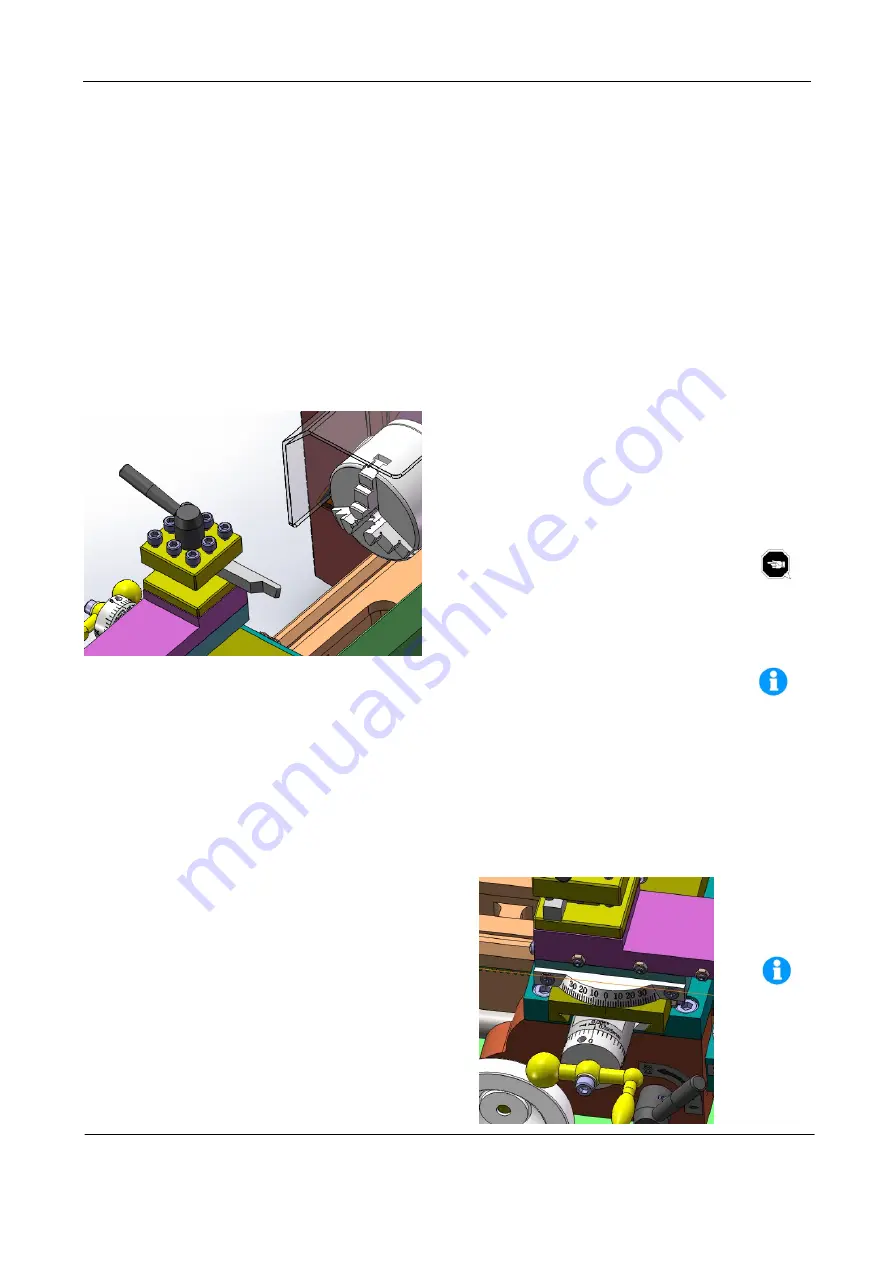
The tool post can be rotated to the predetermined 4 90-degree position or any angle in-between and can 

fix 4 tools one by one at most.   

Tool use


Tool is selected according to the requirement.


The tool bit exposed out of the tool post shall be 

as little as possible and shall be fixed securely with 

two  nuts,  which  is  helpful  to 

maintain  its 

sturdiness.


Ensure  that  the  tool  bit  is  just  on  the 

center  line  of  the  workpiece.  If  not,  use  the 

gasket to have it just on the center line.


Notice: Check the tool bit to find out 

whether it is at the correct height and ensure that the tool bit should be kept on a same 

height with the dead centre of the tailstock.


If both the tops are at the same height or the top of the tool bit is lower than the top 

of the dead centre, then the height is correct.


If the tool bit is higher than the dead centre, then grind the tool to a suitable position 

or replace it with a correct tool.


4.4 Longitudinal Carriage 


Move  the  longitudinal  carriage  so  that  it  is 

perpendicular to the longitudinal axis and the precision 

displayed  on  the  dial  plate  on  the  hand  crank  is 

0.025mm.


Adjust the longitudinal carriage: 

Rotate  the  hand  crank  to  draw  back  the  longitudinal 

carriage  from  the  starting  point  for  0.5mm  at  least  and  then 

move it forward to its starting point.     


Note: This step will eliminate any non-controlled move 

of the lead screw (or backlash), so that the readings on the 


Summary of Contents for CONQUEST SUPER LATHE

Page 1: ...CONQUEST LATHE CONQUEST SUPER LATHE Chester UK Ltd Clwyd Close Hawarden Industrial Park Hawarden Chester CH5 3PZ Tel 01244 531631 Email sales chestermachinetools com www chestermachinetools com...

Page 2: ...1 0 05 05 2013...

Page 3: ...ave purchased and the photos contained in this Operation Instructions which however does not affect the operation of the machine tool We reserve the right to make further technical improvement and dev...

Page 4: ...from Using Emery Cloth in Metal Processing 11 2 3 5 Noise Level 12 2 3 6 Electrical Requirements 12 3 Installation 13 3 1 Tools Required for Installation 13 3 2 Unpacking 13 3 3 Cleaning 15 3 4 Opera...

Page 5: ...7 1 Fault Comparison Table 31 7 1 1 Engine and Electrical 31 7 1 2 Symptoms in Operation and Work 33 7 2 Adjusting Pad Iron 35 7 3 Replace Motor Brush 36 8 Machine Tool Electrical 36 8 1 Electrical Sc...

Page 6: ...1 0 05 05 2013...

Page 7: ...10 10 Max lateral travel of medium carriage mm 65 Max longitudinal travel of small carriage mm 35 Spindle Parameters Spindle through hole diameter mm 20 Chuck middle aperture mm 16 Taper of spindle b...

Page 8: ...type Ordinary brush motor Motor power w 400 or 550 Motor voltage V 110 220 Product Size Machine tool length width height mm 720 300 290 Bottom dimensions length width mm 700 220 Net gross weight kg 40...

Page 9: ...within the machining area as there may be collisions occurred of them with the rotating parts or moving parts of the machine tool 4 Do not touch or step across the moving or rotating parts of the mach...

Page 10: ...e machine tool from collision 18 Do not process toxic or flammable materials which will emit deadly fumes Before processing consult your material suppliers so as to obtain safe materials 19 Do not car...

Page 11: ...of Injury by Machinery Warning There may be injury to the customers or damage to the equipment if the operation methods or procedures designated are not observed Notice There may be damage to the equ...

Page 12: ...to rotate under the high rotation speed especially when a chuck of grey cast iron matrix is used there may be a crack caused in the damaged point c The clamping force required is not known before clam...

Page 13: ...the hands 3 When operating the hand tools and operating handles should be gripped firmly and their appropriate gripping positions should be selected properly Do not grab improper gripping positions of...

Page 14: ...n the power 21 Master each function and various methods of operation 22 Never put your hand on the chuck or the workpiece to stop the rotation of the spindle 23 For the lathe driven through the clutch...

Page 15: ...d during the operation of the machine tool the protective articles are not allowed to be put off for even a short lapse of time The protective articles should be worn properly 39 Care should be taken...

Page 16: ...entional standard chuck of the machine tool For the machine tool equipped with the chuck protection before the spindle of the machine tool is put into running the chuck protection must be in an enclos...

Page 17: ...it is prone to an serious injury Preventive Measures The users should have a certain understanding and knowledge of the necessity to use emery cloth for processing the parts in the machine tool In the...

Page 18: ...ip or a sheet of emery cloth as a very short emery cloth strip or a sheet of emery cloth will not cause such problem as winding or wrapping When carrying out polishing with emery cloth be sure not to...

Page 19: ...s to find out whether they are reliable 3 Installation Safe Installation Read the Operation Instructions so as to master the operation of the machine Warning Throughout the overall installation proces...

Page 20: ...any reserves the right of final interpretation Ser No Name Q ty Ser No Name Q ty 1 Operation Instructions no Shown in Figures 1 6 Allen wrench 1 set 2 Chuck key 1 7 Plastic oiler 1 3 Chuck anti jaw 3...

Page 21: ...cleaning solvents it is necessary to choose a well ventilated place so as to prevent any injury 3 4 Operating Sites CQ0618 is a bench lathe Refer to the data sheet for the weight and dimensions of th...

Page 22: ...ight 2 Ensure that the carriage has left the chuck and is in its disengaged position then insert the power wires into the socket of the work site 220V open the red cover of the emergency stop switch o...

Page 23: ...ection can not be changed 2 Emergency Stop Button Pressing down this button it is in a shutdown state and the motor will be stopped 3 High Low Speed Range Control Spindle rotation speed range High spe...

Page 24: ...o remove all the positive jaw chucks Check the interior of each slot of the chuck to clear off debris Number each chuck to be No 1 2 and 3 or No A B and C The number can be found at the bottom of the...

Page 25: ...in the figure Locking handle To lock the sleeve at a fixed position Tailstock handwheel Turn it to adjust the length of the part extending out of the tailstock Tailstock locking handle To lock the Tai...

Page 26: ...be fixed securely with two nuts which is helpful to maintain its sturdiness Ensure that the tool bit is just on the center line of the workpiece If not use the gasket to have it just on the center li...

Page 27: ...rotate the cross slide to an angle Tighten up the bolt of the cross slide and check the angle again to ensure that it does not move in the tightening up Use the hand crank of the cross slide to move...

Page 28: ...utomatic feed lever downward to the automatic feed position 5 Pull the automatic feed lever upward to the automatic feed stop position 6 The automatic feed can also be operated in the opposite directi...

Page 29: ...cutting attention should be on the small keys on each axis and the gear marking engraved on each gear and do not engage them in a wrong way Notice For the system of a set of gears the gear D has a pad...

Page 30: ...1 0 05 05 2013 24 4 8 Exploded Figures...

Page 31: ...1 0 05 05 2013 25 Ser No Name Q ty Ser No Name Q ty 1 Machine bed 1 4 Screw M6x25 3 2 Chuck 1 6 Nut M6 5 3 Spindle 1 7 Key 5x40 1...

Page 32: ...t circlip 12 2 62 Washer 8 3 23 Ball Bearing 80101 2 63 Nut M8 3 24 Slip double gear 1 64 Axis 1 25 Flat key 4x45 1 67 Screw M6 16 8 26 High and low speed gear shaft 1 69 Positioning screw 3 27 Synchr...

Page 33: ...02 Screw M4 8 2 146 Screw M4 10 2 105 Positioning carriage 1 147 Supporting flange 1 106 Screw M4 14 3 148 Screw M6 20 3 107 Padding iron 1 149 Tailstock 1 108 Small carriage 1 150 Base 1 109 Locating...

Page 34: ...r coordination with the lathe so as to enhance its functions which are introduced as follows 1 80mm dia 4 jaw chuck 2 160mm flower shaped chuck 3 Follower rest 4 Centre frame 5 Morse No 3 headstock ce...

Page 35: ...etailed description provided in this section the best performance of the machine will be achieved Depending on your environment where the machine is used you may need to perform these tasks more frequ...

Page 36: ...achine tool is used constantly it is necessary to open the change gear housing and fill up the oil orifice of the left bracket as well and all the guideways and the surfaces of the large medium and sm...

Page 37: ...ortage 1 Workpiece material mainly metal not suitable for machining 2 Computer circuit board fault 3 There is mistake in motor speed regulation rheostat 4 Motor carbon brush fault 5 Pulley sprocket sl...

Page 38: ...utting depth or feed speed 2 Use suitable speed according to the feed speed table 3 Tool sharpened or replaced 4 Fine tuning gear until when turning the chuck by hand gear rotates smoothly 7 1 2 Sympt...

Page 39: ...st pad iron screws properly 2 Tighten up hand crank fasteners 3 Tighten up fasteners that are loose in the Lead screw mechanism Hand cranks of longitudinal carriage cross slide or saddle are rotated d...

Page 40: ...many foreign objects over machine bed 3 Machine bed is too dry and needs to be lubricated 4 Pad iron is too tight 1 Check to ensure saddle lock fully released 2 Clean off foreign objects frequently du...

Page 41: ...ross slide as shown in B in the figure The pad iron of the saddle has been adjusted properly in the factory before delivery and it should not be required to be adjusted any more Tools required Q ty 2m...

Page 42: ...1 0 05 05 2013 36 8 Machine Tool Electrical 8 1 Electrical Schematic Diagram...

Page 43: ...n in Fig 1 2 For the internal wiring mode of QKS7 Connect the two terminals below as shown in Fig 2 3 Connection mode of plug wires and lines introduced from QKS The plug wires are composed of such th...

Page 44: ...ple wire of the plug wires and the line introduced from QKS7 are connected with the terminal 13 and 23 of the button switch respectively the two wires of the fuse are combined together into a terminal...

Page 45: ...ler and the blue wire is connected to P2 on the board as shown in Fig 2 3 The wires with terminals of the button switch are connected to L1 and L2 on the board respectively as shown in Fig 3 4 Rotary...

Page 46: ...e two wires of the motor to No 4 and No 8 of the rotary switch respectively as shown in Fig 1 and Fig 2 2 General faults analysis 1 Motor does not rotate 1 Fuse is burnt 2 Poor contact check all the w...

Page 47: ...Measured mm 1 Run out of spindle and periodical radial slip of spindle A 0 009 A 2 Run out of spindle nose 0 009 3 Run out of internal taper of spindle A 0 015 B 0 03 A B 4 Paralleslism of tailstock g...

Page 48: ...allelism of spindle axis with carriage movement A vertical pane B horizontal pllane A 0 03 250 B 0 03 250 A B 7 Parallelism of top slide with spindle and carriage movement 0 04 75 8 Run out of yaw chu...

Page 49: ...askets 5 Double end spanner 8 10 14 17 1 each 6 Allen wrench 1 set 7 Plastic oiler 1 pc 8 Fixed centre Morse No 2 1 pc 9 Metric change gears CQ0618 1 set 10 Fuse 1 pc Technical documents accompanied w...

Page 50: ...1 0 05 05 2013 44...

Reviews: