background image

Visit Our Company Website :

www.chevalgrp.com

International E-Mail: 

commce@chevalgrp.com  

Tel:

 +66 2315 1504-5 

Thailand E-Mail: 

domestic@chevalgrp.com  

Tel: 

+66 2744 1632  

Visit Our WebStore :

www.chevalstore.com

E-Mail: 

cheval.e@chevalgrp.com  

Tel:

 +66 2744 1632

ABOUT THE ARION CABINET:

Arion is a premium 19” standard cabinet, comparable to leading brands in the market today. Arion is UL listed with a static load rate  of 3,080 lbs (

1,400 kg

and is strong enough for your heaviest equipment. The perforated doors provide over 80% total open area and can be switched from left hand to right hand 
opening at time of initial assembly or later after deployment. Arion is a knock down design and is easy to put together; does not require any special assembly
jigs. With its adjustable PMA’s (19” mounting rails), multipurpose  PDU/Vertical rails, ample cable access and half height side panels, Arion is a versatile platform
for most of your IT needs.

ABOUT CHEVAL:

Cheval Electronic Enclosure Co., Ltd is a Thailand based multinational company with over 30 years experience in 19” cabinets and data center infrastructure 
solutions. We provide design and manufacturing support (OEM) to some of the worlds largest and best known IT firms. All our products are designed and 
manufactured in house to the highest international standards. We have a full line of 19” cabinets, including network racks, colo racks, seismic racks, OCP racks 
and wide range of accessories.

LIMITED WARRANTY TERMS AND CONDITIONS:

Limited Warranty: 

 Cheval warrants the Arion series 19” enclosures to be free from defects in materials and workmanship for a period of twelve (12) months from

date of receipt.   This warranty applies to the original purchaser only.  Cheval's obligation is limited to repairing, replacing or issuing a credit for the original 
purchase price, at our sole discretion.  This warranty does not apply to goods which have been damaged by incorrect assembly, use, modified or altered from their
original form, improper storage or handling, incorrect installation, repair or service by non-authorized personnel or improper installation of third-party equipment. 
The Arion 19” enclosure is designed for indoor use only and should be stored and installed in an indoor environment only.  This warranty is not transferable.

Limitation of Liability: 

 Except as  provided herein, Cheval makes no warranties, express or implied, including warranties of merchantability, fitness for a specific

purpose and non infringement of third party rights are expressly excluded.  Except as listed here, in no event shall Cheval be liable for direct, indirect, special, 
incidental, or consequential damages arising from the use of this product.  Cheval is not liable for loss of profits, loss of revenue, loss of software or data, loss of 
equipment or use of equipment, cost of replacement goods or claims by third parties.

ARION : 600 SERIES

  - 


About Us

Pg. 19

Summary of Contents for ARION 600W Series

Page 1: ...International Version AAG 20 03 002...

Page 2: ......

Page 3: ...esult in equipment damage serious injury or possible death WARNING Only indentical ARION enclosures should be installed together when ganging The ambient temperature operating range for the ARION Encl...

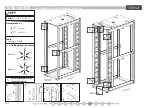
Page 4: ...ly Top Panel Assembly PDU Vertical Cable Rail Assembly PMA 19 Mounting Rails Set Assembly Door Hinges Door Latch Bracket Assembly Front Door Curve Assembly Rear Door Split Assembly Side Panel Assembly...

Page 5: ...ry The recommended equipment for moving the carton are pallet jack or forklift 1 Move the carton to a solid level area clear of obstructions 2 Carefully cut the wrapping straps securing the carton 3 R...

Page 6: ...Assembly Guide Front Door Curve P14 Rear Door split kit P16 ARION 600 SERIES Unpacking Instructions...

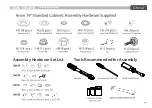
Page 7: ...A B C D A B C D Tools Assembly Bag Hardware Bag P18 PMA P10 x 2 P11 x 2 Vertical Post P2 x 4 Top Panel P6 Caster kit P7 x 4 Side Brace Mid P4 x 2 PDU Vertical Cable Rail P8 x 2 Frame Top P3 Frame Bott...

Page 8: ...racket Top Panel Assy Caster kit PDU Vertical Cable Rail Assy PMA Mounting Bracket 1 4 1 2 2 1 4 2 12 P10 P11 P12 P13 P14 P15 P16 P17 P18 PMA Assy LH PMA Assy RH Door Hinges Door Latch Bracket Front D...

Page 9: ...Tools Recommended for Assembly Assembly Hardware Set List ARION 600 SERIES Tools Hardware...

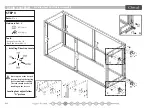
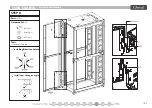
Page 10: ...ssembly Tools Hexagon Socket No 24 16mm Screwdriver Torx T30 Installing Direction Locate Step 1 Step 2 Step 2 Step 1 P2 Cross Section STEP 1 Parts P1 x 1 P2 x 4 P3 x 1 Hardware Set A H1 8 pcs H2 8 pcs...

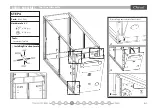
Page 11: ...ARION 600 SERIES Middle Side Brace Assembly STEP 2 Parts P4 x 2 Hardware Set B H6 12 pcs Tools Screwdriver Torx T30 Installing Direction Locate Tighten all location securely...

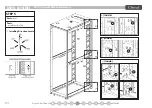
Page 12: ...Leveling Feet And Caster Assembly STEP 3 Parts P7 x 4 Hardware Set B H7 16 pcs H12 4 pcs Tools Hexgon Socket No 10 Open End Wrench No 14 Installing Direction Locate Once in place at the desired locati...

Page 13: ...10 Make sure the Top Panel is installed correctly before tightening Top panel fixing P5 ARION 600 SERIES Top Panel Assembly i i3Inside i i1 i2 STEP 4 Parts P5 x 2 P6 x 1 Hardware Set C H5 2 pcs H7 2 p...

Page 14: ...Inside Inside Inside ARION 600 SERIES PDU Vertical Cable Rail Assembly STEP 5 Parts P8 x 2 Tools Screwdriver Torx T30 Installing Direction Locate...

Page 15: ...MA 19 Mounting Rails Set Assembly P10 N Depth indicator STEP 6 Parts P9 x12 P10 x 2 P11 x 2 Hardware Set C H8 12 pcs H4 12 pcs Tools Hexagon Socket No 13 Picture 1 Picture 2 Use depth indicator label...

Page 16: ...S Door Hinges Door Latch Bracket Assembly STEP 7 Parts P12 x 6 P13 x 1 P15 x 2 Hardware Set D H5 6 pcs H6 6 pcs Tools Screwdriver Torx T30 Picture 1 Picture 2 Check Installing Direction carefully for...

Page 17: ...S T S T ARION 600 SERIES Front Door Assembly STEP 8 Parts P14 x 1 Hardware Set D H5 1 pcs H10 2 pcs H3 1 pcs Tools Screwdriver Torx T30 Install from 90 degree angle Installing Direction Locate...

Page 18: ...U U V V ARION 600 SERIES Rear Door Assembly STEP 9 Parts P16 x 2 Hardware Set D H5 2 pcs H10 4 pcs Tools Screwdriver Torx T30 Install from 90 degree angle Installing Direction Locate H3 2 pcs...

Page 19: ...ARION 600 SERIES Side Panel Assembly STEP 10 1 Parts P17 x 2 Installation Step 1 2 3 Ensure lock is engaged to prevent side panel falling off Installing Direction Locate...

Page 20: ...ARION 600 SERIES Side Panel Assembly STEP 10 2 Parts P17 x 2 Installation Step 1 2 3 Ensure lock is engaged to prevent side panel falling off Installing Direction Locate...

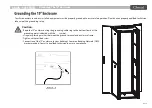
Page 21: ...me Tighten with provided screw Connection of the 19 enclosure to your building s Common Bonding Network CBN is recommended Consult a qualified technician to ensure compliance Pg 17 Your Arion enclosur...

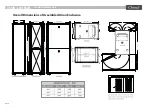
Page 22: ...Pg 18 Overall Dimensions of Assembled Arion Enclosure ARION 600 SERIES Product Information...

Page 23: ...binets including network racks colo racks seismic racks OCP racks and wide range of accessories LIMITEDWARRANTYTERMS AND CONDITIONS Limited Warranty Cheval warrants the Arion series 19 enclosures to b...

Page 24: ......

Reviews: