m easured and recorded. This PAG lubricant should then be
discarded and an equal am ount o f new PAG lubricant added to
the com pressor.
The service com pressor is shipped with 240 ml (8 oz.) o f
PAG lubricant. This lubricant should be drained and retained
for use as replacem ent lubricant when service procedures
require addition o f new lubricant to com pressor. NOTE:
R eplace only with GM approved PAG oil P/N 12345923.
M ost m inor repair procedures may be done on the
vehicle
w ithout discharging the system .
M ajor repair
procedures require that the system be discharged o f refrigerant.
METRIC THREAD SIZE INFORMATION
1.
Com pressor to m ounting bracket bolts.
Front
M 10 x l .5 - 6H
Rear
M8 x 1.25 - 6H
2.
Suction-discharge port screw.
M l O x 1 .5 - 6 H
3.
C om pressor shaft.
M9 x l .25 - 6H
4.
Internal hub-clutch drive assem bly.
M22 x 1 .5 - 6 H
UNIT REPAIR
MINOR COMPRESSOR REPAIR
PROCEDURES
THE
FOLLOWING
OPERATIONS
TO
THE
COM PRESSOR CLUTCH PLATE AND HUB, ROTOR
AND BEARING, AND COIL ARE COVERED AS
“M IN O R ” BECAUSE THEY MAY BE PERFORMED
W ITHO UT
FIRST
RECOVERING
REFRIGERANT
FROM
THE
SYSTEM
OR
REMOVING
THE
COM PRESSOR FROM THE VEHICLE.
T he C om pressor Shaft Seal assem bly, control sw itches,
and Pressure R elief Valve may also be serviced W ITH O U T
R E M O V IN G TH E com pressor from the vehicle but these
o p erations are covered later in this section as M AJOR REPAIR
P R O C E D U R E S because the system must be reclaim ed,
evacuated and recharged to com plete service.
Illustrations used in describing these operations show the
co m p resso r
rem oved from the
vehicle only
to m ore
clearly
illustrate the various operations.
W hen servicing the com pressor, rem ove only the parts
that prelim inary diagnosis show s are in need of service. Refer
to F igures 2 and 5 for inform ation relative to part nam es and
location.
R em oval and installation of external com pressor parts,
and disassem bly and assem bly o f internal parts, must be
perform ed on a clean w orkbench. The work area, tools and
parts m ust be kept clean at all tim es.
COMPRESSOR CLUTCH PLATE AND HUB
ASSEMBLY
Remove or Disconnect
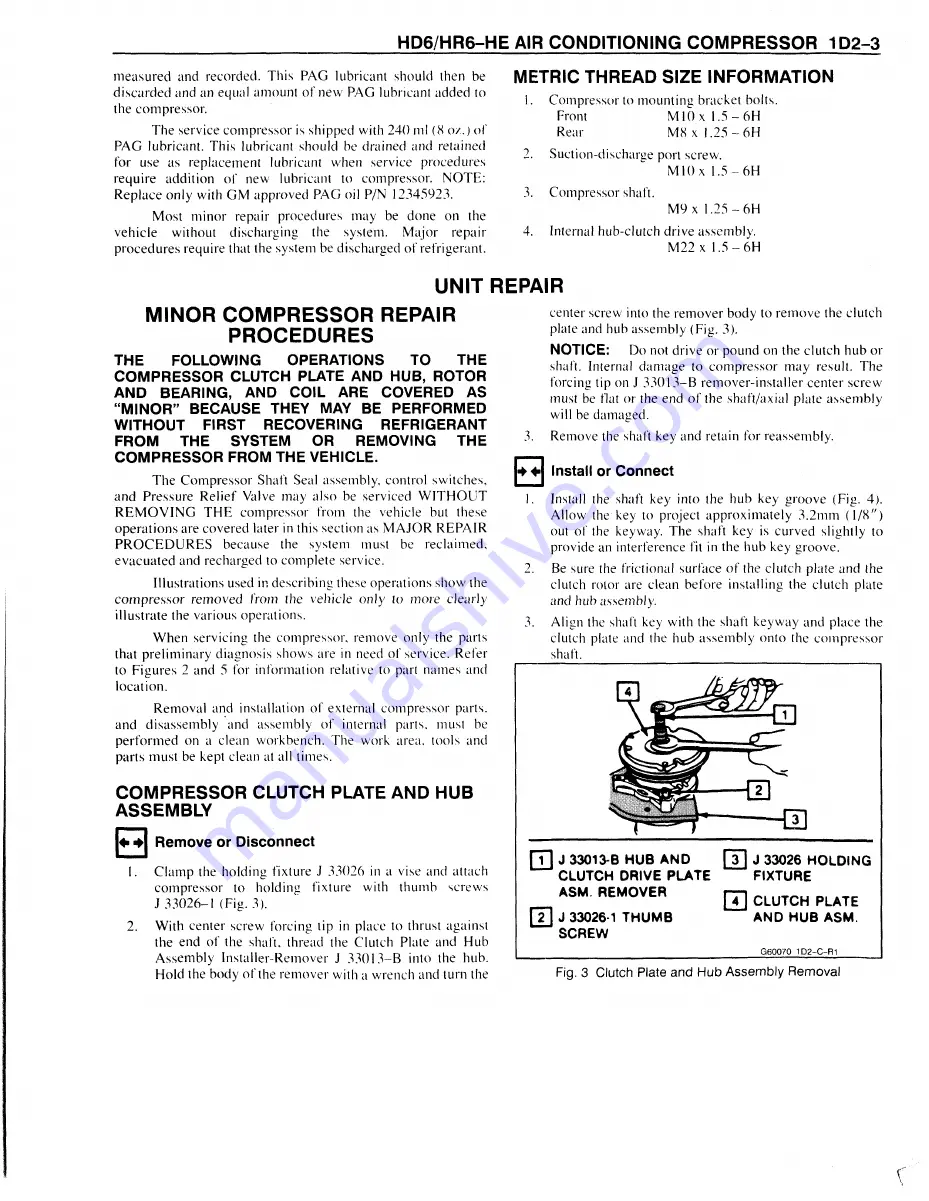
C lam p the holding fixture J 33026 in a vise and attach
com pressor to holding fixture with thum b screws
J 3 3 0 2 6 - 1 (Fig. 3).
With center screw forcing lip in place to thrust against
the end of the shaft, thread the Clutch Plate and Hub
A ssem bly Installer-R em over J 3 3 013-B into the hub.
Hold the body o f the rem over with a w rench and turn the
center screw into the rem over body to rem ove the clutch
plate and hub assem bly (Fig. 3).
NOTICE:
Do not drive or pound on the clutch hub or
shaft. Internal dam age to com pressor m ay result. The
forcing tip on J 330 1 3 -B rem over-installer center screw
must be flat or the end o f the shaft/axial plate assem bly
will be damaged.
Remove the shaft key and retain for reassem bly.
♦ + Install or Connect
Install the shaft key into the hub key groove (Fig. 4).
Allow the key to project approxim ately 3.2m m (1 /8 ")
out of the keyway. The shaft key is curved slightly to
provide an interference fit in the hub key groove.
Be sure the frictional surface o f the clutch plate and the
clutch rotor are clean before installing the clutch plate
and
hub
assembly.
Align the shaft key with the shaft keyw ay and place the
clutch plate and the hub assem bly onto the com pressor
shaft.
rn
J 33013-B HUB AND
[T]
J 33026 HOLDING
CLUTCH DRIVE PLATE
FIXTURE
ASM. REMOVER
j j j CUJTCH p^ TE
[ T | J 33026-1 THUMB
AND HUB ASM.
SCREW
G60070 • 1D2-C-R1
Fig. 3 Clutch Plate and Hub Assembly Removal
Summary of Contents for Light Duty Truck 1994 Series
Page 1: ......
Page 11: ...VIEW A p n n n j VIEW C F7554 Figure 10 Hydra Matic 4L60 E Transmission I D Location ...
Page 24: ...NOTES ...
Page 26: ... ...
Page 69: ...NOTES ...
Page 71: ...3 2 STEERING ...
Page 73: ......
Page 84: ......
Page 102: ...40 ...
Page 130: ...NOTES ...
Page 146: ...NOTES ...
Page 162: ...NOTES ...
Page 166: ...Figure 5 Removing the Pinion Flange Figure 6 Pressing the Drive Pinion from the Cage ...
Page 178: ...Figure 3 Spreading the Differential Case Figure 4 Removing the Differential ...
Page 190: ...NOTES ...
Page 202: ...NOTES ...
Page 206: ...F5785 ...
Page 212: ...B Button Moved Out of Bearing Bore F5791 ...
Page 228: ...NOTES ...
Page 232: ......
Page 234: ......
Page 236: ...Adjuster 63 Bolt 64 Lock Figure 10 Turning the Adjuster Plug K3 Models ...
Page 237: ...Figure 13 Removing the Pinion Seal 39 Bearing Cup Figure 16 Removing the Inner Bearing Cap ...
Page 261: ...F7475 ...
Page 267: ...B Button Moved Out of Bearing Bore F5791 ...
Page 294: ...NOTES ...
Page 300: ...NOTES ...
Page 318: ...NOTES ...
Page 322: ...SR207LN2 EDS ...
Page 324: ......
Page 326: ...OVERHEAD OILING AND RETURN MAIN OIL GALLERY N30005 6A2 J EDS ...
Page 368: ...103 153 127 V1200 ...
Page 370: ......
Page 372: ......
Page 374: ...F9375 Figure 7 Engine Lubrication Diagram Engines Without Balance Shaft ...
Page 376: ...Figure 9 Engine Lubrication Diagram Engines With Balance Shaft ...
Page 399: ...V2974 ...
Page 410: ......
Page 412: ...195 196 201 174 252 163 165 164 244 3706r3924 ...
Page 452: ......
Page 454: ...163 164 V1202 ...
Page 456: ...20 21x 302 210 4 0 41 2 5 2 5 1 2 51 4 2 e3 54 3 9 252 252 S 255 255 25 6 256 209 V1196 ...
Page 458: ...100 1 8 4 185 183 177 v 75 201 3706r1204 ...
Page 460: ......
Page 510: ......
Page 512: ...V2131 ...
Page 514: ...110 106 106 103 90 93 89 88 87 86 v 7 7 7 7 j A _ 111 f t 2 a a s 53 49 L 47 46 3706r4751 ...
Page 566: ...NOTES ...
Page 574: ...NOTES ...
Page 618: ...SPECIAL TOOLS ...
Page 620: ...NOTES ...
Page 672: ......
Page 682: ......
Page 686: ......
Page 694: ...RH0213 4L60 E ...
Page 695: ...657 659 m i J 8092 H J 34196 4 3 34196 5 657 658 665 J 23907 J 7004 1 J 8092 RH0214 4L60 E ...
Page 696: ...J 8092 J 34196 4 33 31 J 8092 RH0215 4L60 E ...
Page 697: ...SPECIAL TOOLS ...
Page 698: ...SPECIAL TOOLS ...
Page 758: ...RH0194 4L80 E ...
Page 764: ......
Page 770: ...SPECIAL TOOLS ...
Page 771: ...SPECIAL TOOLS CONT ...
Page 772: ......
Page 775: ......
Page 776: ......
Page 785: ......
Page 804: ...NOTES ...
Page 806: ......
Page 808: ......
Page 822: ...3707r5079 ...
Page 840: ......
Page 848: ...NOTES ...
Page 852: ......
Page 860: ...F5435 ...
Page 866: ......
Page 878: ...F9167 ...
Page 882: ...16 FrontOutputShaft 18 DrivtQNr 19 DrivenGm t 20 DriveChain 22 FrontOutputBearing V2836 ...
Page 890: ...F9168 ...
Page 908: ......
Page 919: ......


