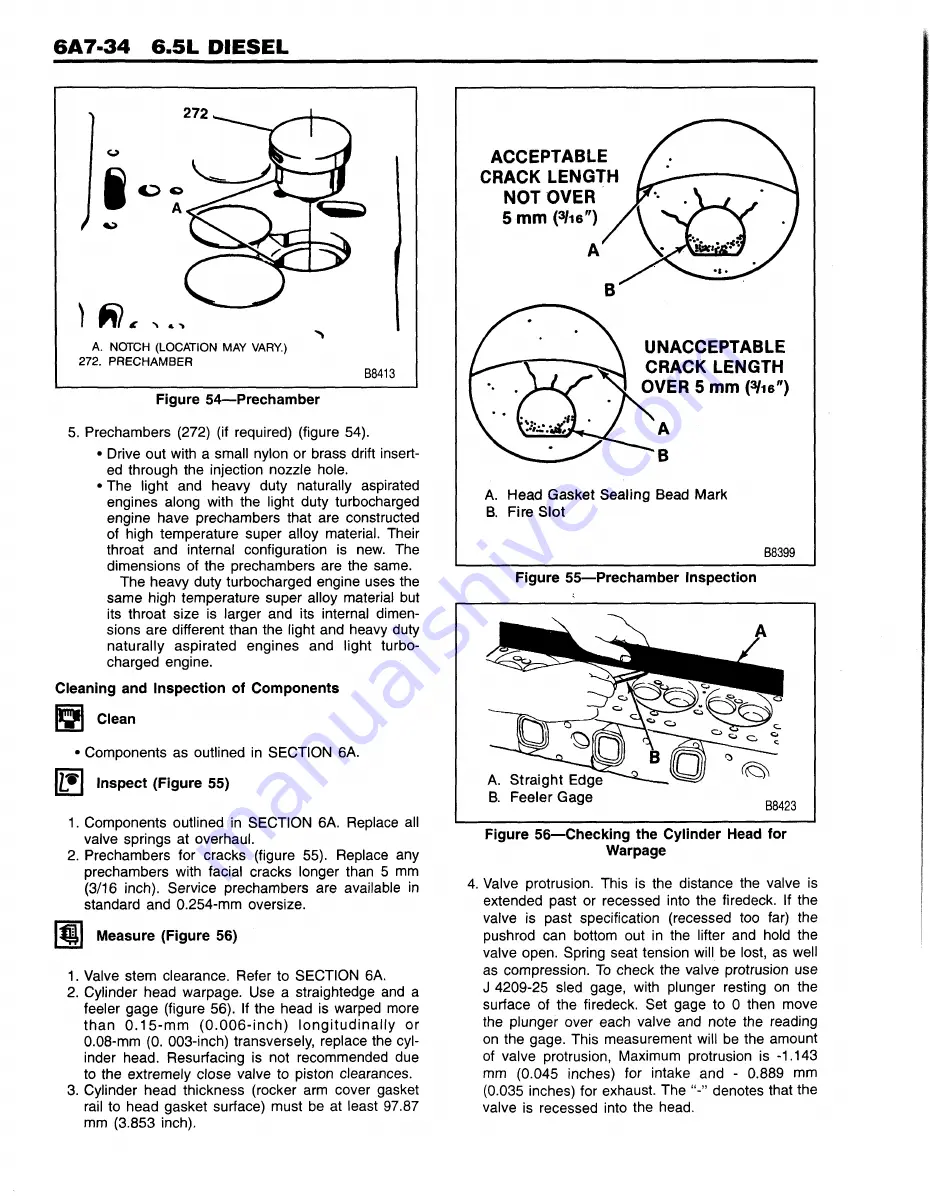
272
A. NOTCH (LOCATION MAY VARY.)
272. PRECHAMBER
Figure 54-—Prechamber
B8413
5. Prechambers (272) (if required) (figure 54).
• Drive out with a small nylon or brass drift insert
ed through the injection nozzle hole.
• The light and heavy duty naturally aspirated
engines along with the light duty turbocharged
engine have prechambers that are constructed
of high temperature super alloy material. Their
throat and internal configuration is new. The
dimensions of the prechambers are the same.
The heavy duty turbocharged engine uses the
same high temperature super alloy material but
its throat size is larger and its internal dimen
sions are different than the light and heavy duty
naturally aspirated engines and light turbo
charged engine.
Cleaning and Inspection of Components
Components as outlined in SECTION 6A.
1 ?
Inspect (Figure 55)
1. Components outlined in SECTION 6A. Replace all
valve springs at overhaul.
2. Prechambers for cracks (figure 55). Replace any
prechambers with facial cracks longer than 5 mm
(3/16 inch). Service prechambers are available in
standard and 0.254-mm oversize.
Measure (Figure 56)
1. Valve stem clearance. Refer to SECTION 6A.
2. Cylinder head warpage. Use a straightedge and a
feeler gage (figure 56). If the head is warped more
than 0 .1 5 -m m (0 .0 0 6 -in c h ) lo n g itu d in a lly or
0.08-mm (0. 003-inch) transversely, replace the cyl
inder head. Resurfacing is not recommended due
to the extremely close valve to piston clearances.
3. Cylinder head thickness (rocker arm cover gasket
rail to head gasket surface) must be at least 97.87
mm (3.853 inch).
ACCEPTABLE
CRACK LENGTH
NOT OVER
5 mm (3/ie")
UNACCEPTABLE
CRACK LENGTH
OVER 5 mm
p h e ")
A. Head Gasket Sealing Bead Mark
B. Fire Slot
B8399
Figure 55— Prechamber Inspection
A. Straight Edge
B. Feeler Gage
B8423
Figure 56— Checking the Cylinder Head for
Warpage
4. Valve protrusion. This is the distance the valve is
extended past or recessed into the firedeck. If the
valve is past specification (recessed too far) the
pushrod can bottom out in the lifter and hold the
valve open. Spring seat tension will be lost, as well
as compression. To check the valve protrusion use
J 4209-25 sled gage, with plunger resting on the
surface of the firedeck. Set gage to 0 then move
the plunger over each valve and note the reading
on the gage. This measurement will be the amount
of valve protrusion, Maximum protrusion is -1.143
mm (0.045 inches) for intake and - 0.889 mm
(0.035 inches) for exhaust. The
denotes that the
valve is recessed into the head.
Summary of Contents for Light Duty Truck 1994 Series
Page 1: ......
Page 11: ...VIEW A p n n n j VIEW C F7554 Figure 10 Hydra Matic 4L60 E Transmission I D Location ...
Page 24: ...NOTES ...
Page 26: ... ...
Page 69: ...NOTES ...
Page 71: ...3 2 STEERING ...
Page 73: ......
Page 84: ......
Page 102: ...40 ...
Page 130: ...NOTES ...
Page 146: ...NOTES ...
Page 162: ...NOTES ...
Page 166: ...Figure 5 Removing the Pinion Flange Figure 6 Pressing the Drive Pinion from the Cage ...
Page 178: ...Figure 3 Spreading the Differential Case Figure 4 Removing the Differential ...
Page 190: ...NOTES ...
Page 202: ...NOTES ...
Page 206: ...F5785 ...
Page 212: ...B Button Moved Out of Bearing Bore F5791 ...
Page 228: ...NOTES ...
Page 232: ......
Page 234: ......
Page 236: ...Adjuster 63 Bolt 64 Lock Figure 10 Turning the Adjuster Plug K3 Models ...
Page 237: ...Figure 13 Removing the Pinion Seal 39 Bearing Cup Figure 16 Removing the Inner Bearing Cap ...
Page 261: ...F7475 ...
Page 267: ...B Button Moved Out of Bearing Bore F5791 ...
Page 294: ...NOTES ...
Page 300: ...NOTES ...
Page 318: ...NOTES ...
Page 322: ...SR207LN2 EDS ...
Page 324: ......
Page 326: ...OVERHEAD OILING AND RETURN MAIN OIL GALLERY N30005 6A2 J EDS ...
Page 368: ...103 153 127 V1200 ...
Page 370: ......
Page 372: ......
Page 374: ...F9375 Figure 7 Engine Lubrication Diagram Engines Without Balance Shaft ...
Page 376: ...Figure 9 Engine Lubrication Diagram Engines With Balance Shaft ...
Page 399: ...V2974 ...
Page 410: ......
Page 412: ...195 196 201 174 252 163 165 164 244 3706r3924 ...
Page 452: ......
Page 454: ...163 164 V1202 ...
Page 456: ...20 21x 302 210 4 0 41 2 5 2 5 1 2 51 4 2 e3 54 3 9 252 252 S 255 255 25 6 256 209 V1196 ...
Page 458: ...100 1 8 4 185 183 177 v 75 201 3706r1204 ...
Page 460: ......
Page 510: ......
Page 512: ...V2131 ...
Page 514: ...110 106 106 103 90 93 89 88 87 86 v 7 7 7 7 j A _ 111 f t 2 a a s 53 49 L 47 46 3706r4751 ...
Page 566: ...NOTES ...
Page 574: ...NOTES ...
Page 618: ...SPECIAL TOOLS ...
Page 620: ...NOTES ...
Page 672: ......
Page 682: ......
Page 686: ......
Page 694: ...RH0213 4L60 E ...
Page 695: ...657 659 m i J 8092 H J 34196 4 3 34196 5 657 658 665 J 23907 J 7004 1 J 8092 RH0214 4L60 E ...
Page 696: ...J 8092 J 34196 4 33 31 J 8092 RH0215 4L60 E ...
Page 697: ...SPECIAL TOOLS ...
Page 698: ...SPECIAL TOOLS ...
Page 758: ...RH0194 4L80 E ...
Page 764: ......
Page 770: ...SPECIAL TOOLS ...
Page 771: ...SPECIAL TOOLS CONT ...
Page 772: ......
Page 775: ......
Page 776: ......
Page 785: ......
Page 804: ...NOTES ...
Page 806: ......
Page 808: ......
Page 822: ...3707r5079 ...
Page 840: ......
Page 848: ...NOTES ...
Page 852: ......
Page 860: ...F5435 ...
Page 866: ......
Page 878: ...F9167 ...
Page 882: ...16 FrontOutputShaft 18 DrivtQNr 19 DrivenGm t 20 DriveChain 22 FrontOutputBearing V2836 ...
Page 890: ...F9168 ...
Page 908: ......
Page 919: ......


