STEERING 9-21
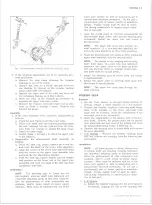
Fig. 38— O v e r -C e n te r Adjustm ent
systems, and/or could result in major repair
expense. It must be replaced with one of the
same part number or with an equivalent part if
replacement becomes necessary. Do not use a
replacement part of lesser quality or substitute
design. Torque values must be used as speci
fied during reassembly to assure proper re
tention of this part.
Pump Belt Tension
1. Loosen pivot bolt and pump brace adjusting nuts.
CAUTION:
Do not move pump by prying against
reservoir or by pulling on filler neck.
2. Move pump, with belt in place until belt is tensioned
to specifications as indicated by Tool J-23600 (Fig.
39).
3. Tighten pump brace adjusting nut. Then tighten pivot
bolt nut.
FLUID LEVEL
1. Check oil level in the reservoir by checking the dip
stick when oil is at operating temperature. On
models equipped with remote reservoir, the oil level
should be maintained approximately 1/2 to 1 inch
from top with wheels in full left turn position.
2. Fill, if necessary, to proper level with GM Power
Steering Fluid or equivalent. If this is not available,
automatic transmission fluid bearing the mark Dex-
ron® may be used.
BLEEDING HYDRAULIC SYSTEM
1. Fill oil reservoir to proper level and let oil remain
undisturbed for at least two minutes.
2. Start engine and run only for about two seconds.
3. Add oil if necessary.
4. Repeat above procedure until oil level remains con
stant after running engine.
Fig.
39—
C h e c k in g Belt Tension with Tool
J-23600
5. Raise front end of vehicle so that wheels are off the
ground.
6. Increase engine speed to approximately 1500 rpm.
7. Turn the wheels (off ground) right and left, lightly
contacting the wheel stops.
8. Add oil if necessary.
9. Lower the vehicle and turn wheels right and left on
the ground.
10. Check oil level and refill as required.
11. If oil is extremely foamy, allow vehicle to stand a
few minutes with engine off and repeat above pro
cedure.
a. Check belt tightness and check for a bent or loose
pulley. (Pulley should not wobble with engine
running.)
,
b. Check to make sure hoses are not touching any
other parts of the truck, particularly sheet metal.
c. Check oil level, filling to proper level if neces
sary, following operations 1 through 10. This
step and Step "D" are extremely important as
low oil level and/or air in the oil are the most
frequent causes of objectional pump noise.
d. Check the presence of air in the oil. Air will
show up as a milky appearing oil. If air is
present, attempt to bleed system as described in
operations 1 through 10. If it becomes obvious
that the pump will not bleed after a few trials,
proceed as outlined under Hydraulic System
Checks-
HYDRAULIC SYSTEM CHECKS
The following procedure outlines methods to identify
and isolate power steering hydraulic circuit difficulties.
This test is divided into two parts. Test number one
provides means of determining whether power steering
system hydraulic parts are actually faulty. If test num-
10-30 CHEVROLET TRUCK SERVICE MANUAL
Summary of Contents for 10 1971 Series
Page 1: ......
Page 96: ......
Page 100: ...10 30 CHEVROLET TRUCK SERVICE MANUAL Fig 4 10 30 Series Truck Frame FRAME 2 4 ...
Page 120: ......
Page 203: ...ENGINE 6 25 Fig 22L Engine Mounts 10 30 CHEVROLET TRUCK SERVICE MANUAL ...
Page 215: ...ENGINE 6 37 REAR M O U NT Fig 21V Engine Mounts 10 30 CHEVROLET TRUCK SERVICE MANUAL ...
Page 218: ......
Page 249: ......
Page 324: ......
Page 340: ......
Page 365: ...10 30 CHEVROLET TRUCK SERVICE MANUAL Fig 43 Power Steering Pump M ounting STEERING 9 25 ...
Page 368: ......
Page 386: ......
Page 390: ...ELECTRICAL BODY AND CHASSIS 12 4 10 30 CHEVROLET TRUCK SERVICE MANUAL ...
Page 391: ......
Page 428: ......
Page 432: ......
Page 449: ...SPECIFICATIONS 9 10 30 CHEVROLET TRUCK SERVICE MANUAL ...
Page 463: ......
Page 464: ......
Page 465: ......
Page 466: ......


