6 T - 6 E M I S S I O N C O N T R O L S Y S T E M S
DIAGNOSIS
Proper system function relies upon component perform
ance as outlined under system operation and description.
Only the air cleaner is discussed in the following checks,
refer to applicable section for other system components.
Operation Check
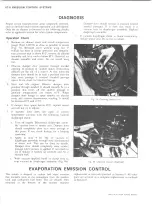
1. Remove air cleaner cover and install temperature
gauge (Tool J-22973) as close as possible to sensor
(Fig. 7b). Reinstall cover without wing nut. If
vehicle has been in recent operation and tempera
ture at sensor unit is above 85°F, remove air cleaner
assembly and let it cool to below 85°F. Reinstall air
cleaner assembly and cover. Do not install wing
nut.
2. Observe damper door position through snorkel
opening. If position of snorkel makes observation
difficult use the aid of a mirror. At this point the
damper door should be in such a position that the
heat stove passage is covered (snorkel passage
open). If not, check for binds in linkage.
3. Start and idle engine. Observe damper door
position through snorkel. It should initially be in a
position that closes off the snorkel passage if
ambient temperatures are below 85°F. When
damper door beings to open remove air cleaner
cover and observe thermometer reading. It should
be between 85°F and 115°F.
4. If damper door opens before 85°F, replace sensor
unit (do not try to adjust).
5. If damper door does not open at correct
temperature continue with the following vacuum
diaphragm check:
a. Turn off engine. Disconnect diaphragm assem
bly vacuum hose at sensor unit. Damper door
should completely close heat stove passage at
this point. If not, check linkage for a binding
condition.
b. Apply at least 9 In. Hg. of vacuum to
diaphragm assembly through hose disconnected
at sensor unit. This can be done by mouth.
Damper door should completely close snorkel
passage when vacuum is applied. If not check to
see if linkage is hooked up correctly and for a
vacuum leak.
c. With vacuum applied, bend or clamp hose to
trap vacuum in diaphragm assembly (Fig.
8
b).
Damper door should remain in position (closed
snorkel passage). If it does not, there is a
vacuum leak in diaphragm assembly. Replace
diaphragm assembly.
6
. If vacuum diaphragm check is found satisfactory,
replace sensor unit. Do not try to adjust.
Fig. 7b—Checking Sensor Unit
Fig. 8b—Checking Vacuum Diaphragm
EVAPORATION EMISSION CONTROL
This system is designed to reduce fuel vapor emission
that normally vents to the atmosphere from the gasoline
tank and carburetor fuel bowl. The air cleaner filter
mounted at the bottom of the canister requires
replacement at intervals specified in Section 0. All other
parts are serviced as a complete replacement as outlined
in Section
8
.
TOOL J-22973
LIGHT DUTY TRUCK SERVICE MANUAL
Summary of Contents for Light Duty Truck 1973
Page 1: ......
Page 4: ......
Page 6: ......
Page 53: ...HEATER AND AIR CONDITIONING 1A 27 LIGHT DUTY TRUCK SERVICE MANUAL...
Page 115: ...LIGHT DUTY TRUCK SERVICE M A N U A L HEATER AND AIR CONDITIONING 1A 89...
Page 123: ...BODY 1B 3 Fig 6 Typical 06 Van LIGHT DUTY TRUCK SERVICE MANUAL...
Page 149: ...BODY 1B 29 Fig 84 Body Mounting 06 Fig 85 Body Mounting 14 LIGHT DUTY TRUCK SERVICE MANUAL...
Page 171: ...LIGHT DUTY TRUCK SERVICE M A N U A L Fig 2 Frame Horizontal Checking Typical FRAME 2 3...
Page 173: ...LIGHT DUTY TRUCK SERVICE M A N U A L Fig 4 10 30 Series Truck Frame FRAME 2 5...
Page 174: ...2 6 FRAME LIGHT DUTY TRUCK SERVICE MANUAL Fig 5 Underbody Reference Points G Van...
Page 185: ...FRONT SUSPENSION 3 11 Fig 16 Toe out on Turns LIGHT DUTY TRUCK SERVICE MANUAL...
Page 224: ......
Page 266: ......
Page 351: ...ENGINE 6 15 Fig ID Sectional View of Eight Cylinder Engine LIGHT DUTY TRUCK SERVICE MANUAL...
Page 375: ...EN G IN E 6 39 LIGHT DUTY TRUCK SERVICE MANUAL...
Page 376: ...6 4 0 ENGINE LIGHT DUTY TRUCK SERVICE MANUAL...
Page 377: ...ENG IN E 6 41 LIGHT DUTY TRUCK SERVICE MANUAL...
Page 378: ...LIGHT DUTY TRUCK SERVICE MANUAL Fig 37L K Series Engine Front Mount 6 42 ENG INE...
Page 400: ...6 6 4 ENG INE LIGHT DUTY TRUCK SERVICE MANUAL...
Page 401: ...ENG IN E 6 65 LIGHT DUTY TRUCK SERVICE MANUAL...
Page 402: ...6 6 6 ENGINE LIGHT DUTY TRUCK SERVICE MANUAL...
Page 403: ...E NG IN E 6 67 Fig 36V C Series Engine Mounts LIGHT DUTY TRUCK SERVICE MANUAL...
Page 410: ......
Page 423: ...EN G IN E C OOLING 6K 13 Fig 16 Overheating Chart LIGHT DUTY TRUCK SERVICE MANUAL...
Page 424: ...6 K 1 4 ENG INE COOLING Fig 17 Coolant Loss Chart LIGHT DUTY TRUCK SERVICE MANUAL...
Page 456: ...6M 32 ENGINE FUEL Fig K15 Accelerator Controls G Van L 6 LIGHT DUTY TRUCK SERVICE MANUAL...
Page 492: ......
Page 512: ...Fig 18e Vacuum Advance Diagram V8 Engine...
Page 516: ...6 T 2 4 E M IS S IO N CONTROL SYSTEMS LIGHT DUTY TRUCK SERVICE MANUAL...
Page 528: ......
Page 590: ......
Page 593: ...CLUTCHES MANUAL TRANSMISSIONS 7M 3 LIGHT DUTY TRUCK SERVICE MANUAL...
Page 598: ...7M 8 CLUTCHES MANUAL TRANSMISSIONS LIGHT DUTY TRUCK SERVICE MANUAL...
Page 642: ......
Page 654: ......
Page 743: ...FUEL TANKS AND EXHAUST 8 13 LIGHT DUTY TRUCK SERVICE MANUAL...
Page 744: ...8 14 FUEL TANKS AND EXHAUST LIGHT DUTY TRUCK SERVICE MANUAL...
Page 760: ...8 30 FUEL TANKS AND EXHAUST Fig 40 Exhaust Pipe P Models LIGHT DUTY TRUCK SERVICE MANUAL...
Page 761: ...FUEL TANKS AND EXHAUST 8 31 LIGHT DUTY TRUCK SERVICE MANUAL...
Page 763: ...FUEL TANKS AND EXHAUST 8 33 LIGHT DUTY TRUCK SERVICE MANUAL...
Page 766: ......
Page 832: ...LIGHT DUTY TRUCK SERVICE MANUAL Fig 106 Power Steering Pump Mounting Typical 9 66 STEERING...
Page 833: ...PUMP ASSEMBLY STEERING GEAR TYPICAL SMALL V8 TYPICAL LARGE V8 STEERING 9 67...
Page 861: ...STEERING 9 95 Fig 134 Power Steering Pump Leakage LIGHT DUTY TRUCK SERVICE MANUAL...
Page 864: ......
Page 876: ......
Page 886: ...11 10 CHASSIS SHEET METAL LIGHT DUTY TRUCK SERVICE MANUAL...
Page 891: ...ELECTRICAL BODY AND CHASSIS 12 5 LIGHT DUTY TRUCK SERVICE MANUAL...
Page 934: ......
Page 942: ......
Page 970: ......
Page 972: ......
Page 974: ......
Page 976: ...V...
Page 978: ......
Page 979: ......


