background image

3491 Mission Oaks Blvd., Camarillo, CA 93011

Visit our Web site at http//www.harborfreight.com

Copyright


 2003 by Harbor Freight Tools

®

.  All rights reserved.  No portion of

this manual or any artwork contained herein may be reproduced in any shape
or form without the express written consent of Harbor Freight Tools.

For technical questions, please call 1-800-444-3353.

IMPACT WRENCH - 12 VOLT

MODEL 90672

®

ASSEMBLY AND OPERATING INSTRUCTIONS

90672.p65

11/20/03, 11:13 AM

1

Summary of Contents for 90672

Page 1: ...s All rights reserved No portion of this manual or any artwork contained herein may be reproduced in any shape or form without the express written consent of Harbor Freight Tools For technical questions please call 1 800 444 3353 IMPACT WRENCH 12 VOLT MODEL 90672 ASSEMBLY AND OPERATING INSTRUCTIONS 90672 p65 11 20 03 11 13 AM 1 ...

Page 2: ... replacement 2 Keep work area clean and dry Cluttered damp or wet work areas invite injuries 3 Keep children away from work area Do not allow children to handle this product 4 Store idle equipment When not in use tools and equipment should be stored in a dry location to inhibit rust Always lock up tools and equipment and keep out of reach of children SKU 90672 PAGE 2 Item Description Electrical Re...

Page 3: ...ate properly and perform its intended function Check for damaged parts and any other conditions that may affect the operation of this product Replace or repair damaged or worn parts immediately 12 Replacement parts and accessories When servicing use only identical replacement parts Only use accessories intended for use with this product Approved accessories are available from Harbor Freight Tools ...

Page 4: ...cidental electrical shock Keep the Impact Wrench dry at all times 23 Avoid eye injuries Always wear ANSI approved safety impact eye goggles when working with a vehicle battery which under certain circumstances can explode causing possible serious burns and injuries to the eyes 24 Avoid contact with battery acid If splashed immediately wash affected area with clean water Continue washing until medi...

Page 5: ... impart wrenches The motor will run to build inertia then will strike a blow of the hammer This is repeated becoming more rapid with decreased resistance This is normal operation for this product 3 If the vehicle s cigarette lighter fuse is below 15 amps you will need to use the vehicle s battery as an electric power source using the Battery Clamps 27 To do so attach the Red positive Clamp to the ...

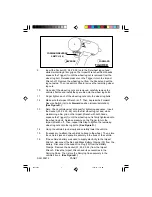
Page 6: ... wheel 7 If necessary remove the wheel s hubcap to expose the wheel lug nuts 8 Make sure the Impact Wrench is off Then depress the Forward Reverse Switch 16 to its Reverse position counterclockwise rotation See Figure D next page BLACK NEGATIVE CLAMP TO NEGATIVE BATTERY TERMINAL RED POSITIVE CLAMP TO POSITIVE BATTERY TERMINAL BATTERY CLAMPS 27 LEAD WIRE PLUG 19 FIGURE B LEAD WIRE PLUG 19 CIGARETTE...

Page 7: ... the Battery Clamps Remove the Socket 23 24 25 26 from the Impact Wrench Place the Impact Wrench and its accessories in the Carrying Case Then store the Carrying Case securely in the vehicle s trunk See Figure B R F REVERSE FORWARD FORWARD REVERSE SWITCH 16 FIGURE D 9 Insert the Socket 23 24 25 26 onto the first wheel lug nut and while maintaining a firm grip on the Impact Wrench with both hands s...

Page 8: ...RRANTY OF ANY KIND TO THE BUYER THAT HE OR SHE IS QUALIFIED TO MAKE ANY REPAIRS TO THE PRODUCT OR THAT HE OR SHE IS QUALIFIED TO REPLACE ANY PARTS OF THE PRODUCT IN FACT THE MANUFACTUER AND OR DISTRIBUTOR EXPRESSLY STATES THAT ALL REPAIRS AND PARTS REPLACE MENTS SHOULD BE UNDERTAKEN BY CERTIFIED AND LICENSED TECHNICIANS AND NOT BY THE BUYER THE BUYER ASSUMES ALL RISK AND LIABILITY ARIS ING OUT OF ...

Page 9: ...w 4 Output Spindle Bearing 21 Housing R 5 Ball Bearing 22 Nameplate 6 Steel Ball 23 Socket 11 16 7 Output Spindle 24 Socket 3 4 8 Bearing 25 Socket 13 16 9 Shift Pin 26 Socket 7 8 10 Shift Spindle 27 Battery Clamps 11 Clutch Return Spring 28 Label 12 Clutch Return Steel Ball 29 Carrying Case 13 Shift Block 14 Bearing 15 Motor 16 Forward Reverse Switch 17 Starting Switch PARTS LIST AND ASSEMBLY DIA...

Reviews: