background image

SKU 94987

 For technical questions please call 1-800-444-3353.

           Page 6

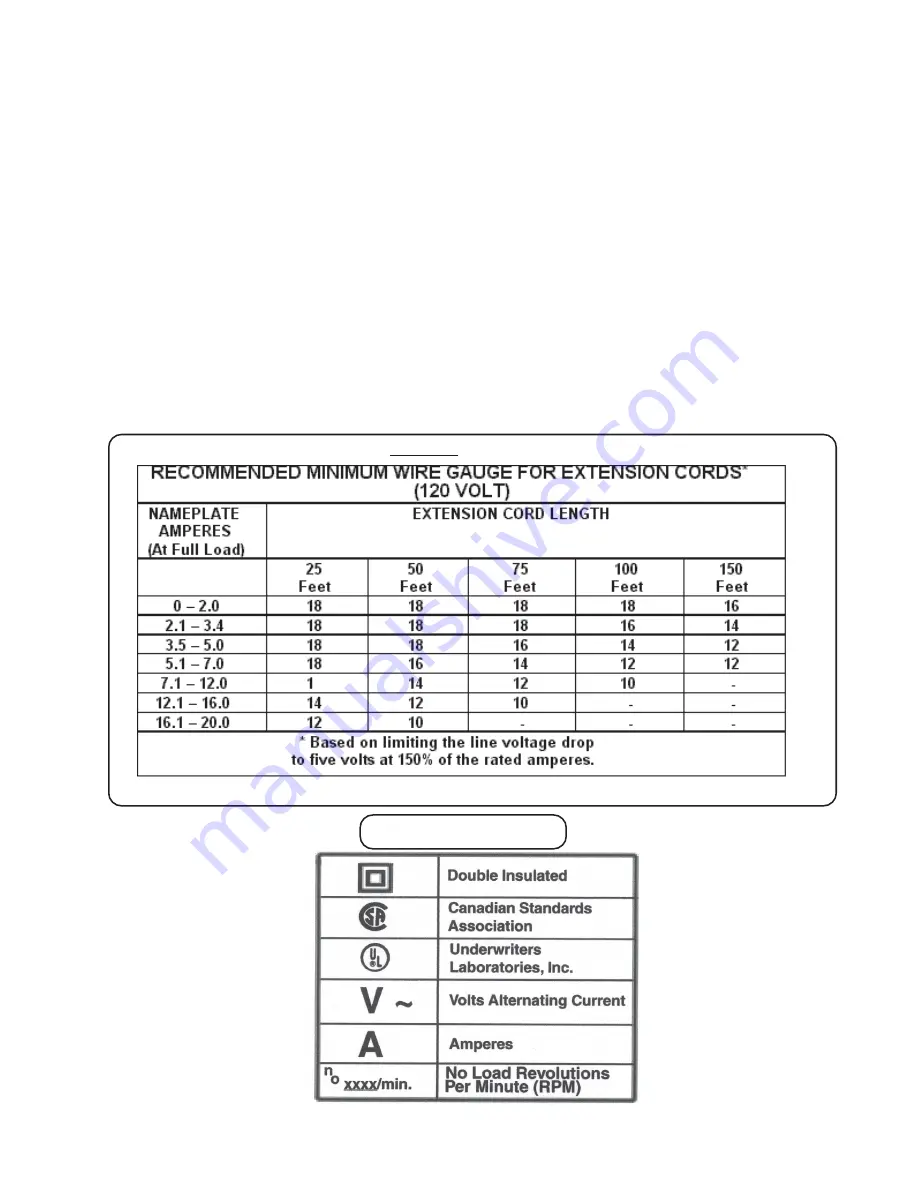
SYMBOLOGY

Figure C

5.

Avoid serious eye injury.  Do not look directly into the Lens when operating this
product.  Always wear ANSI-approved safety goggles when working with tools and
equipment.

6.

Do not touch the bulb at any time.  Oil from skin will drastically shorten the bulb’s life-span
if not cleaned (with rubbing alcohol) before use.  Handle with a soft, clean cloth instead.

7.

Turn off the Spotlight and allow it to completely cool down prior to performing any
inspection, maintenance, or cleaning on the unit.

Note: Performance of this tool (if powered by line voltage) may vary depending on variations in

local line voltage. Extension cord usage may also affect tool performance.

Warning: The warnings, cautions, and instructions discussed in this instruction manual
cannot cover all possible conditions and situations that may occur. It must be understood by
the operator that common sense and caution are factors which cannot be built into this
product, but must be supplied by the operator.

Summary of Contents for 94987

Page 1: ...No portion of this manual or any artwork contained herein may be reproduced in any shape or form without the express written consent of Harbor Freight Tools For technical questions and replacement pa...

Page 2: ...le battery 7Ah sealed lead acid Cord Length 6 Shoulder Strap Black Nylon 49 1 2 L X 1 1 8 X 0 044 Thick Weight 9 65 Lbs Bulb 35 W H7 6000K white HID Xenon bulb AC DC Adapter 120VAC 60Hz Input 13 8 VDC...

Page 3: ...ns Water entering a power tool will increase the risk of electric shock 7 Do not abuse the Power Cord Never use the Power Cord to carry the Spotlight or to pull the Plug from an outlet Keep the Power...

Page 4: ...cord and three prong grounding plug The plug must be connected to a properly grounded outlet If the Spotlight should electrically malfunction or break down grounding provides a low resistance path to...

Page 5: ...e each cord contains at least the minimum wire size required See Figure C 5 If you are using one extension cord for more than one tool add the nameplate amperes and use the sum to determine the requir...

Page 6: ...n cloth instead 7 Turn off the Spotlight and allow it to completely cool down prior to performing any inspection maintenance or cleaning on the unit Note Performance of this tool if powered by line vo...

Page 7: ...the side of the Spotlight see Figure 1 Plug into an electrical socket 2 Allow the Spotlight to charge for up to ten to twelve hours during initial charge 3 During charging the red LED will light up 4...

Page 8: ...s Light Bulb Clip 10 main wire Light Bulb 1 Figure 2 Figure 3 Lens Cover 11 Replacing the Battery 1 Unscrew and remove the Battery Cover 9 Pull out the Battery 2 as in Figure 4 2 Grasp and gently disc...

Page 9: ...over 1 10 Light Bulb Clip 1 11 Lens Cover 1 The Spotlight also has an adjustable Bracket 3 which can be set to provide various positions for shinging the Spotlight 1 2 4 6 Parts 7 and 8 not shown 5 3...

Page 10: ...E WARRANTIES OF MERCHANTABILITY AND FITNESS To take advantage of this warranty the product or part must be returned to us with transportation charges prepaid Proof of purchase date and an explanation...

Reviews: