background image

Page 4

SKU 95189

For technical questions, please call 1-800-444-3353.

Do not abuse the Power cords.  Never use a Power cord to carry tools or pull 

8. 

the Plug from the outlet.  Keep Power cords away from heat, oil, sharp edges, 

or moving parts.  Replace damaged Power cords immediately. 

 Damaged Power 

Cords increase the risk of electric Shock.

When operating a power tool outside, use an outdoor extension coard marked 

9. 

“W-A” or “W”.

  These extension cords are rated for outdoor use, and reduce the 

risk of electric shock.

PERSONAL SAFETY


Stay alert.  Watch what you are doing, and use common sense when operat-

10. 

ing a power tool.  Do not use a power tool while tired or under the influence 

of drugs, alcohol, or medication.

  A moment of inattention while operating power 

tools may result in serious personal injury.

Dress properly.  Do not wear loose clothing or jewelry.  contain long hair.   

11. 

Keep your hair, clothing, and gloves away from moving parts.

  Loose clothes, 

jewelry, or long hair can be caught in moving parts.

Avoid accidental starting.  Make sure the Power Switch is in its “OFF” posi-

12. 

tion, and disconnect the Spark Plug Wire when not in use.
Remove  adjusting  keys  or  wrenches  before  turning  the  Generator  on.   

13. 

wrench or a key that is left attached to a rotating part of the machine may result in 

personal injury.

Do not overreach.  Keep proper footing and balance at all times.

14. 
15. 

use safety equipment.  Always wear eye protection. 

 Always wear ANSI 

approved safety impact goggles when using this product.  ANSI approved 

hearing protection must also be used.

Do not force the generator.  use the correct generator for you application. 

16. 


The correct generator will do the job better and safer at the rate for whick it is de-

signed.

Do not use the Generator if the Power Switch does not turn it on or off.  

17. 

Any 

generator that cannot be controlled with the Power Switch is dangerous and must 

be replaced.

Make sure the Power Switch is in its “OFF” position and disconnect the spark 

18. 

plug wire before making any adjustments, changing accessories, or storing 

7. 


Do not expose power tools to rain or wet conditions.

  Water entering a


  generator will increase the risk of electric shock.

GENERATOR uSE AND cARE

Summary of Contents for 95189

Page 1: ...hts reserved No portion of this manual or any artwork contained herein may be reproduced in any shape or form without the express written consent of Harbor Freight Tools Diagrams within this manual may not be drawn proportionally Due to continuing improvements actual product may differ slightly from the product described herein Tools required for assembly and service may not be included For techni...

Page 2: ... 15 Liters Estimated Run Time 11 8 Continuous Running Hours at Half Loading Weight 91 5 lbs This product requires oil and fuel to be added before starting Attempting to start the engine without oil WILL ruin the engine and void the warranty The Emission Control System for this generator s engine is warranted for standards set by the U S Environmental Protection Agency and by the California Air Res...

Page 3: ... as needed ELECTRICAL SAFETY Grounded tools must be plugged into an outlet properly installed and grounded 4 in accordance with all codes and ordinances Never remove the grounding prong or modify the plug in any way Do not use any adapter plugs Check with a qualified electrician if you are in doubt as to whether the outlet is properly grounded If the tools should electrically malfunction or break ...

Page 4: ...rts Avoid accidental starting Make sure the Power Switch is in its OFF posi 12 tion and disconnect the Spark Plug Wire when not in use Remove adjusting keys or wrenches before turning the Generator on 13 A wrench or a key that is left attached to a rotating part of the machine may result in personal injury Do not overreach Keep proper footing and balance at all times 14 15 Use safety equipment Alw...

Page 5: ...erated on approved inverter type generators or pure sine wave generators When the plugged in product operates abnormally or unusually slow immediately stop using the generator as a power source Always read and adhere to the instruction manual of the product to be powered to make sure that it can be safely and efficiently powered by a portable generator Note When using a generator to provide home s...

Page 6: ...overloading will open the circuit breaker Exceeding the time limit for 27 maximum power operation or slightly overloading the generator may not switch the circuit breaker or circuit protector OFF but will shorten the service life of the generator Always keep fuel tank capped even when empty to prevent rainwater dirt and 28 debris from getting into the fuel tank Maintain labels and nameplates on th...

Page 7: ... well ventilated outdoor areas Carbon monoxide fumes are a colorless odorless gas that if inhaled can cause serious injury or death Pipes and silencer should not use any flammable materials nor should they be installed near the same Generator exhaust fumes must within legal limits If the generator is installed outdoors it must be weatherproofed and should 5 be sound proofed It should not be run ou...

Page 8: ...r store fuel or other flammable materials near the Generator 4 Do not smoke or allow sparks flames or other sources of ignition around 5 the Generator Keep grounded conductive objects such as tools away from exposed live 6 electrical parts and connections to avoid sparking or arcing These events could ignite fumes or vapors Do not refill the Fuel Tank while the Engine is running or while the Engin...

Page 9: ...erate the Generator with safety guards removed 4 While the Genera tor is running do not attempt to reach around the safety guards for maintenance or any other reason Keep hands arms long hair loose clothing and jewelry away from oving parts 5 Be aware that when engine parts are moving fast they cannot be seen clearly Keep access doors on enclosures closed and locked when access is not 6 required W...

Page 10: ... is used make sure to use only UL listed 3 cords having the correct gauge and length See TABLE A Do not attempt to connect or disconnect load connections while standing in 4 water or on wet or soggy ground Do not touch electrically energized parts of the Generator and interconnect 5 ing cables or conductors with any part of the body or with any non insulated conductive object Connect the Generator...

Page 11: ... building and electrical codes before installing this unit Installation must be completed by licensed contractors WARNING 3 The Generator weighs 91 5 pounds Use care and the proper lifting or hoisting equipment when moving it to the installation location Always connect hoist lines to the Frame 41B1 of the Generator GENERAL LOCATIONS It is recommended to locate the Generator outdoors only where coo...

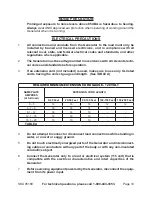
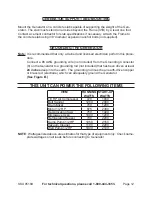
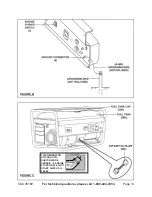
Page 12: ...ding wire not included from the Grounding Connector 8 on the Generator to a grounding rod not included that has been driven at least 24 inches deep into the earth The grounding rod must be an earth driven copper or brass rod electrode which can adequately ground the Generator See Figure B THIS UNIT CAN POWER THE FOLLOWING ITEMS ITEM RUNNING WATTS START UP WATTS 1 3 HP Air Compressor 720 1000 Belt ...

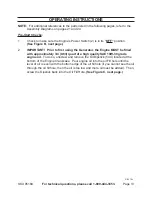
Page 13: ...T Prior to first using the Generator the Engine MUST be filled 2 with approximately 3 4 0 63 quart of a high quality SAE 10W 30 grade engine oil To do so unscrew and remove the Oil Dipstick 54C located at the bottom of the Engine Crankcase Pour engine oil into the oil Fill hole until the level of oil is even with the bottom edge of the oil fill hole if you cannot see the oil through the oil fill h...

Page 14: ...Page 14 SKU 95189 For technical questions please call 1 800 444 3353 REV 09h THIS GENERATOR HAS AN AUTO SHUTDOWN OIL SENSOR IF ENGINE STOPS OR WILL NOT START CHECK OIL LEVEL ...

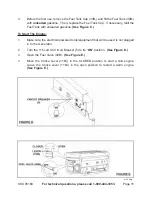
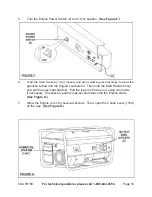
Page 15: ... with unleaded gasoline See Figure C To Start The Engine Make sure the electrical powered tools equipment that will be used is not plugged 1 in to the Generator Turn the 115 volt AC Circuit Breaker 5 to its 2 ON position See Figure D Open the Fuel Valve 40B 3 See Figure E Move the Choke Lever 116C to the CLOSED position to start a cold engine 4 Leave the Choke Lever 116C in the open position to re...

Page 16: ...owing several times to allow the 6 gasoline to flow into the Engine s carburetor Then hold the Start Handle firmly and pull the rope hard and fast Pull the rope all the way out using two hands if necessary If necessary pull the tope several times until the Engine starts See Figure G Allow the Engine to run for several seconds Then open the Choke Lever 116C 7 all the way See Figure E ...

Page 17: ...ls and equipment See Figure D When finished using the Generator turn the Engine Power Switch 2 to its 4 OFF position Turn the Fuel Valve 40B to its OFF position Then disconnect all electrical powered tools and equipment from the Generator s 115 volt AC Duel Outlets 6 See Figure E F G After the Engine and Generator have completely cooled store the Generator in a 5 safe clean dry location if not alr...

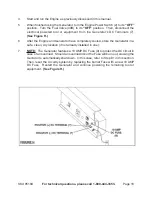
Page 18: ...e Figure H After the Engine and Generator have completely cooled store the Generator in a 6 safe clean dry location if not already installed in one NOTE 7 The Generator features a 10 AMP DC Fuse 9 to protect the DC circuit in case of an overload Should an overload occur the Fuse will burn out causing the Genrator to automatically shut down In this case refer to Step 1 in this section Then reset th...

Page 19: ...s have the problem corrected before further use Do not use damaged equipment Follow all maintenance procedures as outlined in the 3 Engine Maintenance Schedule below at the specified intervals In addition observe the following details Before each use check to make sure the Engine s oil level is adequate If necessary fill the Engine s Crankcase until the oil level is even with the Oil Fill Hole Bef...

Page 20: ... x 30 4 37 Spacer 4 38 Rub Washer 4 39 Bush 4 40B Fuel Valve 1 41B1 Frame 1 42 Switch Box Cover 1 43B1 Engine 1 44 Carbon Brush 1 NOTE Some parts are listed and shown for illustration purposes only and are not available individually as replacement parts PLEASE READ THE FOLLOWING CAREFULLY The manufacturer and or distributor has provided the parts list and assembly diagram in this manual as a refer...

Page 21: ...Page 21 SKU 95189 For technical questions please call 1 800 444 3353 ASSEMBLY DIAGRAM ...

Page 22: ...ir Cleaner 1 39C Seal Air Cleaner 1 40C Bolt Winker Serring 4 41C Nut Flange 6MM 4 42C Bolt Flange 6x10 2 Part Description Qty 43C Muffler Comp 1 44C Bolt Flange 1 45C Stay Muffler A 1 46C Carbon Canister 1 47C Bolt Flange 1 48C Pipe Exhaust 1 49C Bolt Flange 2 50C Gasket Exhaust Pipe 1 51C Nut Exhaust Pipe 2 52C Cover Assy Crankcase 1 53C Packing Case Cover 1 54C Cap Assy Oil Filler 1 55C Cap Ass...

Page 23: ...omp 1 92C Fan Cooling 1 93C1 Pulley Starter 1 94C Nut Special 1 95C Coil Assy Ignition 1 96C Bolt Flange 2 97C1 Cover Comp Fan 1 98C1 Plate Side STD 1 99C1 Shroud Comp 1 100C Fuel Tube A 1 101C Fuel Tube B 1 102C Wire Stop Switch 1 103C Bolt Flange 6x12 6 104C Bolt Flange 6x16 1 105C Screw Setting 1 106C Guide Ratchet 1 107C Spring Friction 1 108C Ratchet Starter 2 109C Spring Ratchet 2 110C Reel ...

Page 24: ...5189 For technical questions please call 1 800 444 3353 ASSEMBLY DIAGRAM continued NOTE Some parts are listed and shown for illustration purposes only and are not available individually as replacement parts Rev 10d ...

Page 25: ...r unapproved modifications You are responsible for shipping your engine to a HFT warranty station as soon as a problem exists Contact the HFT Customer Service department at the number below to make shipping arrangements The warranty repairs should be completed in a reasonable amount of time not to exceed 30 days If you have any questions regarding your warranty rights and responsibilities you shou...

Page 26: ...anted part unless performed by an authorized warranty center c failure to follow recommendations on fuel use contained in the Owner s Manual d improper or inadequate maintenance of any war ranted parts e repairs performed outside of the authorized war ranty service dealers f alterations by changing adding to or removing parts from the engine 5 Service and Maintenance Component parts which are not ...

Reviews: