5.
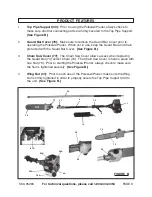
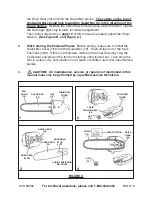
Bottom Pipe Support (2): Always hold the Polesaw/Pruner firmly with both
hands. Keep your left hand on the front portion of the Bottom Pipe Support and
your right hand on the rear portion of the Bottom Pipe Support, so that your
body is to the left of the chain line. Never use a left-handed (cross-handed) grip
or any stance which would place your body or arm across the chain line.
(See Figure B.)
11.
Saw Chain (74): To avoid possible injury, never touch or adjust the Chain while
the Engine (1) is running. The Chain is very sharp. Always wear heavy duty
work gloves when performing maintenance to the Chain. Adjust the Chain
tension only when the Chain is cold. Chain tensioning while warm may be too
tight upon cooling. IMPORTANT: The cutters on the top of the Guard Bar
should face toward the Guard Bar tip, in the direction of the chain rotation.
(See Figure B.)
10.
Chain Tension Adjusting Screw (39): The Chain (74) is properly tensioned
when there is no slack on the underside of the Guard Bar (73). The Chain
should be snug, but should turn by hand without binding. To adjust the tension of
the Chain, turn off the Engine (1). Slightly loosen the Nut (75) on the Chain Saw
Cover (77). Remove all slack from the Chain by turning the Chain Tension
Adjusting Screw clockwise, making sure the Chain seats into the Bar Guard
groove during tensioning. Lift the tip of the Bar Guard up to check for sag.
Release the tip of the Bar Guard, and turn the Chain Tensioning Screw 1/2 turn
clockwise. Repeat this process
until sag does not exist. Then, retighten the
Nut. NOTE: If the Chain is too tight, it will not rotate. Loosen the Nut slightly and
turn the Chain Tension Adjusting Screw 1/4 turn counterclockwise. Lift the tip of
the Bar Guard up to check for proper tension. Then retighten the Nut.
(See Figure B.)
SKU 95283 For technical questions, please call 1-800-444-3353 PAGE 10
6.
Power Switch (10)/Throttle Lever (8): The Power Switch is a simple “ON”/
OFF” rocker type switch. Squeezing the Throttle Lever controls the speed at
which the tool runs. (See Figure B.)
7.
Engine Assembly: The Polesaw/Pruner features a 1 Horsepower, 26cc,
single cylinder, 2-stroke Engine. Do not attempt to start or run the Engine with
out adding the proper 50:1 ratio of fuel and 2-cycle oil in the Engine’s Fuel Tank
(78A). When in use, use caution to avoid touching the hot parts of the Engine.
(See Figure B, and refer to the
“Pre-Start Instructions” section of this
manual.)
8.
Shoulder Harness (14): Always wear the Shoulder Harness for increased
safety and to support the Polesaw/Pruner. (See Figure B.)
9.
Primer (87A): The Engine (1),
when cold, must be primed with fuel prior to
to starting the unit. To do so, simply press inward on the Primer three to four
times with your index finger. Then, proceed with starting the unit.
(See Figure B.)


