background image

6.

DRESS SAFELY.  Non-skid footwear or safety shoes should be used when
working with this product.  Do not wear loose clothing or jewelry as they can
become caught in moving parts.  Wear a protective hair covering to prevent long
hair from becoming caught in moving parts.  If wearing a long-sleeve shirt, roll
sleeves up above elbows.

7.

INDUSTRIAL APPLICATIONS MUST FOLLOW OSHA REQUIREMENTS.

8.

DO NOT OVERREACH.  Keep proper footing and balance at all times to prevent
tripping, falling, back injury, etcetera.

9.

STAY ALERT.  Watch what you are doing at all times.  Use common sense.  Do
not use this product when you are tired or distracted from the job at hand.

10.

CHECK FOR DAMAGED PARTS.  Before using this product, carefully check that
it will operate properly and perform its intended function.  Check for damaged
parts and any other conditions that may affect the operation of this product.
Replace or repair damaged or worn parts immediately.

11.

REPLACEMENT PARTS AND ACCESSORIES.  When servicing, use only
identical replacement parts.  Only use accessories intended for use with this
product.  Approved accessories are available from Harbor Freight Tools.

12.

MAINTAIN THIS  PRODUCT WITH  CARE.    Keep this tool clean and dry for better
and safer performance.

13.

MAINTENANCE:  For your safety, service and maintenance should be performed
regularly by a qualified technician.

14.

USE THE RIGHT PRODUCT FOR THE RIGHT JOB.  There are certain
applications for which this product was designed.  Do not use small equipment,
tools or attachments  to do the work of larger industrial equipment, tools or
attachments.  Do not use this product for a purpose for which it was not intended.

SPECIFIC PRODUCT WARNINGS AND PRECAUTIONS

1.

MAKE SURE THE POWER SWITCH (part #33) IS IN THE “OFF” POSITION
BEFORE PLUGGING IN THE POWER CORD (part #36).

2.

DO NOT ABUSE THE POWER CORD.  Do not use the Power Cord (part #36) to
pull the Plug from a power outlet.  Keep Power Cord away from heat, oil, sharp
edges, and moving parts.  Replace a damaged Power Cord immediately.  Route
the Power Cord safely.  Protect it from being damaged by other equipment in the
work area.  Do not route the Power Cord where it can be walked on or tripped
over.

SKU 46507

PAGE 3

Summary of Contents for CHICAGO 46507

Page 1: ...t our Web site at http www harborfreight com Copyright 2001 by Harbor Freight Tools All rights reserved No portion of this manual or any artwork contained herein may be reproduced in any shape or form...

Page 2: ...equipment and keep out of reach of children 4 DO NOT USE THIS PRODUCT IF UNDER THE INFLUENCE OF ALCOHOL OR DRUGS Read warning labels on prescriptions to determine if your judgment or reflexes are imp...

Page 3: ...y identical replacement parts Only use accessories intended for use with this product Approved accessories are available from Harbor Freight Tools 12 MAINTAIN THIS PRODUCT WITH CARE Keep this tool cle...

Page 4: ...PMENT This Polisher Sander will do the work better and safer at the speed and capacity for which it was designed 6 REMOVE ALL ADJUSTING WRENCHES FROM THE POLISHER SANDER BEFORE TURNING IT ON 7 AVOID U...

Page 5: ...by power sanding sawing grinding drilling and other construction activities contain chemicals known to the State of California to cause cancer birth defects or other reproductive harm Some examples of...

Page 6: ...Adaptor part 1 onto the Spindle See Figures B C and Assy Diagram 4 Then use the Spanner part 43 provided to keep the Adaptor part 1 from turning and firmly hand tighten the Wool Compounding Bonnet on...

Page 7: ...y Diagram 3 Firmly hand tighten the threaded portion of the Side Handle part 20 into the desired mounting hole of the Polisher Sander See Figure C and Assy Dia gram MOUNTING HOLE BRAKE PIN 18 MOUNTING...

Page 8: ...Rubber Backing Plate 46 onto the threaded end of the Spindle 3 until it is snug See diagram below 4 Ahere Sandpaper Disc not included evenly across the Rubber Backing Plate The Rubber Backing Plate h...

Page 9: ...eds from 1 000 RPM to up to 3 000 RPM depending on the material of the workpiece To change speeds make sure the Polisher Sander is off Then select the desired speed using the Variable Switch part 31 S...

Page 10: ...e Brush Caps See Figures B C and Assy Diagram 4 Do not use solvents to wipe off the Polisher Sander as damage may result If necessary wipe with a damp cloth You may use a mild detergent 5 Do not intro...

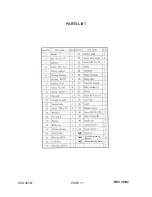
Page 11: ...SKU 46507 PAGE 11 PARTS LIST 1 Adaptor Rubber Backing Plate Wool Compounding Bonnet REV 09 02...

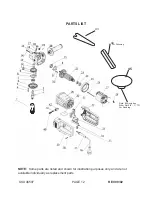
Page 12: ...me parts are listed and shown for illustration purposes only and are not available individually as replacement parts SKU 46507 PAGE 12 45 Note 45 includes Arbor Nut 5 8 11 TPI For Sanding 44 REV 09 02...

Reviews: