background image

SKU 93853        

 For technical questions, please call 1-800-444-3353 

PAGE 19

LIMITED 1 YEAR / 90 DAY WARRANTY

Harbor Freight Tools Co. makes every effort to assure that its products meet high 

quality and durability standards, and warrants to the original purchaser that for a period 

of ninety days from date of purchase that the engine/motor, the belts (if so equipped), 

and the blades (if so equipped) are free of defects in materials and workmanship. Harbor 

Freight Tools also warrants to the original purchaser, for a period of one year from date 

of purchase, that all other parts and components of the product are free from defects in 

materials and workmanship (90 days if used by a professional contractor or if used as rental 

equipment).  This warranty does not apply to damage due directly or indirectly, to misuse, 

abuse, negligence or accidents, repairs or alterations outside our facilities, normal wear and 

tear, or to lack of maintenance. We shall in no event be liable for death, injuries to persons 

or property, or for incidental, contingent, special or consequential damages arising from 

the use of our product. Some states do not allow the exclusion or limitation of incidental or 

consequential damages, so the above limitation of exclusion may not apply to you.  THIS 

WARRANTY IS EXPRESSLY IN LIEU OF ALL OTHER WARRANTIES, EXPRESS OR 

IMPLIED, INCLUDING THE WARRANTIES OF MERCHANTABILITY AND FITNESS.

To take advantage of this warranty, the product or part must be returned to us with 

transportation charges prepaid. Proof of purchase date and an explanation of the complaint 

must  accompany  the  merchandise.  If  our  inspection  verifies  the  defect,  we  will  either 

repair or replace the product at our election or we may elect to refund the purchase price 

if we cannot readily and quickly provide you with a replacement. We will return repaired 

products at our expense, but if we determine there is no defect, or that the defect resulted 

from causes not within the scope of our warranty, then you must bear the cost of returning 

the product.

This warranty gives you specific legal rights and you may also have other rights 

which vary from state to state.

3491 Mission Oaks Blvd.  •  PO Box 6009  •  Camarillo, CA 93011  •  (800) 444-3353

Summary of Contents for DEMOLITION HAMMER 93853

Page 1: ...erved No portion of this manual or any artwork contained herein may be reproduced in any shape or form without the express written consent of Harbor Freight Tools Diagrams within this manual may not be drawn proportionally Due to continuing improve ments actual product may differ slightly from the product described herein Tools required for assembly and service may not be included For technical qu...

Page 2: ...ntenance and cleaning procedures parts list and assembly diagram Keep your invoice with this manual Write the invoice number on the inside of the front cover Keep this manual and invoice in a safe and dry place for future reference GENERAL SAFETY RULES WARNING Read all instructions Failure to follow all instructions listed below may result in electric shock fire and or serious injury The term powe...

Page 3: ...rigerators There is an increased risk of electric shock if your body is grounded Do not expose power tools to rain or wet conditions 4 Water entering a power tool will increase the risk of electric shock Do not abuse the Power Cord 5 Never use the Power Cord to carry the tools or pull the Plug from an outlet Keep the Power Cord away from heat oil sharp edges or moving parts Replace damaged Power C...

Page 4: ...t use the power tool if the Power Switch does not turn it on or off 3 Any tool that cannot be controlled with the Power Switch is dangerous and must be replaced Disconnect the Power Cord Plug from the power source before making any 4 adjustments changing accessories or storing the tool Such preventive safety measures reduce the risk of starting the tool accidentally Store idle tools out of reach o...

Page 5: ...nment 3 Keep the work area well lit Make sure there is adequate surrounding workspace Always keep the work area free of obstructions grease oil trash and other debris Do not use a power tool in areas near flammable chemicals dusts and vapors Do not use this product in a damp or wet location Avoid unintentional starting 4 Make sure you are prepared to begin work before turning on the Demolition Ham...

Page 6: ... avoid contact with skin and use proper protective gloves when grasping the Chisel Do not force the Chisel into the workpiece when cutting 17 Apply moderate pressure allowing the Chisel to cut without being forced Never attempt to remove material stuck in the moving parts of the 18 Demolition Hammer while it is plugged in and running Always unplug the Demolition Hammer from its electrical outlet b...

Page 7: ...cemakers should consult their physician s before use 24 Electromagnetic fields in close proximity to heart pacemaker could cause pacemaker interference or pacemaker failure In addition people with pacemakers should Avoid operating alone Don t use with power switch locked on Properly maintain and inspect to avoid electrical shock Any power cord must be properly grounded Ground Fault Circuit Interru...

Page 8: ... nervous system disorders diabetes or Raynaud s Disease should not use this tool If you feel any medical or physical symptoms related to vibration such as tingling numbness and white or blue fingers seek medical advice as soon as possible Do not smoke during use Nicotine reduces the blood supply to the hands and 2 fingers increasing the risk of vibration related injury Wear suitable gloves to redu...

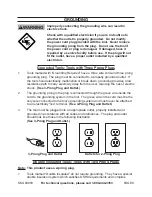
Page 9: ...alfunction or break down grounding provides a low resistance path to carry electricity away from the user reducing the risk of electric shock See 3 Prong Plug and Outlet The grounding prong in the plug is connected through the green wire inside the 2 cord to the grounding system in the tool The green wire in the cord must be the only wire connected to the tool s grounding system and must never be ...

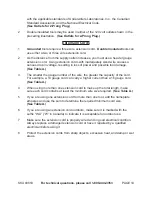
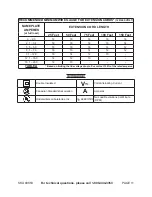
Page 10: ...ble tool damage See Table A The smaller the gauge number of the wire the greater the capacity of the cord 3 For example a 14 gauge cord can carry a higher current than a 16 gauge cord See Table A When using more than one extension cord to make up the total length make 4 sure each cord contains at least the minimum wire size required See Table A If you are using one extension cord for more than one...

Page 11: ...t 150 Feet 0 2 0 18 18 18 18 16 2 1 3 4 18 18 18 16 14 3 5 5 0 18 18 16 14 12 5 1 7 0 18 16 14 12 12 7 1 12 0 18 14 12 10 12 1 16 0 14 12 10 16 1 20 0 12 10 TABLE A Based on limiting the line voltage drop to five volts at 150 of the rated amperes Symbology Double Insulated V Volts Alternating Current Canadian Standards Association A Amperes Underwriters Laboratories Inc n0 xxxx min No Load Revolut...

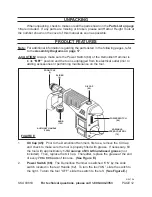
Page 12: ...its electrical outlet prior to adding accessories or performing maintenance on the tool OIL CAP 45 SLIDER 4 FRONT CAP 1 KNOB 105 AUXILIARY HANDLE 104A POWER SWITCH 66 VARIABLE SPEED CONTROL 72 FIGURE E 1 Oil Cap 45 Prior to the Demolition Hammer s first use remove the Oil Cap and check to make sure the tool is properly filled with grease If necessary fill the tool with approximately 1 1 4 ounces o...

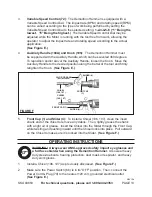
Page 13: ...sired position along the barrel of the tool and firmly retighten the Knob See Figure E FIGURE F SLIDER 4 FRONT CAP 1 OIL OR GREASE NOT INCLUDED CHISEL 106 107 CHISEL 106 107 SLIDER 4 FRONT CAP 1 5 Front Cap 1 and Slider 4 To install a Chisel 106 107 clean the insert shank end of the chisel to remove any debris Then lightly grease the shank with a light oil or grease Insert the Chisel into the Slid...

Page 14: ...he locking 8 Slider 4 backward and pull the Chisel forward The Chisel should be cleaned after removing See Figure F Make sure to store the Demolition Hammer in a clean dry safe location out of 9 reach of children and other unauthorized people INSPECTION MAINTENANCE AND CLEANING CAUTION Always make sure the Power Switch 66 of the Demolition Hammer is in its OFF position and the tool is unplugged fr...

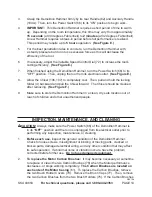
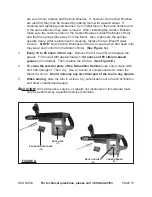
Page 15: ...c or spark when first used until they wear and conform to the Motor s Rotor See Figure G Every 70 to 80 hours of tool use 3 Remove the Oil Cap 45 and replace the grease Fill the tool with approximately 1 1 4 ounces of 3 Lithium based grease not included Then replace the Oil Cap See Figure E To clean the exterior parts of the Demolition Hammer 4 use only a clean cloth and mild detergent Then dry Us...

Page 16: ... the type of work being 2 done See page 12 Apply moderate pressure only Allow the tool to do the cutting without 3 being forced Check the Motor Carbon Brushes for excessive wear and or debris 4 Replace or clean if necessary See page 14 Have a qualified service technician service the tool 5 Tool overheats and suddenly stops running Make sure the tool is filled with approximately 1 1 4 ounces of 3 1...

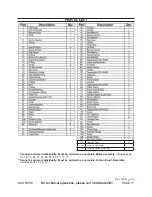
Page 17: ... ordered individually Must be ordered as a complete Motor Assembly Includes parts 33 34 35 36 37 40 58 59 60 61 73 74 Cannot be ordered individually Must be ordered as a complete Carbon Brush Assembly Includes parts 75 76 77 A 108 Clamping Piece 2 109 Complete Motor Assy 1 110 Complete Carbon Brush Assy 1 ...

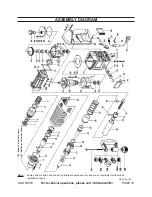
Page 18: ...e call 1 800 444 3353 PAGE 18 ASSEMBLY DIAGRAM REV 08g 10d Note Some parts are listed and shown for illustration purposes only and are not available individually as replacement parts 106 Spade Chisel not shown 107 Ball Point Chisel not shown ...

Page 19: ...y or for incidental contingent special or consequential damages arising from the use of our product Some states do not allow the exclusion or limitation of incidental or consequential damages so the above limitation of exclusion may not apply to you This warranty is expressly in lieu of all other warranties express or implied including the warranties of merchantability and fitness To take advantag...

Reviews: