background image

6

7

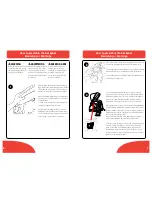
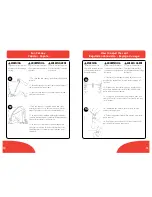
How to assemble the backpack

Ensamblaje • Montage

After removing the backpack from the packag-
ing, assemble the various components as follows:
1. Raise the sun canopy to a vertical position, in 
order not to hinder the subsequent operations.

Una vez extraída la mochila de su embalaje, 
proceder con el ensamblaje de los distintos 
componentes:
1. Levantar la capota en vertical para que no 
estorbe las operaciones sucesivas.

Une fois le porte-bébé extrait de son em-
ballage, monter les différents composants:
1. Lever la capote en position verticale pour 
ne pas gêner les opérations suivantes


WARNING

Before use, remove and dispose 
of all plastic bags and packag-
ing materials and keep them 
out of reach of children.


ADVERTENCIA

Antes del uso quitar y eliminar 
las bolsas de plástico y todos 
los elementos que formen 
parte de la caja del producto y 
mantenerlos fuera del alcance 
de los niños


MISE EN GARDE

Avant l’emploi, enlever et 
éliminer tous les sacs en 
plastique et éléments faisant 
partie de l’emballage du 
produit et les garder hors de 
portée des enfants.

2. Raise the bumper bar to the horizontal position, until a click 
is heard, indicating that the frame is locked into position.

2. Levantar el protector delantero en posición horizontal 
hasta escuchar el clic de bloqueo con la estructura.

2. Lever l’arceau en position horizontale jusqu’au déclic 
de blocage à la structure

1

3. To ensure that the bumper bar is locked correctly 
into position, check, on both sides, that the black part 
of the bumper bar is perfectly in contact with frame’s 
joint (see picture). Push gently the bumper bar in a 
downward direction to ensure it is locked correctly.

3. Asegurarse que el protector delantero haya quedado 
perfectamente bloqueado; para más seguridad contro-
lar sobre ambos lados que la parte negra del mismo se 
encuentre en perfecto contacto con la articulación de 
la estructura (ver ilustración).
Ejercer una leve presión hacia abajo sobre el mismo 
para comprobar que haya quedado bien firme.

3. S’assurer que l’arceau est correctement bloqué; pour 
en être certain, contrôler des deux côtés si la partie 
noire de l’arceau est parfaitement en contact avec 
l’articulation de la structure (cf. photo). Exercer une lé-
gère pression vers le bas sur l’arceau pour être certains 
qu’il est correctement bloqué

How to assemble the backpack

Ensamblaje • Montage

3

2

Summary of Contents for 04069503590070 - Smart Support Backpack Child Carrier

Page 1: ......

Page 2: ...oidinjurytoyourchild sfeet Donotusethebackpackifanycomponentsaremissing ordamaged Donotfitanyaccessories sparepartsorcomponentsnot suppliedorapprovedbythemanufacturertothebackpack Ifthebackpackisleftexposedtodirectsunlightforalong time allowittocoolbeforeplacingyourchildinit Prolonged exposuretodirectsunlightmaycausethefabrictofade Preventthebackpackfromcomingintocontactwithsalt water Itmaycauseth...

Page 3: ...sérieuses blessures ou même la mort Pour la sécurité de votre enfant lisez les étiquettes et le manuel d utilisation avant l utilisation du produit Si vous n avez pas le manuel d utilisation composez le 1 877 424 4226 États Unis pour en recevoir un Nodejenuncaalbebésinvigilanciaenelinteriorde estamochila Asegúresedequelamochilaestéabiertaycorrectamente bloqueadaantesdeacomodaralniñoensuinterior ut...

Page 4: ...orizontal position until a click is heard indicating that the frame is locked into position 2 Levantar el protector delantero en posición horizontal hasta escuchar el clic de bloqueo con la estructura 2 Lever l arceau en position horizontale jusqu au déclic de blocage à la structure 1 3 To ensure that the bumper bar is locked correctly into position check on both sides that the black part of the b...

Page 5: ... el montaje de la mochila 6 Nous conseillons de fermer la jambe quand on utilise le porte bébé en le portant sur les épaules Pousser la jambe jusqu à ce qu elle soit complètement fermée La jambe se bloque automatiquement en fin de course On peut maintenant achever le montage du portebébé 4 5 6 5 To open rear leg of the backpack pull the leg toward the rear of the backpack The leg will lock automat...

Page 6: ...dans les trous externes et en tirant le dossier vers le haut WARNING Thesuncanopycannotbe removed butitcanbeturned backwardscompletely Before turningthesuncanopyback wards removethesupports ofthesecondarchtofreethe canopy ADVERTENCIA Lacapotanosepuede quitarperosepuederecoger completamentehaciaatrás Quitarprimerolossoportes delsegundotensordejandola capotalibre MISE EN GARDE Lacapoten estpasdétach...

Page 7: ... The sun canopy is supplied with a rain cover Attach the rain cover to the sun canopy with the zipper The rain cover has side ventilation holes 12 La capota tiene también un impermeable que se aplica mediante una cremallera El impermeabile tiene orificios laterales de aireación 12 La capote est fournie avec un habillage pluie à fixer sur la capote à l aide de la fermeture éclair L habillage pluie ...

Page 8: ...del bebé 15 Le porte bébé est muni d un mini réducteur interne qui permet le plus grand confort au bébé The backpack has a 5 point safety harness which should be adjusted to fit the child securely shoulder straps lap belt and crotch strap 16 Place the child into the backpack and secure child with the safety harness The height of the safety harness can be adjusted to two positions La mochila tiene ...

Page 9: ...19 Leporte bébéestminid unporte mobile lunettesàaccrocher auxépaulières ouvrirlabandesurlesépaulières droiteougauche au choix puisl enfilersurl arrièreduporte téléphone 20 Fixerlabandeàl aideduvelcroprévuàceteffet CARRYBAG 21 Thecarrybagcanbeusedasawaistbeltbag 22 Tohookthebagtothebackpack foldandfastenthestrapsatthe rearofthebag asshowninthediagram BOLSO RIÑONERAPORTAOBJETOS 21 Lamochilatieneunbo...

Page 10: ...sition sur le produit Nettoyer périodiquement les parties en plastique avec un chiffon hu mide Sécher les parties en métal pour éviter la formation de rouille Contrôler périodiquement l état des coutures des épaulières et du siège Cleaning Consejos para el mantenimiento Conseils pour l entretien Ifyouhaveanyquestionsorcommentsaboutthisproduct oraremissinganyof theparts pleasecontactusinoneofthefol...

Page 11: ...www chiccousa com COMO ITALY 6 36 ...

Reviews: