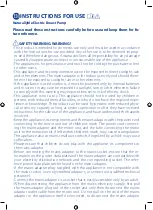
background image

19

INTENDED USE AND INDICATIONS FOR THE ELEC-

TRIC BREAST PUMP 

The Chicco NaturallyMe electric breast pump is intended 
for extracting breast milk.

THE BREAST PUMP AND BREASTFEEDING

Breastfeeding is a very important stage in a baby’s and in 
a mother’s life. For babies, latching on and sucking means 
not only satisfying a primary physiological need, but also, 
and more importantly, a precious moment in their relation-
ship with their mothers, full of emotions and tactile, audi-
tory,  taste,  and  olfactory  sensations.  Satisfying  this  need 
gives a great feeling of tranquillity and well-being to both 
the mother and her child. Breast milk contains all the nutri-
ents required to meet infants’ nutritional and psychological 
needs at least for the first 6 months of their lives.
Chicco’s electric breast pump helps extend breastfeeding, 
in the event of excess milk or when you cannot always be 
with your baby. In such cases you can extract milk, store it, 
and give it to baby when required.
To guarantee the greatest flexibility and convenience, the 
electric  breast  pump  operates  both  with  AA  size  1.5V  al-
kaline  batteries  (not  supplied)  and  with  a  special  mains 
adaptor (model LXCP12A - 006100DEH, manufactured by: 
Shenzhen Longxc Power Supply Co. , LTD).
•  Product features might be subjected to change without 

notice.

•  If you have any doubts on the contents of this instruction 

manual, please contact your retailer.
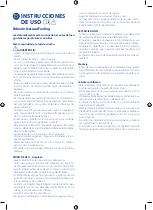
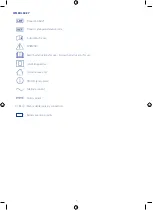
LIST OF COMPONENTS

1- Membrane
2- Membrane cover
3- Soft silicone cover
4- Pump body 
5- Valve
6- NF feeding bottle
7- 0m teat with cap and ring
8- Airtight cap
9- Base
10- Engine body
11- Display 
12- Battery compartment
13- On/off button
14- Button for increasing level of extraction/stimulation
15- Button for decreasing level of extraction/stimulation
16- Stimulation/extraction button
17- Silicone tube
18- Power supply
19- Appliance power cable connector
20- Battery level indicator
21- -Extraction/stimulation level indicator
22- Timer
23- Stimulation indicator
24- Extraction indicator

PREPARATION

•   Before  using  the  Breast  pump  for  the  first  time,  please 

clean all the components* thoroughly as shown in the“-

CLEANING

” paragraph.

•  Then assemble the breast pump as follows:
•  Push the valve (5) down into the circular duct in the base 

of the pump body (4). (Fig. 1)

NB: fit the valve preferably with the tab positioned inside 
the pump body.
•  Push the outer edge to prevent damaging the valve and 

make sure that both closing edges of the assembled valve 
are  joined  together.  If  not,  reposition  the  valve,  making 
sure that the two edges are correctly aligned.

•  For greater comfort, you can fit the silicone cover (3) onto 

the pump body (4). Insert the silicone cover well into the 
cone of the pump body, and seal it around the outer rim 
of the pump body (Fig.2). Press the pads of the cover to 
expel any air trapped inside.

•  Fit the membrane cover (2) onto the silicone membrane 

(1) and insert the membrane and cover (pre-assembled) 
onto the pump body (4) (Fig.3)

•  Screw  the  NaturalFeeling  feeding  bottle  (6)  onto  the 

threaded base of the pump body (4).(Fig.4)

•  Use the practical base to lay the assembled product on a 

flat surface (9) and improve its stability.

•  To use the breast pump with its mains adaptor (18), attach 

the connector (19) to the socket on the motor unit (10) 
and then insert the plug of the mains adapter to a wall 
socket. (Fig.5 )

•  To use the breast pump with alkaline batteries, open the 

cover of the battery compartment (12) and insert two AA 
size 1.5V batteries (not included) making sure you match 
the polarity markings. Close the compartment. The dura-
tion  of  the  alkaline  batteries  may  change  based  on  the 
used brand and their charge status.

•  WARNING:

 as a precaution, always remove the batteries 

from the engine body (10) if the breast pump is powered 
by the mains adapter (18) and/or if it is not used for a long 
time.

•  Connect the silicone tube (17) to the membrane cover (2) 

(Fig.6)

•  Insert the rigid connector on the silicone tube (17) into the 

slot provided on the motor body (10) (Fig.7)

•  Take care that you do not lose the connector, if it is lost you 

may not be able to use the appliance.

*Excluding the motor body (10) and mains adaptor (18) and 
the silicone tube (17).

USING THE BREAST PUMP

•  Before each use, sanitise all the components* with a cold 

sanitizing  method  using  sterilising  liquids  (following  the 
manufacturer's  instructions),  or  a  hot  one  (steam)  using 
specific devices, or by boiling them (5 minutes), and let-
ting  all  the  hot  sanitized  components  fully  cool  down 
before use.

•  Wash  your  hands  and  assemble  the  breast  pump  as 

shown in the 

PREPARATION

 paragraph.

•  The appliance is designed to operate only with the com-

ponents  supplied  in  the  original  packaging  and  with  a 
150-ml  feeding  bottle.  Use  with  other  components  or 
with feeding bottles with higher capacities may not guar-
antee the stated performance.

•  Cleanse your breast appropriately using water or one of 

the handy Chicco breast wipes.

•  In  order  to  facilitate  the  milk  flow,  you  can  take  a  hot 

shower or apply a warm cloth on your breast just before 
expressing milk or breastfeeding your child.

Summary of Contents for 06836M

Page 1: ...EXTRACTOR DE LECHE ELÉCTRICO ELECTRIC BREAST PUMP ...

Page 2: ...2 A 1 8 9 2 5 3 4 6 7 18 19 ...

Page 3: ...3 B C 10 17 14 12 11 16 15 13 20 24 22 23 21 ...

Page 4: ... capacidades físicas o sensoriales siem pre y cuando estén bajo supervisión o hayan recibido instrucciones en cuanto al uso seguro del aparato y comprendido los peligros inherentes al mismo Mantenga el aparato sus componentes y el adaptador de red con el cable co nexión al cuerpo del motor fuera del alcance de los niños Dejar al alcance de los niños el cable de alimentación que conecta el adaptado...

Page 5: ...n el producto modelo LXCP12A 006100DEH fabricante Shenzhen Longxc Power Supply Co LTD de lo contrario el aparato resultaría no conforme con las normas técnicas específicas pertinentes y su seguridad e integridad se verían comprometidas En caso de fallo del adaptador de red pón gase en contacto con el personal técnico cualificado No intente abrir ni reparar el aparato o el adaptador de red si están...

Page 6: ...equieran las leyes vigentes en el país en el que se ha vendido Si se decide no utilizar el aparato durante un período prolongado extraiga siem pre las pilas alcalinas El incumplimiento de esta advertencia puede dar lugar a salidas de ácidos con consiguientes daños y contaminación química del aparato Para evitar riesgos de incendio o de descarga eléctrica evite que el cable de conexión entre el ada...

Page 7: ...o de pér didas de líquido este o los elementos que estén cerca del mismo puedan sufrir daños Las pérdidas de líquido pueden contaminar químicamente partes desti nadas al contacto con alimentos En caso de pérdida de líquido de las pilas cámbielas de inmediato limpie el compartimento y lávese bien las manos en caso de contacto con el líquido Compruebe que el líquido que se haya salido no haya entrad...

Page 8: ...Instrucciones de uso ADVERTENCIA Lea las instrucciones de uso Siga las instrucciones de uso Aparato de Clase II Solo para uso en interiores ENCENDIDO APAGADO presión presión Corriente alterna Corriente continua Polaridad de conexión del adaptador de red Polaridad de introducción de las pilas ...

Page 9: ... Ejerza presión sobre el borde externo para no dañar la válvula y asegúrese de que los dos bordes de cierre de la válvula montada queden unidos De lo contrario vuelva a poner la válvula prestando atención a que los bordes queden alineados Para un mayor confort es posible ensamblar en la cam pana 4 el revestimiento de silicona 3 Monte el reves timiento de silicona empujándolo bien contra el fondo d...

Page 10: ...o biberón NaturalFeeling listo para el uso En cambio si se cierra la botella con el práctico tapón her mético 8 incluido en el empaque se puede conservar la leche extraída en el frigorífico hasta un máximo de 48 horas a 4 ºC o 3 meses en el congelador a 18 ºC Al fin de prevenir la proliferación de bacterias se reco mienda suministrar la leche inmediatamente después de su extracción o colocarla ráp...

Page 11: ...l nivel de aspiración para hallar una estimulación y una aspiración más cómodas pulsando el botón El Extractor de Leche Eléctrico no se enciende Adaptador de red y o aparato dañado Compruebe que haya corriente eléctrica Revise la posición de las pilas en el compartimento Conexiones incorrectas Revise todas las conexiones Pilas descargadas Cambie las pilas ESPECIFICACIONES TÉCNICAS EXTRACTOR DE LEC...

Page 12: ...ecto desgaste o hechos accidentales Para la duración de la garantía sobre los defectos de conformidad remítaste a las disposiciones específicas de la normativa nacional aplicable en el país de compra si las hubiera Fabricante Artsana S p A via Saldarini Catelli 1 22070 grandate Como italy Fabricado en China IMPORTADO POR ARTSANA MEXICO S A DE C V Alejandro Dumas 211 Colonia Polanco Miguel Hidalgo ...

Page 13: ...a caliente y un detergente para vajillas y aclárelo abundantemente Es preferible lavar a mano el producto y evitar el uso de productos abrasivos el lavado en el lavaplatos puede ace lerar el deterioro del producto Cuando use cepillos limpiabiberón preste atención para no dañar las partes más delicadas del producto p ej los orificios y las válvulas de las tetinas Esterilice el producto antes del us...

Page 14: ... under supervision or after they have received instructions for the safe use of the appliance and have understood the hazards involved Keep the appliance its components and the mains adaptor with the power cord connecting to the motor unit out of children s reach The power cord connect ing the mains adaptor and the motor unit and the tube connecting the motor unit to the extraction kit if left wit...

Page 15: ...e appliance non compliant with the applicable specific technical standards im pairing its safety and integrity Contact our qualified personnel in the event of failure of the mains adaptor Do not attempt to open or repair the appliance of the mains adaptor when faulty or damaged Any repair service carried out directly by the user may lead to se vere risks to her or to any third party s safety as we...

Page 16: ...amination of the appliance To avoid any risk of fire or electric shock ensure that the cable connecting the mains adaptor and the appliance does not pass under any carpets or close to radiators stoves and heaters Operate the appliance at a temperature range between 5 C and 40 C Use outside these temperature limits and in particular above the upper limit may cause the appliance to overheat with con...

Page 17: ...ng sure you clean the battery compartment and thoroughly wash your hands if they have come into contact with the liquid Check that any leaked liquid has not come into contact in any way with the parts of the kit in particular with those designed to come into contact with the milk Do not throw run down batteries into a fire or release them into the environ ment or dispose of them as normal urban wa...

Page 18: ...erence code Instructions for use WARNING Read the Instructions for use Follow the Instructions for use CLASS II Appliance For indoor use only ON OFF press press Alternate current Direct current Mains adapter polarity connection Battery insertion polarity ...

Page 19: ...s of the assembled valve are joined together If not reposition the valve making sure that the two edges are correctly aligned For greater comfort you can fit the silicone cover 3 onto the pump body 4 Insert the silicone cover well into the cone of the pump body and seal it around the outer rim of the pump body Fig 2 Press the pads of the cover to expel any air trapped inside Fit the membrane cover...

Page 20: ... airtight cap 8 included in the package you can store the ex pressed milk in the fridge for up to 48 hours at 4 C or for up to 3 months at 18 C in the freezer In order to avoid the proliferation of bacteria it is advisa ble to feed the baby immediately after the milk has been collected or to immediately store the collected milk in the most appropriate way WARNING When the breast pump is not used a...

Page 21: ...h Change the suction level until you achieve more comfortable stimulation and suction by pressing the button The breast pump does not switch on Failure of mains adapter and or appliance Check that mains power is present Check the position of the batteries in the battery compartment Incorrect connections Check all the connections Run down batteries Replace the batteries TECHNICAL SPECIFICATIONS ELE...

Page 22: ...uctions for use The warranty shall not therefore apply in the case of damages caused by improper use wear or accidental events For the duration of warranty on conformity defects please refer to the specific provisions of national laws Manufacturer Artsana S p A via Saldarini Catelli 1 22070 Grandate Como Italy Made in China ...

Page 23: ...time immerse in boiling water for 5 mins This ensures that it is sterile Wash with hot water and washing up liquid before every use then rinse thoroughly It is preferable to wash the bottle by hand avoiding abra sive products washing it in the dishwasher may cause the product to wear more quickly If bottle brushes are used make sure you do not damage the more delicate parts of the product e g teat...

Page 24: ...24 1 5 3 7 2 6 4 1 2 ...

Page 25: ...25 NOTE ...

Page 26: ...26 NOTE ...

Page 27: ......

Page 28: ...46 009199 059 000_00_1744 00009199000590 Rev 1744 Artsana S p A via Saldarini Catelli 1 22070 Grandate Como Italy www chicco com Made in China Fabricado en China ...

Reviews: