5
cause it allows the child to extend its field of vision and develop its eye-hand co-ordination skills.
Furthermore, the vehicle can be steered by simply turning the remote control as if it was a driving
wheel, which makes the toy easier and more fun to use.
By the age of three, the child learns to associate the direction selected with the remote control unit
with the effect produced (corresponding to the movement of the toy). In the beginning, the child
learns to control the toy car until it meets an obstacle. At a later stage, it learns to co-ordinate
precisely the correct use of the remote control unit to achieve the desired direction.
HOW TO USE THE TOY
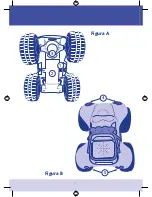
1. Switch on the toy, by positioning the ON/OFF switch (diag. A-1), located under the toy, to I.
2. Switch on the remote control, by positioning the ON/OFF switch lever (diag. D-10), located
underneath, to I.
3. Activate the car by pressing the buttons on the remote control: the remote control has two
buttons, one for the forward direction (diag. C-6) and one for reverse (diag. C-7).
4. To steer the car towards the right or left, simply “steer” the remote control to the right or left-
hand side.
5. In the forward straight gear, the headlights switch on (diag. B-4). Conversely, the rear lights
switch on in the reverse gear (diag. B-5).
6. Billy Big Wheels makes the roar of a real engine when it accelerates in the forward gear, and
sounds a warning signal in reverse.
7. When it is steered to the right or left, the indicators located on the remote control (diag. C-9)
are illuminated according to the selected direction.
8. Pressing the central button of the remote control (diag. C-8) activates the horn, and all the
front and rear lights light up.
9. After use, always switch off the toy car (diag. A-1) and remote control (diag. D-10), positioning
both switches on O.
Adjusting the Direction Settings
If the car does not maintain a straight direction when the forward straight button is pressed (diag.
C-6), the direction can be corrected by adjusting the selector (diag. A-3), located underneath the
car, one notch at a time.
FITTING AND/OR REPLACING BATTERIES
• Batteries must only be fitted by an adult.
• To replace spent batteries: Loosen the screw on the battery compartment (for toy car see shown
on the product). Close the battery cover, and tighten the screw.
diag. A–2; for remote control see diag. D-11) with a screwdriver; remove the cover and spent
batteries. Fit new batteries, ensuring that they have been fitted in the correct polarity
(as shown on the product). Close the battery cover, and tighten the screw.
• Only use alkaline batteries of the same type or equivalent to the type recommended for the
correct function of this product.
• Never mix new and old or different types of batteries.
• Always keep batteries and tools out of reach of children.
Summary of Contents for Billy FunWheels
Page 1: ...Billy FunWheels ...
Page 2: ...2 Figura B Figura A 3 1 2 4 5 ...


