bility of the booster seat. Check that the height indi-
cators (L) are identical on both legs.
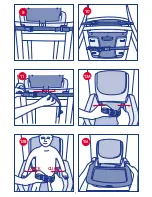
5. Position the booster seat on the chair (diagram 7);
when using this product it is recommended to place
it on a chair whose minimum dimensions comply
with those illustrated in diagram 8. Connect the rear
harness straps (D) by threading it behind the seat
backrest, as seen in diagram 9 and the lower harness
straps (E) around the seat, as seen in diagram 10;
when mounted correctly they will ‘click’ into place.
Pull the free ends of the harness straps D and E to
adjust the length until the booster seat is firmly an-
chored to the chair (diagram 11).
6. Once the booster seat has been fastened to the
chair seat and backrest, place the child inside as fol-
lows:
a. Release the clasps from the three point safety har-
ness (C) as indicated in Diag. 12A
b. Place the child on the booster seat and strap him in
with the safety harness. Check that the safety har-
ness strap clasps are fitted correctly (diagram 12B).
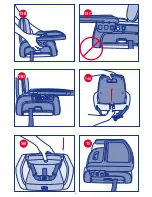
7. Connect the activity tray to the booster seat by
turning the side handles outwards, and pressing the
central connector button (G) on both sides of the
booster seat (see diagrams 13A/13B). The stabilis-
ers (H) on both sides of the connector button aim to
guarantee stability for the tray; check that the activ-
ity tray is connected to at least one connector but-
ton, and never solely using the stabilisers (diagram
13C). The activity tray can be adjusted to 3 different
positions (diagram 13D).
FOLDING AWAY AND TRANSPORT
8. Remove the activity tray using the side handles as
illustrated in section 2.
9. Press the release button (K) at the bottom of the
backrest, as seen in diagram 14°, pull the backrest
A upwards and then lower it (diagram 14B) until it
closes.
10. Fasten the activity tray to the buttons H, posi-
tioning it as illustrated in Diagram 15, so the product
is ultra-compact to carry around.
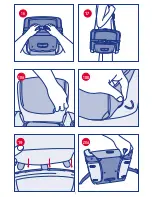
11. Fasten the lower harness belts (E) threading them
over the activity tray, as seen in Diag. 16.
12. The booster seat can easily be carried around us-
ing the rear harness belts (D) as seen in diagram 17.
Simply lengthen the straps as needed.
REMOVING THE FABRIC PARTS
13. To remove the fabric from the backrest, release
the elastics from their supports on the back of the
cover (diagrams 18A/18B), then unthread the fas-
tener tabs found at the top of the fabric from the
frame (diagram 19).
14. To replace the fabric cover on the backrest, follow
the instructions provided in section 13 in the reverse
order, inserting the fastener tabs to the upper section
of the frame and fastening it in place connecting the
elastics to the supports.
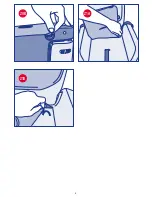
15. To remove the fabric from the backrest, turn the
frame over, release the elastics from their supports
on the lower part of the seat (diagrams 20A/20B);
then release the elastics from the supports on the up-
per part of the seat (diagram 21A/21B).
16. To replace the fabric cover on the seat, follow the
instructions provided in section 14 in the reverse or-
der, connecting the elastics to the upper part of the
sear and the other elastics to the lower part of the
seat. Remember to thread the safety harness straps
through the slots in the fabric cover.
19
Summary of Contents for MoDe
Page 2: ...2 ...
Page 3: ...2 1 3A A B A C B C F G H J L I E D K 3 ...
Page 4: ...4 7 5 3B 4 6 8 210 mm CLICK 320 mm 290 mm ...
Page 5: ...5 9 10 12A 12B 13A 11 CLICK CLICK ...
Page 6: ...6 13B 13C 15 14A 14B 13D ...
Page 7: ...7 19 18A 18B 20A 17 16 ...
Page 8: ...21A 20B 21B 8 ...
Page 9: ...9 MoDe ...
Page 42: ...42 Note ...
Page 43: ...43 Note ...

