14
15
5. Fit the fabric on the armrest making sure that it is fit cor-
rectly (fig. 5), and fasten the fabric to the base of the seat
with the two buttons circled in red (fig. 5A).
6. Insert the legrest supports in the lower part of the lining
(fig. 6).
7. To complete the fitting of the lining on the seat, fasten the
two buttons on the sides (fig. 7), fit the elastic strap on the
relevant hook as shown in fig. 7A and fasten the buttons in
the lower part of the backrest (fig. 7B).
To remove the lining, follow the same steps in the reverse
order.
SAFETY HARNESS
The stroller comes with a five-point safety harness which
consists in two shoulder straps, a waist strap and a crotch
strap with a buckle.
8. WARNING: when using with children aged 0 to 6 months,
you may have to shorten the length of the straps to adapt
them to your baby To do so, use the shoulder straps by
inserting them first through the adjustment slots (fig. 8).
9. Make sure the shoulder straps are adjusted at a suitable
height for your child: otherwise, adjust the height (fig. 9).
10. After placing your child, put the two forks in the buckle
(Fig. 10) and adjust the width of the waist belt if need-
ed, pressing on the buckles. To unfasten the waist belt,
press the two lateral forks at the same time (fig. 10A).
WARNING:
To ensure the safety of your child, you must
use the crotch strap, waist belt and safety harness at the
same time.
WARNING:
After removal of the safety harness (e.g. for
washing), ensure that the harness is reassembled cor-
rectly using the anchorage points. The harness must be
re adjusted.
BUMPER BAR
11. The seat features a bumper bar. To fasten the bar, press
the two buttons located in the lower part of the two ex-
tremities and fit it on the pins located at the end of the
armrests (fig. 11). To remove the bumper bar, follow the
steps described above in the reverse order. You can re-
lease one side of the bumper bar to let your child to seat.
The bumper bar can be used both forward facing and
parent facing.
WARNING:
Always fasten your child with the safety har-
nesses. The bar IS NOT a device for containing your child.
WARNING:
The bar must not be used to lift the product
with the child inside of it.
FITTING THE SEAT ON THE STROLLER
12. To attach the stroller seat, insert it in the relevant vertical
fastening devices until you hear the click which confirms
that it has been fastened (fig. 12). To facilitate fastening
the seat on the stroller, please read the instructions on the
labels on both sides of the fabric showing you the correct
alignment of the seat with the fasteners (fig. 12 A). The
seat can be attached both forward facing (fig. 12B) and
parent facing (fig. 12C).
WARNING:
Before using, make sure that the seat is proper-
ly locked on by pulling it upwards.
WARNING:
If not properly locked, press both white keys on
the fitting device of the structure and repeat the fitting pro-
cedure checking the complete locking. Otherwise contact
the Chicco customer service.
er will not come into contact with
your child.
• Make sure that the person using the
stroller knows how to do it in the
safest way.
• This product must only be used by
an adult.
• The product must be assembled by
an adult.
• To avoid all strangulation risks, nev-
er give children objects with cords or
strings attached, or leave them with in
proximity of such objects.
• Never use the stroller on staircases
or escalators: you could suddenly
lose control of it.
• Always pay attention when going
up and down steps or pavements.
• If the stroller has been exposed di-
rectly to sunlight for a long time,
you must let it cool down be-
fore placing your child inside of it.
Prolonged exposure to direct sun-
light may cause the colour of the
materials and fabric to fade.
• Prevent the stroller from contact
with salty water. It might cause the
formation of rust.
• Do not use the stroller on the beach.
• When unused, the stroller should
be kept out of reach of children.
TIPS FOR CLEANING AND MAINTENANCE
This product requires periodical maintenance. Cleaning
and maintenance operations must be performed exclu-
sively by an adult.
CLEANING
Clean the fabric parts using a wet sponge and neutral soap.
The lining can be removed (please refer to the section
"Fitting/removing the seat lining"). Please refer to the care
labels for instructions on how to clean the fabric parts.
Below are the cleaning symbols and their meanings:
Wash by hand in cold water
Do not bleach
Do not tumble dry
Do not iron
Do not dry clean
Routinely wipe clean plastic parts with a soft damp cloth.
Never use solvents or abrasive detergents. In case the stroll-
er has come into contact with water, always dry the metal
parts to prevent rust formation.
MAINTENANCE
Regularly check the condition of the wheels and, keep
them clean from dust and sand. To avoid friction that may
prevent correct operation of the stroller, make sure that all
the movable plastic parts along the metal frame are clean
from dust, dirt or sand. Keep the stroller in a dry place.
Lubricate the moving parts only if necessary, with a light
application of a silicone based lubricant.
LIST OF COMPONENTS
Check that none of the components of this model are miss-
ing before assembling the product. If any part is missing,
contact Chicco Customer Service. No tools are needed to
assemble this product. The following pieces are needed for
product assembly:
• Frame
• Seat
• Seat lining
• Hood
• Bumper bar
• Comfort kit (shoulder and crotch straps)
• Storage basket
• Bag
• Leg cover
• Rain cover
• Joined handgrip
OPENING THE STROLLER FRAME
WARNING:
When opening the stroller, make sure that your
child or other children are at a safety distance. Make sure
that during these operations the moving parts of the stroll-
er will not come into contact with your child.
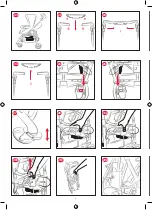
1. With the stroller positioned vertically (fig.1) lift both
handles to the relevant position by pushing the buttons
on the sides (fig. 1 A). Make sure that the handgrips are
locked in position for use.
2. To open the frame, press the button shown in Fig. 2 (1-
push). Then lift the stroller's handgrips and raise the stroll-
er to make it easier for it to open (Fig. 2A). The stroller
is completely opened when the tubes are completely
fixed to the front (fig. 2B). To complete the opening of the
stroller, press the rear crossbar (fig. 2C).
FITTING/REMOVING THE SEAT LINING
3. Fitting the lining must be done with the seat disengaged
from the stroller Before starting, open the waist buckle
shown in fig. 3.
4. Fit the lining by sliding it first on the backrest (fig. 4) and
insert the waist strap in the relevant slots in the lower
part of the backrest (fig. 4 A). Then insert the crotch strap
in the slot in the seat (fig. 4B).
Summary of Contents for TrioLove Up
Page 1: ......
Page 2: ...2 ...
Page 3: ...3 5 1 4A 3 1 2 5 4 1A 2A 2B 2C 4B 4A 5A ...
Page 4: ...4 11 6 7 8 10 12 7B 10A 12A 12B 7A ...
Page 5: ...5 20 13 15 16 17 18 19 21 22 14A 12C ...
Page 6: ...6 1 GO 1 2 GO STOP 1 1 1 23 25 27 28 26 24 24A 28A 28B 22A 28C 28D ...
Page 7: ...7 GO GO GO 33 35 30 29 32A 34A 31A 30A 31 32 34 ...
Page 106: ...106 NOTE ...
Page 107: ......


