Installation Instructions
Model: K-Series
7
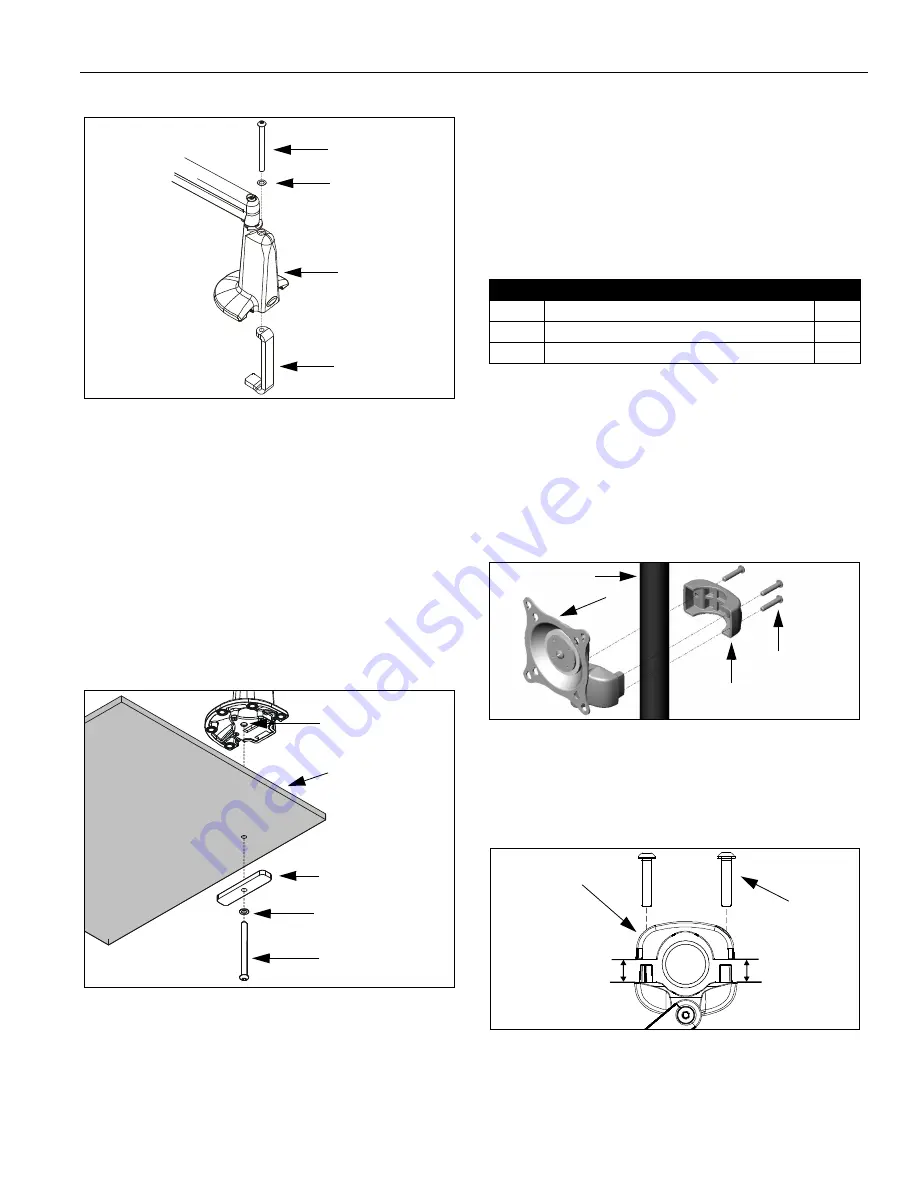
Figure 7: Remove Clamp Adjustment Screw
3.
Using 2.5mm hex key, re-install baseplate with three
retained attach screws. Ensure baseplate nut faces
interior
of mount (See Figure 6). Tighten securely.
IMPORTANT ! :
IF you will be installing a SINGLE
display (including KCY-210/-220) with RECESSED
mounting holes, then proceed to "DISPLAY
INSTALLATION"
before continuing
with this mount
installation procedure.
4.
From below desk, insert retained clamp adjustment
screw and washer through bracket (20) and up
through hole in desk (See Figure 8). Using
3/16" hex key, thread screw into baseplate nut but do
not tighten completely at this time.
Figure 8: Desk Mount - Hole Installation
5.
Center mount (10) over hole. Using 3/16" hex key,
securely tighten screw.
6.
Drop screw (30) into open (unused) clamp adjustment
hole on top of mount (for appearance only).
7.
If you are installing:
•
SINGLE display with RECESSED mounting
holes: Proceed to "CABLE MANAGEMENT."
•
KCY-210/-220: Proceed to "MULTI-DUAL ARM
ASSEMBLY."
•
ALL other display configurations: Proceed to
"DISPLAY INSTALLATION."
INSTALLATION TO POLE
1.
Verify that you have the following parts:
IMPORTANT ! :
IF you will be installing a SINGLE
display with RECESSED mounting holes, then proceed
to "DISPLAY INSTALLATION"
before continuing
with this
mount installation procedure.
2.
Determine approximate location for mount keeping in
mind display size, extension, height adjustment (if
applicable), and pitch/roll requirements.
3.
Place mount (10) against pole, with clamp (20) on
opposite side of pole (See Figure 9). Using 5/32" hex
key, loosely assemble with screws (30).
Figure 9: Pole Mount Installation
NOTE:
Equally tighten screws (30) against mount and
the pole clamp (20). (See Figure 10)
4.
Position mount at desired height and orientation.
Tighten screws (30) securely.
Figure 10: Securing Pole Mount and Clamp
5.
Proceed to "CABLE MANAGEMENT" (for SINGLE
display with RECESSED mounting holes), or to
"DISPLAY INSTALLATION" (for all other display
configurations).
Clamp Adjustment
Washer
Clamp
10
Screw
Desk
Clamp Adjustment
Washer
Screw
20
Baseplate Nut
Item
Description
Qty
10
MOUNT, Pole, K-Series
1
20
CLAMP, Back
1
30
SCREW, Button Head Cap, 1/4"-20 x 1-1/8"
3
10
Pole
20
30
(3 places)
Keep equal
distance between
mount and
clamp when
tightening
30
(3 places)
20


