background image

Installation Instructions

PACCS1

7

2.

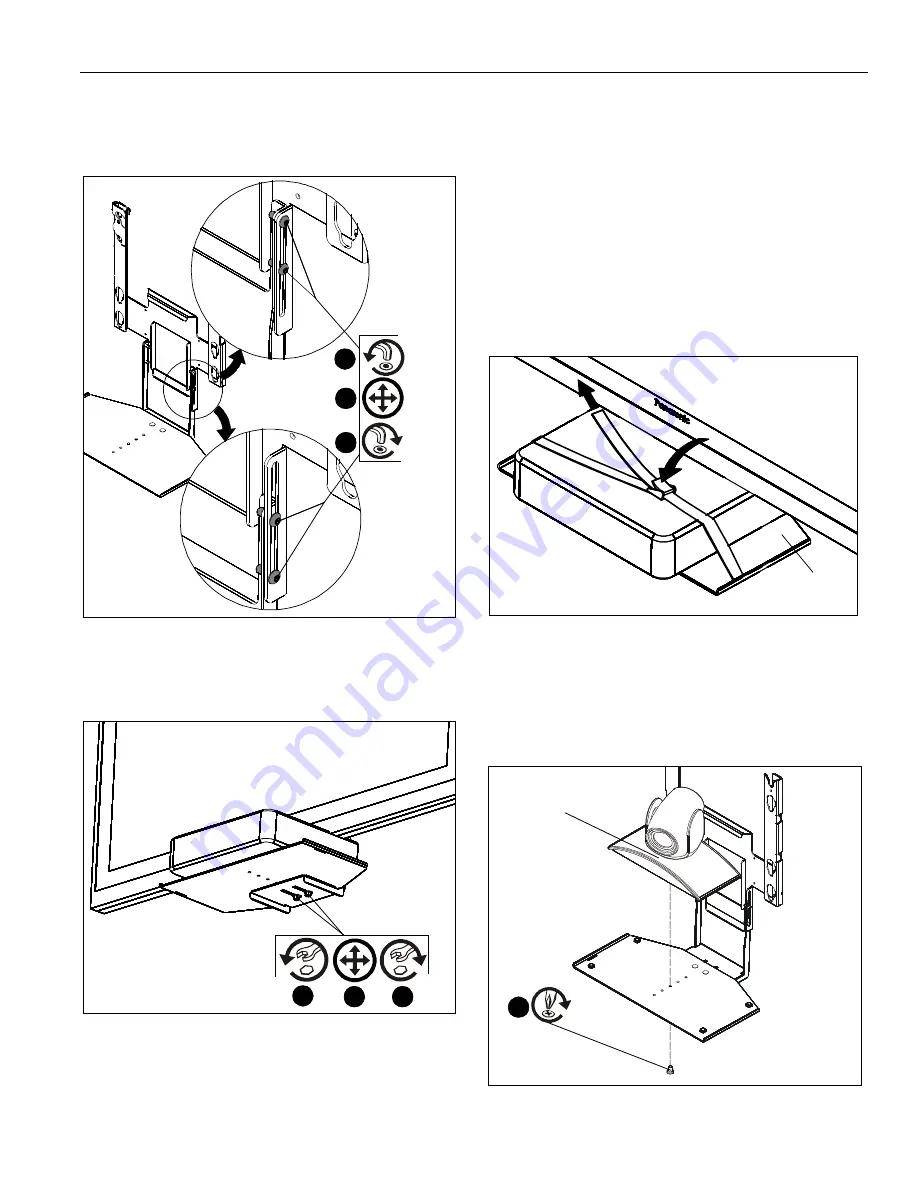
Reposition shelf up or down to desired position.  (See
Figure 7)

3.

Tighten two button head cap screws securing adjustment
bracket to shelf bracket using 1/8" hex wrench (K). (See
Figure 7)

Figure 7

To adjust shelf horizontal position:

1.

Loosen two round head carriage bolts securing shelf. (See
Figure 8)

Figure 8

2.

Reposition shelf in or out to desired position.  (See Figure 8)

3.

Tighten two round head carriage bolts securing shelf. (See
Figure 8)

Cable Management

Route cables and wires to display using cable ties (H) as
necessary, and following manufacturers installation instructions.

Installing Equipment on Shelf Using Strap

1.

If necessary, place rubber bumpers (G) or hook and loop
squares (J) on shelf to help hold equipment in place.

2.

Place equipment on shelf.

NOTE:

A strap, such as the PAC103 (not included), may also

be used to hold the equipment in place on the shelf.

3.

OPTIONAL:

 Thread optional strap (PAC103) through slots

in shelf.  (See Figure 9)

4.

Complete installation of strap following instructions included
with the strap kit.

Figure 9

Installing Camera on Shelf Using Screw

NOTE:

Mounting options will vary depending on the type of

camera being mounted.

1.

Install 1/4-20 x 3/8" Phillips pan machine screw (T) through
one of the mounting holes on shelf and into the hole on the
bottom of the camera. (See Figure 10)

Figure 10

3

2

1

Shelf
Completely
Retracted

Shelf
Completely
Extended

3

2

1

Display

2

Display

PACCS1
shelf

camera (example)

(T)

1

Summary of Contents for PACCS1

Page 1: ... N I N S T R U C T I O N S Large Shelf Accessory Spanish Product Description German Product Description Portuguese Product Description Italian Product Description Dutch Product Description French Product Description PACCS1 ...

Page 2: ...iding of factory warranty It is the installer s responsibility to make sure all components are properly assembled and installed using the instructions provided WARNING Failure to provide adequate structural strength for this component can result in serious personal injury or damage to equipment It is the installer s responsibility to make sure the structure to which this component is attached can ...

Page 3: ... losdraaien Desserrez les fixations Phillips Screwdriver Destornillador Phillips Kreuzschlitzschraubendreher Chave de fendas Phillips Cacciavite a stella Kruiskopschroevendraaier Tournevis à pointe cruciforme Hex Head Wrench Llave de cabeza hexagonal Sechskantschlüssel Chave de cabeça sextavada Chiave esagonale Zeskantsleutel Clé à tête hexagonale Open Ended Wrench Llave de boca Gabelschlüssel Cha...

Page 4: ...ded 1 4 C 1 Shelf A 1 Shelf Bracket B 1 Adjustment Bracket D 1 Right Upright E 1 Left Upright F 4 Mounting Button G 4 Rubber Bumper H 6 Cable Tie J 2 1 x 1 Hook Loop K 1 1 8 M 2 1 4 20 N 4 1 4 20 x 5 8 P 2 1 4 20 x 5 8 Q 2 10 24 x 1 2 R 4 10 24 x 7 8 L 6 10 24 S 2 1 4 T 1 1 4 20 X 3 8 ...

Page 5: ...d E using two 10 24 x 7 8 button head cap screws R and two 10 24 lock nuts L See Figure 1 Figure 1 2 Assemble two lower mounting buttons F to uprights D and E and shelf bracket A using two 10 24 x 7 8 button head cap screws R and two 10 24 lock nuts L 3 Complete attachment of uprights D and E to shelf bracket A using two 10 24 x 1 2 button head cap screws Q and two 10 24 lock nuts L See Figure 2 F...

Page 6: ...WARNING IMPROPER INSTALLATION CAN LEAD TO DISPLAY FALLING CAUSING SEVERE PERSONAL INJURY OR DAMAGE TO EQUIPMENT Make sure ALL mounting buttons are properly seated in lower area of four teardrop mounting holes 5 Move latching flag to CLOSED position to secure display on PACCS1 See Figure 6 NOTE A padlock or similar device may be used to provide additional security Figure 6 Adjustments The PACCS1 al...

Page 7: ... on Shelf Using Strap 1 If necessary place rubber bumpers G or hook and loop squares J on shelf to help hold equipment in place 2 Place equipment on shelf NOTE A strap such as the PAC103 not included may also be used to hold the equipment in place on the shelf 3 OPTIONAL Thread optional strap PAC103 through slots in shelf See Figure 9 4 Complete installation of strap following instructions include...

Page 8: ...instraat 14 6003 DK Weert Netherlands P 31 0 495 580 852 F 31 0 495 580 845 Asia Pacific A Office No 1 on 12 F Shatin Galleria 18 24 Shan Mei Street Fotan Shatin Hong Kong P 852 2145 4099 F 852 2145 4477 Chief Manufacturing a products division of Milestone AV Technologies 8800 002050 Rev04 2012 Milestone AV Technologies a Duchossois Group Company www chiefmfg com 07 12 ...

Reviews: