PSMH2465
Installation Instructions
10
Steel Stud Wall
WARNING:
IMPROPER INSTALLATION CAN LEAD TO
EQUIPMENT FALLING CAUSING SERIOUS PERSONAL
INJURY OR DAMAGE TO EQUIPMENT! Figure 4 identifies
the minimum requirements for installation of display mounts
onto a steel stud structure. If the structure or its components
do not meet these requirements contact the mount
manufacturer for specific instructions before attempting
installation. It should also be noted that no other equipment
should be mounted to the same stud.
(See Figure 4)
WARNING:
IMPROPER INSTALLATION CAN LEAD TO
DISPLAY FALLING CAUSING SERIOUS PERSONAL
INJURY OR DAMAGE TO EQUIPMENT! It is the installer’s
responsibility to make sure the structure to which this mount
is being attached can support a minimum of 900 lbs
(408.2 kg). Reinforce the structure as required before
installing this mount.
1.
Identify desired mounting location on wall.
2.
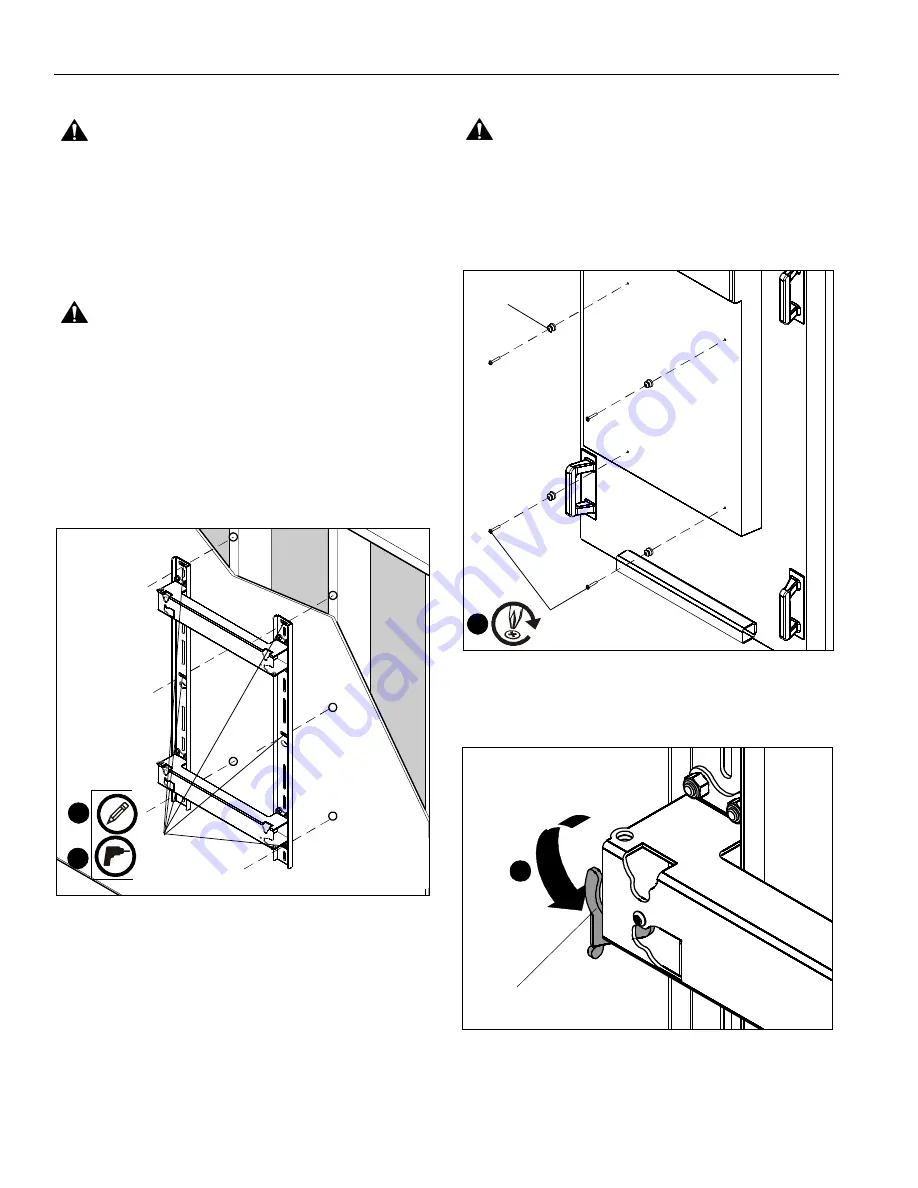
Align mounting holes in mount with studs making sure
mounting holes are centered on studs. (See Figure 16)
Figure 16
3.
Mark location of six mounting holes on wall.(See Figure 16)
4.
Drill six 1/2" holes. (See Figure 16)
NOTE:
Proceed to Steps 5-13 on page7
, using six
1/4-20 x 1-3/4" Phillips pan head screws (L), six 1/4" flat
washers (M), and six snap-toggles (N).
Installing Display
WARNING:
IMPROPER INSTALLATION CAN LEAD TO
MOUNT FALLING CAUSING SERIOUS PERSONAL
INJURY OR DAMAGE TO EQUIPMENT! DO NOT substitute
hardware.
1.
Install four mounting buttons (D) onto display using four
M6 x 35mm (F) Phillips pan head screws. (See Figure 17)
Figure 17
2.
Move two locking flags (B) on wall mount (A) to the OPEN
position. (See Figure 18)
Figure 18
3
4
x 6
(D) x 4
2
(F) x 4
OPEN
2
(B) x 2


