background image


Solar Mounting Systems


2. Determine the installation area on the roof


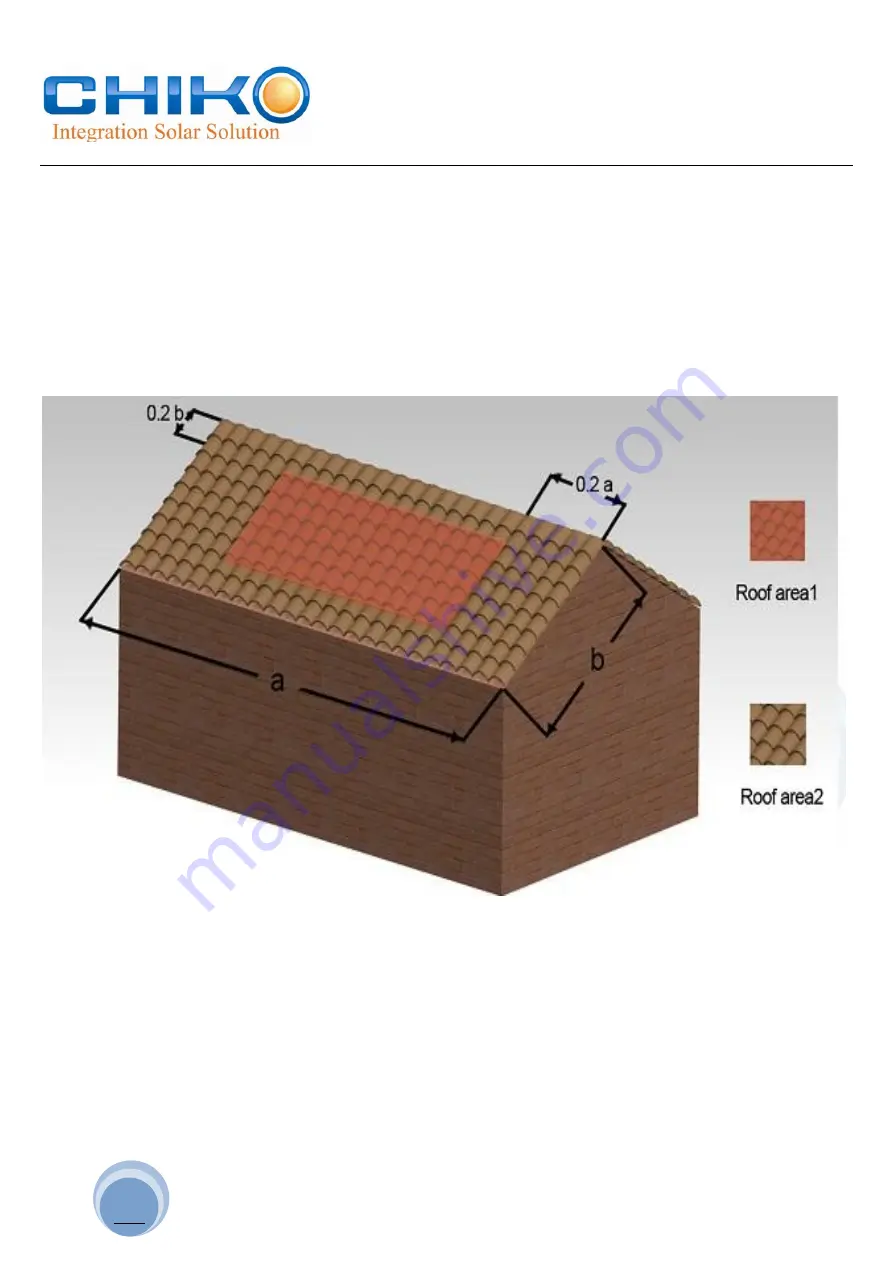
Chiko Mounting system may be installed anywhere on a roof but fixing centres are required to be 
reduced at ridges and edges. The diagram below shows the area of higher wind within a (minimum of 
0.2a and 0.2b) of a roof edge or ridge (where b and d are the plan dimension of the building). 

The following table will help you determine the maximum rail support spacing for your project. 

Also note that if the roof slope is less than 10 degree the reduction on spacing does not apply.   


3. Determine the height of the of your installation site 

This document provides sufficient information for Roof system installation height less than 20 meters. 
If your installation site is more than 20 meters in height, please contact Chiko Solar to obtain 
engineering data to support your installation. 


Summary of Contents for CK-300N1

Page 1: ...nd the Module 5 7 Part III Planning the array laylout 8 9 Part IV Installation instruction 9 15 Part V Angle Adjustment Description 15 16 Part VI Warranty 17 Compliant Planning and Installation with Australia AS NZS1170 Chiko Pitched roof installation Gui Chiko Flat roof installation Guide Pub CM V3 3 10 Mar 2012 ...

Page 2: ...ngs Most of Australia is designated Region A which indicates a Regional Ultimate Basic Wind Velocity of 45msec Some areas are designated Region B 57msec Local authorities will advise if this applies in your area Region C areas 66msec are generally referred to as Cyclonic and are generally limited to northern coastal areas Most Region C zones end 100km inland Region D 80msec Australia s worst Cyclo...

Page 3: ...e plan dimension of the building The following table will help you determine the maximum rail support spacing for your project Also note that if the roof slope is less than 10 degree the reduction on spacing does not apply 3 Determine the height of the of your installation site This document provides sufficient information for Roof system installation height less than 20 meters If your installatio...

Page 4: ...ters 535 310 20 Meters 505 280 The table below is based on solar modules length of 1600 1960mm Spacing mm of Tilt kit for angle of Tilt 30deg Installation Region A B Region C D Height Spacing mm Spacing mm 5 Meters 555 310 10 Meters 460 280 15 Meters 415 240 20 Meters 390 220 The table below is based on solar modules length of 1600 1960mm Spacing mm of Tilt kit for angle of Tilt 60deg Installation...

Page 5: ...olar Roof system can be used for roof slope up to 60 degrees Please verify the Installation site roof slope should be between 0 degrees and 60 degrees 7 Installation tools 6 mm Allen key Cordless drill Open end spanner set 9 10 17 19 mm required only for mounting with hanger bolts Torx 30 AW 30 bit Angle grinder with stone disk Power Cord If necessary timber to shim the roof hooks 8 Installation R...

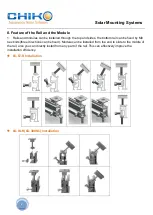
Page 6: ...nd sides the bottom rail can be fixed by M8 hex bolts three directions can be fixed Module can be installed from the end to slide to the middle of the rail also you can directly install from any part of the rail This can effectively improve the installation efficiency CK FZ R Installation CK FA R CK 300N1 Installation ...

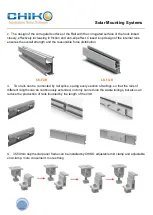
Page 7: ...gth and the reasonable force distribution CK FZ R CK FA R 3 Two rails can be connected by rail splice saving every section of tailings so that the rails of different lengths can be continuously extended not only can reduce the waste tailings but also can reduce the production of rails troubled by the length of the limit 4 35 50mm depth solar panel frame can be installed by CHIKO adjustable mid cla...

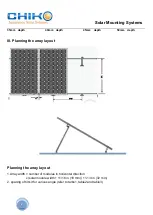
Page 8: ...depth 50mm depth III Planning the array layout Planning the array layout 1 Array width number of modules in horizontal direction x solar module width 11 16 in 18 mm 1 1 4 in 32 mm 2 spacing of tilt kit for various angle refer to talbe1 table2 and table3 ...

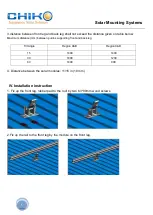
Page 9: ...m between purlins supporting front and back leg Tilt Angle Region A B Region C D 15 1800 1400 30 1800 1200 60 1800 900 4 Distance between the solar modules 11 16 in 18 mm IV Installation instruction 1 Fix up the front leg rubber pad to the roof by two 6 3 90mm wood screws 2 Fix up the rail to the front leg by the module on the front leg ...

Page 10: ...bber pad to the roof by two 6 3 90 wood screws 4 Fix up the rail to the back leg by the L type module on the back leg 5 As the requirement of Planning the array layout Fix up front leg back leg and rail on the roof 6 Fix up the solar panel on the rail ...

Page 11: ... by the end clamp M8 25 hexagonal head screw and module Fix up the Adjacent two solar panels on the rail by middle clamp and M8 Hexagon head screw The length of the Hexagon head screw is according to the thickness of solar panel 2 The rest can be done in the same manner Fix up all the solar panels on the rails ...

Page 12: ...clamp 1 Fix up the solar panel on the rail by the adjustable end clamp M8 25 hexagonal head screw and module Fix up the Adjacent two solar panels on the rail by adjustable middle clamp and M8 Hexagon head The following show 35mm depth solar panel frame 40mm 45mm 50mm in the same way ...

Page 13: ...Solar Mounting Systems 13 2 The rest can be done in the same manner Fix up all the solar panels on the rails ...

Page 14: ...Solar Mounting Systems 14 9 Fix Tilt kit while connected with Chiko Tin roof clamp foot kliplock 406 700 will not cause any damages to tin roof make the mount system more stonger ...

Page 15: ...lar Mounting Systems 15 V Angle Adjustment Description Loose two M8 no head inner hex bolts on the back leg adjust the length of back leg pipe then fixup two M8 no head inner hex bolt to adjust the angle ...

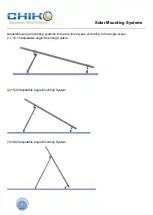
Page 16: ... Systems 16 Adjustable Angle mounting systems there are three types according to the angle scope 1 10 15Adjustable angle Mounting System 2 15 30Adjustable angle Mounting System 3 30 60Adjustable angle Mounting System ...

Page 17: ... Product that occurs during its shipment storage or installation This Warranty shall be VOID if installation of the Product is not performed in accordance with Chiko Solar s written installation instructions or if the Product has been modified repaired or reworked in a manner not previously authorized by Chiko Solar IN WRITING or if the Product is installed in an environment for which it was not d...

Reviews: