background image


ASSEMBLY / OPERATING INSTRUCTIONS

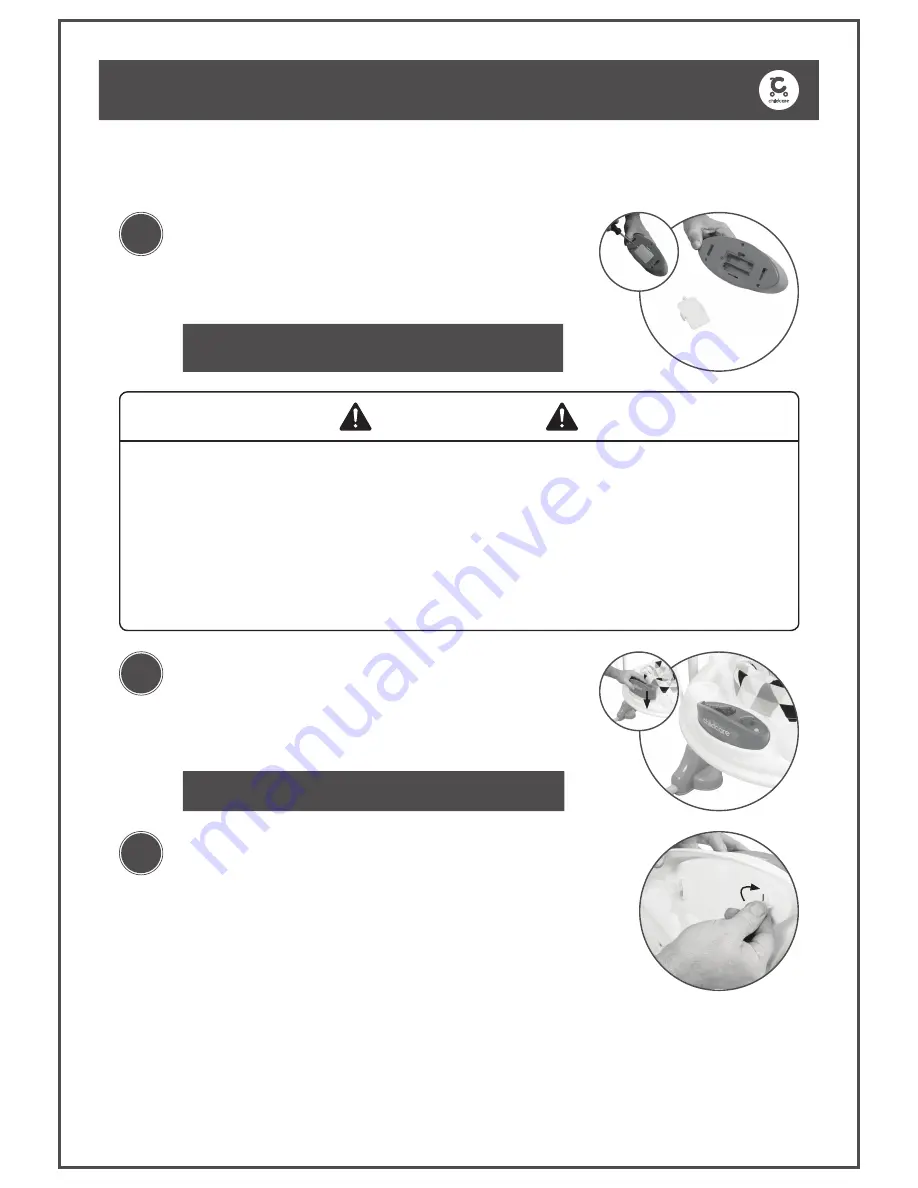
To assemble Music & Lights Module...

1

2

3

Turn 

Music and Light Module

 over and 

unscrew the battery cover.
Insert 2 x AA batteries (sold separately).
Replace battery cover by screwing back into 

place.

Position the rear side of the 

Music and Light 

Module

 into the 

Main Frame

.

Push the front side of the 

Music and Light 

Module

 down to click into position.

Push and twist the locking levers on the underside of 

the 

Main Frame

 to secure.

1a.

1b.
1c.

2a.

2b.

3a.

IMPORTANT! 

Please note that a screwdriver (not included) is required 

to access the Toy Bar Battery Pack to insert 2 x AA Batteries (sold 
separately).

PLEASE NOTE! 

The Toy Tray includes 7 melodies.

Do not mix old and new batteries.
Do not mix alkaline, standard (carbon-zinc) or rechargeable (nickle-cadmium) batteries.
Adult supervision is required when charging rechargeable batteries. 
Always remove flat or exhausted batteries from the toy. 
Do not short circuit the supply terminals. 

Non-rechargeable batteries are not to be recharged 

WARNING

Summary of Contents for Hopperoo

Page 1: ...IMPORTANT RETAIN FOR FUTURE REFERENCE READ CAREFULLY Hopperoo ActivityCentre Trios Model 025011 389...

Page 2: ...over place product on a flat level surface Never use this product on an elevated surface eg A table Strangulation hazard stringscancausestrangulation Donotplaceitemswithastringaround child s neck such...

Page 3: ...seofthisproductinafire Thebatteriesinsidemayexplodeorleak Nevershort circuitthebatteryterminals Useonlybatteriesofthesameequivalenttypeandpolarity asrecommended DO NOT chargenon rechargeablebatteries...

Page 4: ...notice as a result of our ongoing policy of product improvement Contents Assembly contents list Assembly Operating instructions How to care for your Hopperoo Activity Centre Congratulations on your pu...

Page 5: ...667137 inNewZealand contact Wainhouse Distribution on 0800 567 5000 Supplied loose in box Seat assembly with mounting connectors Top frame plugs Assorted toys Phillips Screwdriver Not Included x 1 x 2...

Page 6: ...ctors TheActivity Centre should now resemble the photo opposite Slide the Seat Assembly Mountings onto the Side Support Frame 3a 4a 5a 2 1 Connect the Rear L H and R H Base Frame Assembly to the Front...

Page 7: ...ng levers on the underside of the Main Frame to secure 1a 1b 1c 2a 2b 3a IMPORTANT Please note that a screwdriver not included is required to access theToy Bar Battery Pack to insert 2 x AA Batteries...

Page 8: ...here are three height adjustments that are changed by altering the position of the connectors on the underside of the SeatTray 2a 1a 1a ASSEMBLY OPERATING INSTRUCTIONS To assemble AssortedToys 1 Inser...

Page 9: ...towards the seat to unlock The position closest to the seat is the highest setting 2a 2b 3 Reconnect by pushing the connector in and sliding it outwards to lock 3a ASSEMBLY OPERATING INSTRUCTIONS To o...

Page 10: ...rmits these methods Check activity centre regularly to ensure that locking devices and components are secure and working properly Always check parts regularly for tightness of screws nuts and other fa...

Page 11: ...greements These include distribution lines for Brica Cybex Evenflo Good Baby Lascal Maclaren Munchkin Project Nursery Summer Infant Yookidoo Our own brands including Childcare have gone from strength...

Page 12: ...ce 1300 667 137 W www cnpbrands com au E info cnpbrands com au F www facebook com CNPBrands I cnp_baby Distributed in New Zealand by Wainhouse Distribution 2 6 Argyle St Morningside PO Box 41 014 St L...

Reviews: