CF905-137 BIG BL
OCK TR
OLL
Y (SET A)
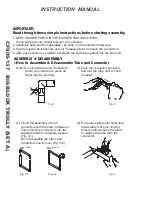
Note: Do not hold tube and connectors
where you insert each piece as
finger may be pinched.
(1) Push the connector into tube
and turn the tube until a "click"
is heard.
(2) Finish the assembly of both
connectors with the tube in between.
Then insert the connectors into two
separate tubes to complete a panel.
(Fig. 3-1)
Do not assemble the tubes and
connectors one by one. (Fig. 3-2)
(3) Put release pliers into holes that
have safety lock pins coming
through and squeeze the pliers
to release the tube from the
connector.
OK
(EASY)
NG
(HARD)
IMPORTANT:
Read through these simple instructions before starting assembly.
1. KEEP UNUSED PARTS IN THE MARKED BAG UNTIL USED.
Some parts are very similar and can be confused.
2. Assemble each section separately - as shown in the exploded drawings.
3. If parts need to be loosened, use our "release pliers" to loosen the connection
4. After each section is complete, assemble the sections together into the final unit.
Fig. 1
Fig. 2
Fig. 3-1
Fig. 3-2
Fig. 4
How to Assemble & Disassemble Tube and Connector
ASSEMBLY & DISASSEMBLY
INSTRUCTION MANUAL


