background image

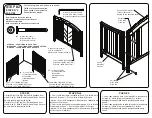
STEP #2

ÉTAPE No2

PASO #2

STEP #2

ÉTAPE N°2

PASO #2

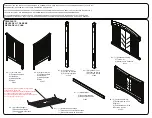
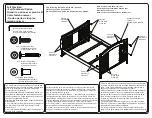
Day bed assembly from step #1

le montage effectué à l'étape n° 1

la estructura del paso #1 

The following tools and parts are required:

Outils et pièces nécessaires:

Se necesitan las siguientes herramientas y piezas:

Note: Fasteners are shown full size

Remarque: Les dispositifs de fixation sont

Montrés en taille réelle

Nota: Los pernos se muestran en tamaño real

M4 Hex Wrench (Provided)

M4 Clé À Six Pans (Fournie)

M4 Llave Hexagonal (se Incluye)

Day bed assembly from step #1

le montage effectué à l'étape n° 1

la estructura del paso #1 

Part #12

Pièce No12

Pieza #12

Part #12

Pièce No12

Pieza #12

#7 - (1) Stabilizer Bar 

(1) Barre stabilisatrice 

(1) Barra estabilizadora 

#12 - (4) M6 x 35mm Bolt

(4) Boulons M6 x 35mm

(4) Pernos M6 x 35mm

Part #7

Pièce No7

Pieza #7

#14 - (1) M6 x 18mm Bolt

(1) Boulons M6 x 18mm

(1) Pernos M6 x 18mm

Part #14

Pièce No14

Pieza #14

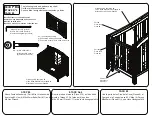
1. Determine if the optional Toddler Bed Guard 

Rail (purchased separately, see next page) will 

be used.

2. Attach the Stabilizer Bar (Part #7) to the 

Assembly from Step #1 with (4) M6x35mm Bolts 

(Part #12).  The small hole near the end of the 

rail should be on top on the end of the crib where 

the optional guard rail will be installed.

3. If not installing the optional guard rail, install 

(1) M6x18mm Bolt (Part 14) into the hole near 

the center of the rail.

1. Décider si le garde-corps facultatif (acheté 

séparément, voir la page suivante) sera utilisé.

2. Fixer la barre stabilisatrice (Pièce N° 7) à 

l’ensemble monté à l’étape N° 1 à l’aide de (4) 

boulons M6 x 35 mm (Pièce N° 12). Le petit trou 

qui se trouve près de l’extrémité du panneau 

devrait être orienté vers le haut à l’endroit où le 

garde-corps facultatif sera installé, le cas 

échéant. 

3. Si le garde-corps n’est pas utilisé, insérer (1) 

boulon M6 x 18 mm (Pièce N° 14) dans le trou 

qui se trouve près du centre du garde.

1. Determine si utilizará o no el Riel de 

Protección para Bebés (se vende por separado; 

vea la página siguiente).

2. Ponga la Barra Estabilizadora (Pieza #7) con 

el Cuerpo de la Cuna del Paso #1 utilizando (4) 

Pernos M6 x 35 mm (Pieza #12). El pequeño 

agujero cerca del extremo del riel debiera estar 

en la parte superior del extremo de la cuna 

donde se instalará el riel de seguridad opcional.

3. Si no se instala el riel de seguridad opcional, 

instale (1) Perno M6 x 18 mm (Pieza #14) en el 

agujero cerca del centro del riel.

Summary of Contents for SIMMONS KIDS Slumber Time Crib 'N' More

Page 1: ...nstructions avant l assemblage et l utilisation CONSERVEZ LES INSTRUCTIONS POUR R F RENCE ULT RIEURE L ASSEMBLAGE DOIT ETRE FAIT PAR UN ADULTE A cause de la pr sence de petites pi ces pendant l assemb...

Page 2: ...support and the mattress to the next highest position Fall Hazard Stop using crib when child begins to climb out or reaches a height of 35in 89cm whichever occurs first The child should be placed in a...

Page 3: ...s assurer que le sommet du c t lat ral avant du lit se trouve au moins 7 6 cm 3 pouces plus haut que la surface sup rieure du matelas Si ce n est pas le cas abaisser le support du matelas et le matela...

Page 4: ...rior del colch n En caso contrario baje el soporte del colch n y el colch n hasta la siguiente posici n m s alta Peligro de ca das deje de utilizar la cuna cuando el ni o comience a trepar o alcance u...

Page 5: ...esign Be sure to use the proper size and shape specified in the instructions Remarque au cours du proc d d assemblage lorsque vous utilisez des vis ou des boulons v rifiez les en pla ant la vis le bou...

Page 6: ...8 2741 ANTES DE ENCENDER A LA ASAMBLEA SI ALGUNAS PIEZAS SON QUE FALTA O DA ADAS CRIB PARTS PI CES DE LIT DE B B PIEZAS DE LA CUNA 4 1 Left Crib Side 1 PanneaudeGauche duLitdeB b 1 MontajedelLado Izqu...

Page 7: ...lons M6 x 75mm 4 Pernos M6 x 75mm 10 8 M6 x 55mm Bolt 8 Boulons M6 x 55mm 8 Pernos M6 x 55mm 11 6 M6 x 45mm Bolt 6 Boulons M6 x 45mm 6 Pernos M6 x 45mm 12 4 M6 x 35mm Bolt 4 Boulons M6 x 35mm 4 Pernos...

Page 8: ...0 Pi ce No10 Pieza 10 Part 16 Pi ce No16 Pieza 16 Part 16 Pi ce No16 Pieza 16 Part 16 Pi ce No16 Pieza 16 10 2 M6 x 55mm Bolt 2 Boulons M6 x 55mm 2 Pernos M6 x 55mm Part 10 Pi ce No10 Pieza 10 Part 9...

Page 9: ...S assurer que l tiquette est tourn e vers l int rieur 2 Fixer le c t gauche de la couchette pi ce n 4 la t te de lit mont e l tape n 1 Pour ce faire utiliser 3 boulons pi ce n 10 et la cl hexagonale...

Page 10: ...NIVEAU EN S ASSURANT QU IL EST LA M ME HAUTEUR TOUS LES POINTS DE SOUTIEN PASO 3 Fije el Soporte del Colch n Pieza 8 al Ensamblado de la Cuna del Paso 2 utilizando 4 Pernosn Pieza 14 utilice la llave...

Page 11: ...Lit Superieur 1 Estructura Superior de la Parte de los Pies Crib Assembly from Step 3 Lit De B b Assembl L tape No3 Montaje de la Cuna del Paso 3 Crib Assembly from Step 3 Lit De B b Assembl L tape No...

Page 12: ...Ne JAMAIS suspendre de ficelles au dessus d un lit NE JAMAIS placer autour du cou d un enfant des objets avec une ficelle une corde ou un ruban comme une ficelle de capuche ou une corde pour sucette C...

Page 13: ...in the lowest position DO NOT use Day Bed or Toddler Bed unless mattress support is in the lowest position Store all unused hardware safely 1 Retirer le pied de lit mont Pi ce N 6 en enlevant les 6 b...

Page 14: ...rt 12 The small hole near the end of the rail should be on top on the end of the crib where the optional guard rail will be installed 3 If not installing the optional guard rail install 1 M6x18mm Bolt...

Page 15: ...CRIB N MORE PEUT TRE CONVERTI EN LIT D ENFANT L ACHAT DU GARDE CORPS POUR LIT D ENFANT SIMMONS No 180120 PLUS DE D TAILS EN MAGASIN NOTA ESTA CUNA SE PUEDE CONVERTIR EN UNA CAMA DEL NI O CON LA COMPR...

Page 16: ...te de lit 2 Utiliser 4 boulons M6 x 18 mm pi ce n 14 pour remplir les trous de boulon qui se trouvent l arri re du pied de lit Esta Crib N More puede convertirse en una cama tama o normal si compra e...

Reviews: