background image


24 

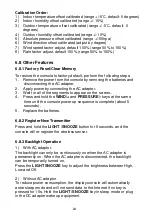
Calibration Order: 

1)  Indoor temperature offset calibrated (range +/-5˚C, default: 0 degrees) 
2)  Indoor humidity offset calibrated (range +/-10%) 
3)  Outdoor temperature offset calibrated (range +/-5˚C, default: 0 

degrees) 

4)  Outdoor humidity offset calibrated (range +/-10%) 
5)  Absolute pressure offset calibrated (range +/-50hpa) 
6)  Wind direction offset calibrated (adjust by degree) 
7)  Wind speed factor adjust, default 100% (range 50% to 150%) 
8)  Rain factor adjust, default 100% (range 50% to 150%) 
 

6.8 Other Features 

6.8.1 Factory Reset/Clear Memory 

To restore the console to factory default, perform the following steps: 
1.  Remove the power from the console by removing the batteries and 

disconnecting the AC adapter. 

2.  Apply power by connecting the AC adapter. 
3.  Wait for all of the segments to appear on the screen,. 
4.  Press and hold the 

WIND/+

 and

 PRESSURE/- 

keys at the same 

time until the console power up sequence is complete (about 5 
seconds). 

5.  Replace the batteries. 
 

6.8.2 Register New Transmitter 

Press and hold the 

LIGHT /SNOOZE

 button for 5 seconds, and the 

console will re-register the wireless sensor. 
 

6.8.3 Backlight Operation 

1)  With AC adaptor. 
The backlight can only be continuously on when the AC adapter is 
permanently on. When the AC adapter is disconnected, the backlight 
can be temporarily turned on. 
Press the 

LIGHT SNOOZE

 key to adjust the brightness between High, 

Low and Off. 
 
2)  Without AC adaptor 
To reduce power consumption, the display console will automatically 
enter sleep mode and will not send data to the Internet if no key is 
pressed for 15s. Hold the 

LIGHT /SNOOZE

 key in sleep mode or plug 

in the DC adapter wake up equipment. 

Summary of Contents for 22515

Page 1: ... 2 4 Install Rain Gauge 8 5 2 5 Install Batteries 8 5 2 6 Mount assembled outdoor sensor package 9 5 2 6 1 Before you mount 9 5 2 6 2 Mounting 9 5 2 7 Reset Button and Transmitter LED 10 5 3 Best Practices for Wireless Communication 10 5 4 Display console 11 5 4 1 Vertical Desk Stand 13 6 Display Console Operation 14 6 1 Screen Display 14 6 2 Initial Display Console Set Up 15 6 3 Key function 16 6...

Page 2: ...ireless Signal Strength Indicator 25 6 8 6 Weather forecast 25 6 8 7 Snooze 27 6 8 8 MAC address display 27 7 Specification 28 8 Live Internet Publishing 29 8 1 Connecting the Weather Station Console to WiFi 30 8 1 1 Download mobile application 31 8 1 2 Connect the console to Wi Fi 31 8 1 2 1 Configure device 31 8 2 Adding weather services 33 8 2 1 Ecowitt Weather 34 8 2 2 Viewing data on ecowitt ...

Page 3: ... Quick Start Guide Although the manual is comprehensive much of the information contained may be intuitive In addition the manual does not flow properly because the sections are organized by components The following Quick Start Guide provides only the necessary steps to install operate the weather station and upload to the internet along with references to the pertinent sections Required Step Desc...

Page 4: ...nstall the sensor array at least 5 from any building structure ground or roof top 3 Avoid wind and rain obstructions The rule of thumb is to install the sensor array at least four times the distance of the height of the tallest obstruction For example if the building is 20 tall and the mounting pole is 6 tall install 4 x 20 6 56 away 4 Wireless Range The radio communication between receiver and tr...

Page 5: ...ng clamps 1 User manual 1 Zip bag for 1pc 10mm single head wrench 5 2 Sensor Set Up 1 Wind Vane 2 Wind Speed Sensor 3 UV sensor Light sensor 4 Thermo hygro sensor 5 Rain collector 6 Bubble level 7 Solar panel 8 U Bolt 9 Battery compartment 10 Reset button 11 LED Indicator light on for 4s if the unit power up Then the LED will flash once every 16 seconds the sensor transmission update period ...

Page 6: ...panel Note that one side of the plate has a straight edge which goes into the groove the other side is bent at a 90 degree angle and has a curved profile which will end up hugging the mounting pole Once the metal plate is inserted remove nuts from the U Bolts and insert both U bolts through the respective holes of the metal plate as shown in Figure 8 Figure 1 Loosely screw on the nuts on the ends ...

Page 7: ...irection measurements Figure 3 Figure 4 There are four alphabet letter of N E S and W around the wind direction representing for the direction of North East South and West Wind direction sensor has to be adjusted so that the directions on the sensor are matching with your real location Permanent wind direction error will be installation when the wind direction sensor is not positioned correctly du...

Page 8: ...igure 7 Figure 8 Note If no LED light up or is permanently on make sure the batteries are inserted the correct way or a proper reset has happened Do not install the batteries backwards You can permanently damage the outdoor sensor Note We recommend 1 5V lithium batteries for cold weather climates but alkaline batteries are enough for most climates We do not recommend rechargeable batteries They ha...

Page 9: ... but loosen s as necessary Once placed hand tightens all four nuts to do so evenly Now you will need to align the whole package in the proper y rotating it on top of the mounting pipe as needed Locate labeled North that you will find on top of the sensor package xtto the light sensor You must rotate the whole sensor package his arrow points due north To achieve proper alignment usea compass many c...

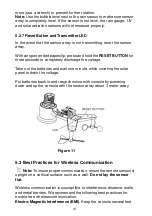
Page 10: ...ge the voltage Take out the batteries and wait one minute while covering the solar panel to drain the voltage Put batteries back in and resynchronize with console by powering down and up the console with the sensor array about 3 meter away Figure 11 5 3 Best Practices for Wireless Communication Note To insure proper communication mount the remote sensor s upright on a vertical surface such as a wa...

Page 11: ...ass through metal barriers such as aluminum siding If you have metal siding align the remote and console through a window to get a clear line of sight The following is a table of reception loss vs the transmission medium Each wall or obstruction decreases the transmission range by the factor shown below Medium RF Signal Strength Reduction Glass untreated 5 15 Plastics 10 15 Wood 10 40 Brick 10 40 ...

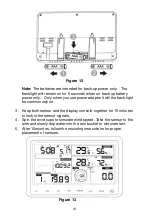
Page 12: ...adapter it will the back light be continuously on 3 Keep both sensor and the display console together for 15 minutes to lock in the sensor signals 4 Spin the wind cups to simulate wind speed Take the sensor to the sink and slowly drip water into the rain bucket to simulate rain 5 After 15miuntes follow the mounting instructions for proper placement of sensors Figure 13 ...

Page 13: ...t desk stand on the back of the display console the console also includes a vertical desk stand to improve the viewing able on a desk as shown in Figure 14 Figure 14 Your display console should have readings in all sections Wind and Rain will show 0 s connected until wind or rain occur or are If you only use battery to power up display console you must press LIGHT SNOOZE key to light up the LCD be...

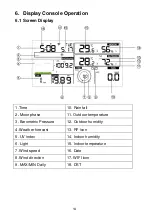
Page 14: ...e 10 Rain fall 2 Moon phase 11 Outdoor temperature 3 Barometric Pressure 12 Outdoor humidity 4 Weather forecast 13 RF icon 5 UV index 14 Indoor humidity 6 Light 15 Indoor temperature 7 Wind speed 16 Date 8 Wind direction 17 WIFI icon 9 MAX MIN Daily 18 DST ...

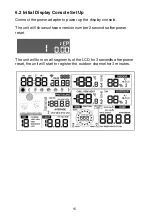
Page 15: ...set The unit will turn on all segments of the LCD for 3 seconds after reset the unit will start to register the outdoor channel for 3 minutes Connect the power adapter to power up the display console 2 seconds after power The unit will turn on all segments of the LCD for 3 seconds after power reset the unit will start to register the outdoor channel for 3 minutes ...

Page 16: ...e of Temperature Humidity rain rate rain day wind MAX MIN Press this key to view the MAX MIN value of Temperature Humidity rain rate rain day wind UVI LIGHT Absolute Pressure LIGHT SNOOZE Press this key to adjust LCD backlight brightness HI MID OFF Hold this key to register new transmitter Note 1 When power on press WIND and PRESSURE key to reset the weather station and clear all records memory an...

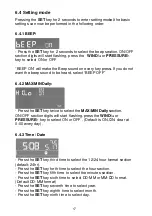
Page 17: ... 0 00 every day 6 4 3 Time Date Press the SET key third time to select the 12 24 hour format section default 24hr Press the SET key forth time to select the hour section Press the SET key fifth time to select the minutes section Press the SET key sixth time to select DD MM or MM DD format Default DD MM format Press the SET key seventh time to select year Press the SET key eighth time to select mon...

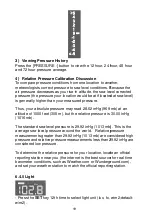
Page 18: ... value REL pressure value and hPa digits will start flashing press the WIND key or PRESSURE key to increase or decrease the REL pressure value 1 Viewing Absolute vs Relative Pressure To switch between absolute and relative pressure press and hold the PRESSURE button for two seconds Absolute pressure is the measured atmospheric pressure and is a function of altitude and to a lesser extent changes i...

Page 19: ...tive pressure for your location locate an official reporting station near you the internet is the best source for real time barometer conditions such as Weather com or Wunderground com and set your weather station to match the official reporting station 6 4 5 Light Press the SET key 12th time to select light unit lux fc w m2 default w m2 button to view the 12 hour 24 hour 48 hour another level con...

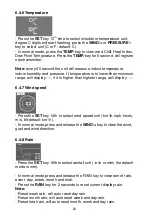
Page 20: ...he wind gust and wind direction 6 4 8 Rain Press the SET key 15th to select rainfall unit inch or mm the default mode is mm In normal mode press and release the RAIN key to view rain of rate event day week month and total Press the RAIN key for 2 seconds to reset current display rain Note Reset week rain will auto reset day rain Reset month rain will auto reset week and day rain Reset total rain w...

Page 21: ... 4 9 Moon phase Press the SET key 16th to select Northern or Southern Hemisphere 6 5 Alarm mode 6 5 1 Display of Alarm value 1 Press and release ALARM key to display high alarm 2 Press ALARM key again to display low alarm Note Press RAIN key to select display rate or day rain alarm data Press WIND key to select display wind or gust alarm data Press ALARM key third time or press LIGHT SNOOZE normal...

Page 22: ...rmal mode 6 5 3 Alarm Setting Order 1 Time alarm setting 2 Indoor high temperature setting 3 Indoor low temperature setting 4 Indoor high humidity setting 5 Indoor low humidity setting 6 Outdoor high temperature setting 7 Outdoor low temperature setting 8 Outdoor high humidity setting 9 Outdoor low humidity setting 10 High wind setting 11 High gust setting 12 Rain rate high setting 13 Rain day hig...

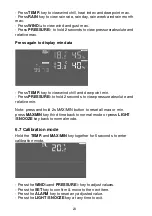
Page 23: ... MIN key third time back to normal mode or press SNOOZE key back to normal mode 6 7 Calibration mode Hold the TEMP and MAX MIN key together for 5 seconds to enter calibration mode Press the WIND and PRESSURE key to adjust values Press the SET key to confirm move to the next item Press the ALARM key to reset any adjusted value Press the LIGHT SNOOZE key at any time to exit key to view wind chill he...

Page 24: ...ing the AC adapter 3 Wait for all of the segments to appear on the screen 4 Press and hold the WIND and PRESSURE keys at the same time until the console power up sequence is complete about 5 seconds 5 Replace the batteries 6 8 2 Register New Transmitter Press and hold the LIGHT SNOOZE button for 5 seconds and the console will re register the wireless sensor 6 8 3 Backlight Operation 1 With AC adap...

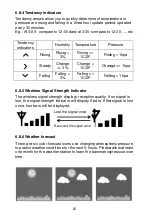
Page 25: ...e allow at least one month for the weather station to learn the barometric pressure over time Tendency indicators Humidity Temperature Pressure Rising Rising 3 Rising 1C 2F Rising 1hpa Steady Change 3 Change 1C 2F Change 1hpa Falling Falling 3 Falling 1C 2F Falling 1hpa Lost the signal once Received the signal once Tendency arrows allow you to quickly determine of temperature or pressure are risin...

Page 26: ... to partly cloudy If the rate of change of pressure decreases the weather is generally degrading cloudy rainy or stormy If the rate of change is relatively steady it will read partly cloudy Sunny Partly sunny Cloudy Blink for 30 minutes at most Blink for 30 minutes at most Snowy icon will appear in place of rainy icon when the outdoor reases the weather is generally improving sunny to partly cloud...

Page 27: ...stop the alarm 6 8 8 MAC address display When the external power adaptor is connected and plugged in press and release the SET button to view MAC address For example the MAC is 12 34 56 AB CD EF With your obtained MAC address register your device on the Ecowitt service or customized website son the current conditions do not match the forecast icon is 48 hours in advance In most locations this pred...

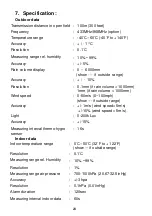
Page 28: ...rain volume 1000mm 1mm if rain volume 1000mm Wind speed 0 50m s 0 100mph show if outside range Accuracy 1m s wind speed 5m s 10 wind speed 5m s Light 0 200k Lux Accuracy 15 Measuring interval thermo hygro sensor 16s Indoor data Indoor temperature range 0 C 50 C 32 F to 122 F show if outside range Resolution 0 1 C Measuring range rel Humidity 10 99 Resolution 1 Measuring range air pressure 700 1100...

Page 29: ...y 8 Live Internet Publishing Your console is capable of sending your sensor data to select internet based weather services The supported services are shown in the table below Hosting Service Website Description Ecowitt Weather https www ecowitt net Ecowitt is a new weather server that can host a bunch of sensors that other services don t support Weather Undergound https www wunderground com Weathe...

Page 30: ... data to these services you must connect your console to the internet via Wi Fi The console can only operate using Wi Fi when the external power adapter is connected and plugged in Note If you are testing the setup with the outdoor sensor package nearby and indoor you may want to consider connecting to Wi Fi but not yet configuring any of the weather services The reason is that while indoor the te...

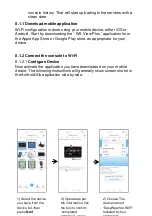
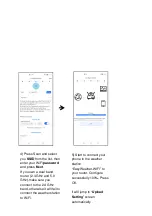
Page 31: ...le Play store as appropriate for your device 8 1 2 Connect the console to Wi Fi 8 1 2 1 Configure Device Now activate the application you have downloaded on your mobile device The following instructions will generally show screen shots for the Android iOs application side by side 1 Select the device you have from the device list then press Next 3 Operate as per the information tick the box to conf...

Page 32: ...al band router 2 4 GHz and 5 0 GHz make sure you connect to the 2 4 GHz band otherwise it will fail to connect the weather station to WiFi 5 Start to connect your phone to the weather station EasyWeather WIFI to your router Configure successfully 100 Press OK it will jump to Upload Setting screen automatically ...

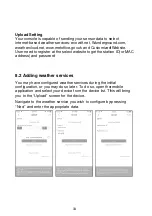
Page 33: ...open the mobile application and select your device from the device list This will bring you to the Upload screen for the device Navigate to the weather service you wish to configure by pressing Next and enter the appropriate data Your console is capable of sending your sensor data to select Wunderground com Customized Website User need to register at the select website to get the station ID or MAC...

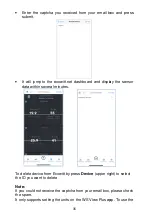
Page 34: ...l time Press Save on the page Press Register at ecowitt net and finish the registration on the page Press the button and select enter your email address Set a password for your ecowitt account Press Submit It s recommended to use the Ecowitt Weather server to monitor and On the ecowitt net uploading page enable the ON button Register at ecowitt net and finish the registration on the Press the butt...

Page 35: ...ou want to delete Note If you could not receive the captcha from your email box please check the spam It only supports setting the units on the WS View Plus app To use the you received from your email box and press It will jump to the ecowitt net dashboard and display the sensor upper right to select If you could not receive the captcha from your email box please check It only supports setting the...

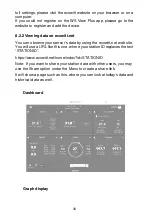
Page 36: ...f you want to share your station data with other users you may use the Share option under the Menu to create a share link It will show a page such as this where you can look at today s data and historical data as well Dashboard Graph display full settings please visit the ecowitt website on your browser or on a t register on the WS View Plus app please go to the ecowitt net web site You will use a...

Page 37: ...37 List display Weather Map ...

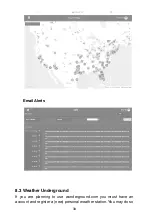
Page 38: ... are planning to use wunderground com you must have an account and register a new personal weather station You may do so If you are planning to use wunderground com you must have an account and register a new personal weather station You may do so ...

Page 39: ...ess Register at Wunderground com and finish the registration on the page 1 Visit Wunderground com and click Join as the right top arrow indicates and select the Sign up for free option 2 Click My Profile and select My Devices to register your station 3 Select Add New Device ...

Page 40: ...40 4 Find Personal Weather Station Select other and click Next 5 Select Address or Manual option and find your local position Press Next ...

Page 41: ...41 6 This time you will be asked details about your weather station Go ahead and fill out the form 7 After completing the weather station you will see station ID and key password ...

Page 42: ...e screen within hours To add WU station ID by press the icon upper right To delete WU station ID by press Station ID upper right to select the ID you want to delete Note WU Dashboard shows the data obtained from WU server Take note of the PWS identifier ID and the password that will be You ll see the current WU data including graphs on the screen icon upper right by press Station ID upper right to...

Page 43: ...tation ID replaces the text STATIONID http www wunderground com personal weather station dashboard ID STATIONID It will show a page such as this where you can look at today s data and historical data as well There are also some very useful mobile apps The URLs provided here go to the Web version of the application pages You can also find them directly from the iOS or Google Play stores WunderStato...

Page 44: ...round forecast id48 6154808 https play google com store apps details id com wunderground a ndroid weather hl en PWS Weather Station Monitor View weather conditions in your neighborhood or even right in your own backyard Connects to wunderground com https itunes apple com us app pws weather station monitor id713 705929 ...

Page 45: ...ce to Favorites column by press the star button on the back of the device Note This function requires that your phone and the console is using the same network bottom left on the home screen and select You can move the device to button on the back of the device Note This function requires that your phone and the console is using ...

Page 46: ...rs If left in too long the batteries may leak due to environmental challenges In harsh environments inspect the batteries every 3 months when cleaning the solar panel You can set your desired display units or default home page for the app Clean the rain gauge once every 3 months Rotate the funnel clockwise and lift to expose the rain gauge mechanism and clean with a damp cloth Remove any dirt debr...

Page 47: ...eries apply a corrosion preventive compound on the battery terminals available at Amazon and most hardware stores 5 In snowy environments spray the top of the weather station with anti icing silicon spray to prevent snow build up ...

Page 48: ...ent will flash every 16 seconds If the LED is not flashing every 16 seconds Replace the batteries in the outside sensor array If the batteries were recently replaced check the polarity If the sensor is flashing every 16 seconds proceed to the next step There may be a temporary loss of communication due to reception loss related to interference or other location factors or the batteries may have be...

Page 49: ...le level mounting solution Data not reporting to Wunderground com 1 Confirm your password or key is correct It is the password you registered on Wunderground com Your Wunderground com password cannot begin with a non alphanumeric character a limitation of Wundeground com not the station Example oewkrf is not a valid password but oewkrf is valid 2 Confirm your station ID is correct The station ID i...

Page 50: ...i settings are correct network name and password 3 Make sure the console is plugged into AC power The console will not connect to WiFi when powered by batteries only 4 The console only supports and connects to 2 4 GHz routers If you own a 5 GHz router and it is a dual band router you will need to disable the 5 GHz band and enable the 2 4 GHz band 5 The console does not support guest networks ...

Reviews: