3
allow 3/8” OD lines to connect the faucet are acceptable.
Purge off all air from the water lines by slowly opening the faucet lever. A steady water stream of water assures all
air is purged.
Prior to drinking, flush water through Chiller for at least 2 minutes. Close the faucet and check all water tight
connections.
Plug in the Chiller and you will be able to enjoy cold water in about 30 minutes after completing installation.
CAUTION: TO PREVENT PROPERTY DAMAGE DUE TO WATER LEAKAGE, SEEK INSPECTION BY A PLUMBER TO
CONFIRM THAT THE WATER PRESSURE IS LESS THAN 100PSI (690KPA) BEFORE YOU CONNECT THE SU PP L Y
WATER. CAUTION: FAILURE TO ABIDE BY ABOVE PROCEDURE CAN CAUSE PHYSICAL DAMAGE TO THE CHILLER
AND POSSIBLY CAUSE WATER LEAKS.
4.
PRESSURE LIMITER (optional use)
An optional use 30 -50 psi (factory preset to 40 PSI) pressure limiter is available for the Chiller for use in certain
applications. The pressure limiter is not needed if Chiller Daddy® is installed on a typical residential reverse osmosis
RO system. Even though Chiller Daddy® is rated for 100 PSI maximum inlet water pressure we suggest using the
pressure limiter if there are possible “water hammer” pressure spikes. Pressure limiters help protect plumbing
systems from water hammer pressure spikes in a similar way that surge suppressors protect electronics from
damage by electrical spikes. The Pressure Limiter allows you to adjust the strength of the water flow to your
desired faucet level. 30 – 50 PSI allows you to choose a very strong flow or a softer flow as the water comes out of
the faucet.
4.5
INSULATED FAUCET CONNECTION TUBE (optional use)
An optional use 30” insulated ¼” OD faucet connection poly tube is included. This insulated tube not only helps to
keep the water colder, but also prevents condensation from forming on the tube and running down onto the
Chiller. It helps keep the Chiller better looking by keeping the condensation water marks from forming. This is
especially important in humid locations.
5.
CLEANING & SANITIZING
Keep the black radiant condensers dust free for maximum water chilling and longest system life. Use a vacuum
cleaner with a long bristle brush attachment to remove dust from the black condenser grid on both sides as needed.
For cleaning and sanitizing the drinking water pathway we suggest doing it in conjunction with the routine
maintenance on your Reverse Osmosis RO system or drinking water system. Any sanitizing solution approved for
your RO system will work well with the Chiller Daddy® stainless steel waterway, such as Pro Products Sani System
Water Filtration System Sanitizer.
6.
STORAGE
When not in use for a long period of time, conduct cleaning before putting in storage and again before returning
to use.
Unplug power cord. Open faucet until water is room temperature.
Close the source water inlet valve.
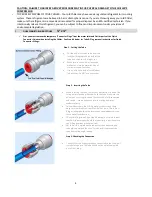
Disconnect the water tubes from the water Chiller. See Section 7, Step 4 for instructions on tube removal from
quick connection fittings.
Place a bucket beneath the drain cap on the bottom of the Chiller. Open the drain cap and drain the remaining
water from the tank. Reinstall the drain cap.
CAUTION: BE SURE TO SECURELY REINSTALL THE DRAIN CAP TO
PREVENT LEAKAGE AND WATER DAMAGE.
Reinstall the “Connector Plugs” into the water inlet and outlet Quick Connectors to keep the system sealed while
storing.
Store standing in an upright position on a flat and even surface. (Do not lay Chiller Daddy® on its side, end or
upside down.)


