Chiltern Invadex LiteTrack Portable Gantry
10
15. Final safety check
Prior to hoisting a client check:
-
All handwheels are in place (3 per upright) and they have
been securely tightened
-
The gantry is level in all directions
-
The height and width of the gantry are appropriate for the
task eg. there is sufficient space to position a wheelchair or
shower chair at the side of the bed for transfer
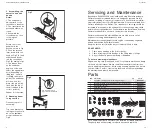
The gantry is now
ready for use. The
weight of the hoist will
release the cassette
and allow it to travel
freely along the beam
as Fig 15. Slide the
hoist across the
gantry to the desired
position ready to lift/
transfer the client.
Take care when
moving around the
gantry to avoid
trip hazards such as
the legs, handwheels
and potential injury
from the corner
quadrant or cassette.
14. Attaching the
Wispa Lite Portable
hoist
Rest the Portable hoist
on the bed or trolley
ready for attaching to
the eye on the gantry.
Release sufficient
tape to connect the
carabena on the hoist
to the eye on the
gantry as Fig 14. Do
not lift the hoist to
attach it to the gantry.
Fig 14
Fig 15
Final positioning
User Guide
11
16. Disassembly of the gantry
1.
Do not lift the hoist.
Lower the hoist by releasing sufficient
tape to disconnect the carabena on the hoist from the eye on the
gantry as Fig 16 (B). Remove the hoist from the gantry.
2.
Always ensure the cassette is locked in the central position
before
disassembling the gantry. To achieve this slide the
cassette along until it clicks into position in the centre of the rail
as Fig16 (A).
If the height of the gantry needs to be lowered release the
middle handwheel. Hold onto the top handwheel with one hand,
pressing the release levers in on the leg with the other hand,
and push the leg down to the required height
one hole at a
time
, lowering one leg and then repeating by the same
increment on the other side.
3.
If the bed is occupied, relocate the gantry to a suitable place
ready for disassembly.
Disassembly of the gantry
A
B
Disassembly of the gantry
Fig 16


