background image

Chiltern Invadex Side Entry MK2

2

Installation

General Guide
For your safety this installation should be completed by qualified 
personnel complying with all relevant regulations and byelaws.

Chiltern Invadex Shower cubicles are manufactured to many different
specifications and sizes. It is therefore important that all services
relevant to your model are complete and tested before you attempt to
assemble your shower cubicle.  All building work and decorating should
be finished i.e. a suitable floor in place, skirting boards painted and fixed,
walls  and ceilings plastered and decorated.

Check all the items in the carton against the parts list on the
enclosed leaflet.

Should you require any technical assistance or have any queries
regarding installation procedures contact your nearest Chiltern Invadex
Office. For an efficient response it will help if you have the model type
and serial number to hand when you call (the serial number can be found
on the label on the back panel).

Services - Incoming Water
The installation must be in accordance with local water company
byelaws.

Mixer showers

Both hot and cold supplies must come from the water storage tanks with
at least 2 metres head of water above the shower.
BOOSTER PUMP  If the required head of water is not available a Twin
Impeller Booster Pump can be employed.  Do not use flow switches.
All supplies should terminate close to the relevant controls with a 3/4" B.
S. Male outlet. We strongly recommend that accessible isolating valves
are fitted near to our units to facilitate future servicing, or isolation, in the
event of an emergency.

Instantantaneous Shower

15mm pipe with mains cold water supply.
Minimum operating pressure 1 bar  (14.5 p.s.i.).
Permissible pressure variations 1 bar - 10 bar (14.5 p.s.i. - 145  p.s.i.).

Waste Water 

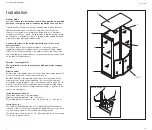
(fig 1)

The Chiltern Invadex Shower has a 12 volt pump positioned in the rear
left hand corner of the cabinet. It pumps the waste water out of the base
to a waste stack similar to that used by a washing machine.
The waste stack need only be in 1 1/4" (32mm) plastic but it is necessary
to fit a trap to prevent odours.

User Guide

19

5, 6, 7

1

8

3

9

4

2

Waste pump Detail

10

11

Summary of Contents for Side Entry Mk2

Page 1: ...without the express permission in writing of Chiltern Invadex UK Ltd Published by Chiltern Invadex UK Ltd 126 Churchill Road Bicester Oxfordshire OX26 4XD Registered in England No 04704248 CINV 86 05...

Page 2: ...Guide 16 Accessories 17 Spare parts 18 Warranty 20 Side Entry Mk2 Shower Cubicle These products have been designed to the highest standards with safety strength and quality in mind Follow the recommen...

Page 3: ...ack panel Services Incoming Water The installation must be in accordance with local water company byelaws Mixer showers Both hot and cold supplies must come from the water storage tanks with at least...

Page 4: ...uirements of the user and we recommend that this operation is left until later Flush pipe and multikwik pan connector are supplied for standard installation These can be extended on site Additional pa...

Page 5: ...s II Insulation class Type B equipment All electrical installations should be carried out by qualified personnel complying with all relevant byelaws and IEE regulations Prior to installing your shower...

Page 6: ...complete electrical supply Shower pumped waste The correct wiring installation for the electric shower and pumped waste is shown in Fig 2 Please pay particular attention to the wire sizes Electrical I...

Page 7: ...r supply presssures may be affected by simultaneous use of water at another point in the house a fault in the house plumbing or a problem with the water supply to the house For further assistance plea...

Page 8: ...s may require a non scratch liquid cleaner Do not use oven cleaner or a scouring powder on any of the surfaces Use of scourers will dull the finish of the surfaces and spoil the appearance of your tra...

Page 9: ...into the base socket until the face of the pump and socket meet Prior to fitting the pump cover 10 ensure that the electrical cable and waste pipe are clear of obstructions Fig 4 10 To waste pipe Chil...

Page 10: ...the shower tray base The door must nearly be touching when closed so as not to leak Using the drill provided drill through the holes in the corner section and lock into position with the 1 2 self tap...

Page 11: ...push them all the way down to the bottom of the side panel The seat can then be fitted using the screws provided Please contact your Chiltern Invadex regional office if a seat is required but has not...

Page 12: ...push them all the way down to the bottom of the side panel The seat can then be fitted using the screws provided Please contact your Chiltern Invadex regional office if a seat is required but has not...

Page 13: ...the shower tray base The door must nearly be touching when closed so as not to leak Using the drill provided drill through the holes in the corner section and lock into position with the 1 2 self tap...

Page 14: ...into the base socket until the face of the pump and socket meet Prior to fitting the pump cover 10 ensure that the electrical cable and waste pipe are clear of obstructions Fig 4 10 To waste pipe Chil...

Page 15: ...s may require a non scratch liquid cleaner Do not use oven cleaner or a scouring powder on any of the surfaces Use of scourers will dull the finish of the surfaces and spoil the appearance of your tra...

Page 16: ...r supply presssures may be affected by simultaneous use of water at another point in the house a fault in the house plumbing or a problem with the water supply to the house For further assistance plea...

Page 17: ...complete electrical supply Shower pumped waste The correct wiring installation for the electric shower and pumped waste is shown in Fig 2 Please pay particular attention to the wire sizes Electrical I...

Page 18: ...m Rating 315mA Delivery output 18ltrs min maximum Class II Insulation class Type B equipment All electrical installations should be carried out by qualified personnel complying with all relevant byela...

Page 19: ...uirements of the user and we recommend that this operation is left until later Flush pipe and multikwik pan connector are supplied for standard installation These can be extended on site Additional pa...

Page 20: ...ack panel Services Incoming Water The installation must be in accordance with local water company byelaws Mixer showers Both hot and cold supplies must come from the water storage tanks with at least...

Page 21: ...in this user guide 3 Our warranty does not cover replacements adjustments or repairs which may be required as result of normal wear and tear wilful or accidental damage misuse neglect or any other ca...

Page 22: ...Dealers Name Address Post Code Telephone Your Serial Number is Date of purchase Please fill in the information below for future reference MK2 Side Entry COVER 28 1 05 11 45 am Page 2...

Page 23: ...K Ltd Published by Chiltern Invadex UK Ltd 126 Churchill Road Bicester Oxfordshire OX26 4XD Registered in England No 04704248 CINV 86 05 November 2010 The crossed wheelie bin symbol shown on the pumpe...

Reviews: