background image

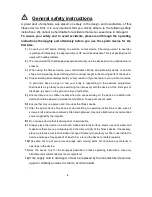
Special Safety Precautions


Power source: 

  Choose a place in reach of a socket when placing the treadmill.   

  Always connect the appliance to a socket with a grounded circuit and no other 

appliances connected to it. It is recommended not to use any extension cords.   

  A faulty grounding of the appliance can cause the risk of electrical shocks. Ask 

a  qualified  electrician  to  check  the  socket  in  case  you  do  not  know  if  the 

appliance is grounded appropriately. do not modify the plug provided with the 

appliance if it is not compatible with your socket. ask a qualified electrician to 

install a suitable socket.     

  Sudden  voltage  fluctuations  can  seriously  damage  the  treadmill.  Weather 

changes  or  switching  on  and  off  other  appliances  can  cause  peak  voltages, 

over-voltage  or  interference  voltage.  To  limit  the  danger  of  damage  to  the 

treadmill,  it  should  be  equipped  with  an  over-voltage  protective  device  (not 

included).     

  This appliance is designed for use with ~220 - ~240 Volt rated voltage.   

  Keep power cord away from the 

carrying roller.

 Do not leave the power cord below 

the 

striding belt.

 Do not use the treadmill with a damaged or worn out power cord.   


Unplug  before  cleaning  or  engaging  in  maintenance  work.  Maintenance  should 

only  be  done  by  authorised  service  technicians,  unless  otherwise  stated  by  the 

manufacturer. Ignoring those instructions would automatically void the warranty. 


  Inspect the treadmill before every use to make sure that every part is operational.   

  Do not use the treadmill outdoors, in a garage or under any kind of canopy. Do not 

expose the treadmill to high humidity or direct sunlight.   

  Never leave the treadmill unattended. 


Make sure the striding belt is always tense. Start the striding belt before stepping on it. 


Summary of Contents for CE-7305

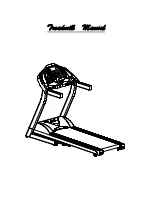
Page 1: ...Treadmill Manual...

Page 2: ...wing parts as far as included in the scope of delivery Frame cable electronic devices foam wheels The guarantee does not cover Damage effected by outer force Intervention by unauthorised parties Incor...

Page 3: ...xercising too intensively with the device At the first signs of dizziness lay down on the ground until you feel better 5 Ensure there are no children nearby when you are exercising on the device In ad...

Page 4: ...or interference voltage To limit the danger of damage to the treadmill it should be equipped with an over voltage protective device not included This appliance is designed for use with 220 240 Volt ra...

Page 5: ...jury when using tools and carrying out technical activities Please proceed with care when assembling the device Make sure you have a hazard free working environment and do not for example leave tools...

Page 6: ...stand all instructions thoroughly before assembling the treadmill UNPACK AND VERIFY THE CONTENTS OF THE BOX Lift up and remove the box that surrounds the Treadmill Check the following items are presen...

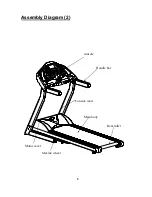
Page 7: ...Assembly Diagram 2 6 console Handle bar Console mast Main body Motor cover Moving wheel Rear roller...

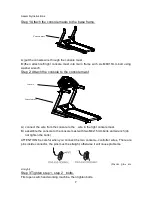
Page 8: ...wire from the console to the wire in the right console mast B assemble the console to the console mast with two M4x15mm bolts and wrench do not tighten the bolts ATTENTION be careful when you connect...

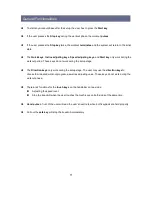
Page 9: ...ist part of your clothes In case of trouble where it is necessary to turn of the motor immediately simply push out the safety out of the console by pulling the rope To turn the treadmill on again turn...

Page 10: ...l Speed Adjustment Keys Are used for adjusting the speed level Select Key Is for select Quick Incline Keys Are used to raise the incline level directly to the certain level Quick Speed Keys Are used t...

Page 11: ...tions Hitting by hard or sharp object Dropping liquid on console Heat sources Enormous shocking 10 Quick Speed Key Speed Quick Incline Key Incline 2 2 Km h 0 0 5 5 Km h 2 2 8 8 Km h 5 5 12 12 Km h 8 8...

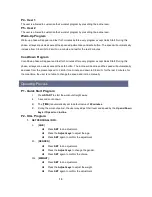
Page 12: ...k during the setup stage The Direction keys only work during the setup stage The user may use the direction keys to choose their desired workout program as well as adjusting value These keys do not wo...

Page 13: ...ange of 65 80 of the THR If the user chooses to change the intensity by Speed level For users under 30 years old the treadmill will accelerate 1 Km Hr every 30 seconds The upper limit is set at 15 Km...

Page 14: ...e speed will automatically decrease from the present speed to 2 km hr for a minute and down to 0 8 km hr for the rest 2 minutes for the meantime the user is not able to change the speed and incline ma...

Page 15: ...start the workout II 3 second count down III Workout starts IV During the workout period the user may adjust their Incline and Speed from the Up and Down keys of Speed and Incline P3 TARGET HEART RATE...

Page 16: ...keys of Speed and Incline IV During the workout if the THR is not reached the speed incline or both Speed Incline will adjust automatically according to what the user has chosen at the setting phase...

Page 17: ...ustment 3 SELECT LEVEL The workout level will be divided into 16 parts as below I The first brick at the button of the first section shows II Press the Direction keys to add the bricks to the desired...

Page 18: ...lipping is eliminated 4 Be careful not to tighten the running belt tension too much as you can create excessive pressure on the front and rear roller bearings An excessively tightened running belt may...

Page 19: ...ble If traces of silicon spray are found lubrication is not necessary In case of a dry surface refer to the following instructions Only use oil free silicon spray Application of lubricant on the belt...

Page 20: ...r damages that were caused by improper usage Please consult your GP before starting your exercise session to clarify whether you are in suitable physical health for exercising with this device The doc...

Page 21: ...the outlet and the treadmill switch is turned on PROBLEM The treadmill circuit breaker trips during a workout SOLUTION Verify that the treadmill is plugged into a dedicated 20amp circuit Note No exte...

Page 22: ...rmining the optimal exercise pulse Make sure you breathe regularly and calmly when exercising Take care to drink enough while exercising This ensures that the liquid requirement of your body is satisf...

Page 23: ...cooling down Please pay attention to the following points NECK EXERCISES Tilt your head to the right and feel the tension in your neck Slowly drop your head down to your chest in a semi circle and the...

Page 24: ...nd repeat this exercise 2 times for each leg INSIDE UPPER THIGH Sit on the floor and place your feet in such a way that your knees are facing outwards Pull your feet as close as possible to your groin...

Page 25: ...ur right foot with your right arm Maintain this position for 30 40 seconds if possible EXERCISES FOR THE CALVES ACHILLES TENDON Place both hands on the wall and support your full body weight Then move...

Reviews: