- 86 -
8-22. Calendar Timer Settings
“Timer”
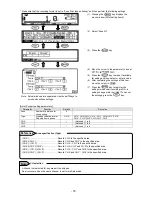
Alarm relay output ON/OFF or message printing can be executed on a date specified arbitrarily. Up to five dates can be
set, and alarm relay output ON/OFF or message No. can be specified for each date.
Actual printing is executed in the following order: “Date”, “Time”, “Timer No.” and then “Message”.
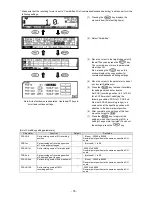
(1) Pressing the
key displays the
menu window (list of setting items).
(2) Select
“Timer”.
(3) Move the cursor to the target calendar timer
No. wi
th the ▲/▼ keys and press the
key. The cursor does not move to
parameters other than No.
Also, pressing the
key on this
window displays the copy window for
calendar timer settings.
(4) Move the cursor to the parameter to be set
(5) Press the
key to make it available
for setting and then select or enter a value.
(6) After completing the settings of this item,
move the cursor to Set .
(7) Press the
key to register the
settings (when chart recording is ON, a
setting change mark is printed). To cancel
the settings, press the
key.
[List of Timer setting parameters]
Parameter
Function
Default
Set value
Mode
Select timer type
None
None, ON (specify ON time only)
ON & OFF (specify both ON and OFF times)
[Timer ON]
Set date and time for alarm output ON or
message printing
*
Jan 1, 2000 to Dec 31, 2099
00 : 00 to 23 : 59
[Timer OFF]
Set date and time for alarm output OFF
*
Jan 1, 2000 to Dec 31, 2099
00 : 00 to 23 : 59
Relay No.
Specify relay No. for timer ON output
*
- (No output at timer ON), 99 (internal circuit
output), 1 to 6
And/Or
Select circuit type for timer ON output
*
And, Or
Message No.
Specify message No. printed at timer ON
*
- (Message not printed at timer ON), 1 to 20
Note:
Actual windows are separated. Use the ▲/▼ keys to
scroll and continue settings.


