background image

INST.No.INE-475-P1CE                                                                   Software Version 1.00 

-14- 


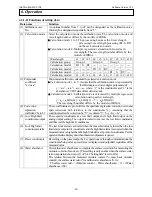
6.3.1-2) Functions of setting data


Data name 

Function 

(1) 


Calibration curve 

No. 

An optional number from 1 to 99 can be designated as the calibration curve. 

Ordinary It is designated sequentially from “1”. 

(2) 


Calculation mode    Select the calculation mode the calibration curve The calculation mode and 

wavelength number differs by the models of IRMA. 

 Calculation mode 1 to 3: The processing becomes the 2-wavelength 

processing/3-wavelength processing (R1, S, R2) 

on the each calculation mode.


 Calculation mode 4: Multiple regression calculation that used each 

wavelength. The wavelength number differs by the 

models of IRMA. 

Wavelength 

λ

1

λ

2

λ

3

λ

4

λ

5

λ

λ

λ

λ

9

λ

10

Calculation group 

Group 1 

Group 2 

Group 3 


Calculation mode 1 

R1 S  R2

― ―


― ―


Calculation mode 2 

― ―

R1 S R2 


― ―


Calculation mode 3 

― ― ―

― ―

 R1  S  R2


Calculation mode 4 

λ

1

λ

2

λ

3

λ

4

λ

5

λ

λ

λ

λ

9

λ

10


(3) 


Polynomial 

coefficient  

“a

0

 to a

10

” 

Polynomial coefficient is calculated by selected calculation mode. 

 Calculation mode 1 to 3: Assume that the calibration curve is represented by 

the third-degree or lower-degree polynomial of   

y = a

3

x

3

 + a

2

x

2

 + a

1

x + a

0

, where, “y” is the constituents and “x” is the 

absorbance (“CH0” data of this detector unit). 

 Calculation mode 4: Calibration curve is calculated by multiple regression 

calculation using each wavelength. 

y = a

0

 + a

1

LOG(

λ

1) + a

2

LOG(

λ

2) + 

····

 + a

10

LOG(

λ

10) 

The wavelength number differs by the models of IRMA. 

(4) 


Correction 

expression 

coefficient


“b

0

 to b

2

” 

These coefficients are provided for the quadratic expression correction (zero and 

span correction) with reference to the constituents “y”. Assuming that the 

constituents after the correction be “Y”, we obtain “Y = b

2

y

2

+b

1

y + b

o

”. 

(5) 


Low/ High limit 

constituents output 

These specify constituents at a low limit output and a high limit output on the 

analog output scaling. The output is scaled to 4mA at the low limit constituents 

and 20mA at the high limit constituents. 

(6) 


Low/ High limit 

constituents alarm 

The low limit alarm is activated when the measured value is lower than the low 

limit alarm set-point of constituents and the high limit alarm is activated when the 

measured value is higher than the high limit alarm set-point of constituents. Use the 

operator interface/display unit when the alarm outputs are required. 

(7)  Preset constituents 

By turning on the preset output by key operations or through communications, the 

constituents being set as a preset value is displayed and outputted, regardless of the 

measured value. 

(8)  Water absorbance 

Decide the water absorbance to compute the surface water ratio for measuring the 

moisture content of sands, etc. [This setting is only enable when the surface water 

ratio computation shown in (11) of “6.4.1 Setting data” is set to ON.] 

The relation between the measured moisture content (%: mass basis moisture 

content), the surface water ratio (%) and the water absorbance (%) is; 

y

 Surface water ratio = (Moisture content – Water absorbance) / (1 + (Water 

absorbance / 100) 


6. Operation 

Summary of Contents for IM Series

Page 1: ... IM series Infrared multiple constituents analyzer Mirror type multiple constituents meter Detector Unit Model IRMA51 IRMA52 Store this manual in a readily accessible location for future reference This manual should be provided to the end user ...

Page 2: ...NO Corporation Notices 1 The contents of this manual are subject to change without notice 2 Every effort has been made to ensure that the details of this manual are accurate However should any errors be found or importance information be omitted please contact your nearest agent of CHINO Corporation 3 Under absolutely no circumstances may the contents of this manual in part or in whole be transcri...

Page 3: ...hed 2 Symbols used in this manual The following symbols are used depending on important degrees of warnings cautions to operate this product safely and to avoid malfunctions or unexpected situation Important degree Symbols Contents 1 This symbol is indicated with a title for an explanation with 2 Indicates important information that must be observed to avoid the risk of fire or electric shock or o...

Page 4: ...the power cord or other cable is high abnormally turn off the power source to this product immediately and contact your nearest sales agent of CHINO Corporation Confirm the grounding To avoid the risk of electric shock before supplying the power to this product make sure that the power terminals and the protective ground terminal have been wired correctly and reliably Caution May cause personal in...

Page 5: ...ames and functions of detector unit components 10 5 2 Names and functions of data display parts 11 5 3 Terminal portion 11 6 Operation 12 6 1 Confirmation before operation 12 6 2 Setting detector unit numbers 12 6 3 Setting calibration curve data 13 6 3 1 Data for setting 13 6 3 1 1 List of setting data 13 6 3 1 2 Function of setting data 14 6 3 2 Procedure for setting 15 6 3 3 Correcting calibrat...
Page 6: ...ith the operator interface display unit 33 9 Inspection and maintenance 34 9 1 Periodical inspection 34 9 2 Self diagnosis function 34 9 3 Measures against troubles not included with self diagnosis 35 9 3 1 No display on this detector unit appears 35 9 3 2 Measured value remains unchanged 35 9 3 3 Measured value fluctuates 35 9 3 4 Measured value is slightly higher or lower than the actual value 3...

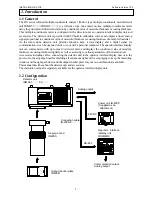
Page 7: ...or with a personal computer The operator interface display unit can communicate with up to nine 9 detector units and displays the constituent value of moisture thickness or coating thickness digitally as well as accessing to various parameters of the detector unit Accessories including cables connecting the detector unit to the operator interface display unit or to the power unit the air purge hoo...

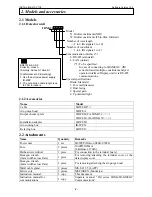
Page 8: ...MA52 Installation adapter IR WED1 Air cooling box IR WEX Relaying box IR WEE 2 2 Attachments Name Quantity Remarks Power unit 1 set IR WEP Omron S82K 05024 Fuse 2 pieces 10A Ø5X20mm Littelfuse 217010 Flathead screwdriver 1 piece For connection to the terminal board Hexagon wrench 3mm width across flats 1 piece For removing attaching the terminal cover or the data display cover Hexagon wrench 4mm w...

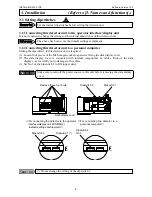
Page 9: ...r carefully not to damage to the cables 3 Set No 3 of the dipswitch 2 to ON upper side Warning Do not change the setting of the dipswitch 1 Set the internal dipswitches before setting the detector unit The above has been set as the default settings at shipment Make sure to turn off the power source to this unit before removing the data display cover Remarks Reference Caution 3 Installation Refer t...

Page 10: ...cm2 or lower 3 3 Cooling this detector unit water cooling or air cooling The inlet and outlet for cooling are provided on the side of this detector unit Let the purified cooling water flow through the inlet and outlet The recommended water volume is about 0 5 to 1Nl min and the maximum pressure is 200kPa 2kgf cm2 or lower In the environment where the cooling water can not be used this detector uni...

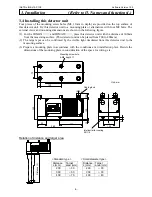
Page 11: ...mm from the measuring surface This detector unit can be placed from 200 to 400mm 2 The target spot can be confirmed by the visible light irradiated from this detector unit to the measuring surface 3 Prepare a mounting plate in accordance with the conditions at an installation place Decide the dimensions of the mounting plate in consideration of the space for wiring etc Relation of distance and tar...

Page 12: ... dust smoke and steam are not contained in the sight path between this detector unit and the measuring area If these cannot be prevented from being contained and their effects are not eliminated mount the air purge hood on this detector unit or use effective alternatives to provide a clear sight path to the measuring area The dc light like the natural light onto the measuring area will not cause a...

Page 13: ...e outer diameter of the cable gland otherwise waterproofing of the detector unit may deteriorate Tighten the cable glands with the nuts and fix the terminal board cover securely after wiring Reference Caution P P OUT OUT SA SB SG DI COM D OCOM IN IN 24VDC 4 20mADC RS 485 DIGITALIN DIGITALOUT 4 20mADC P P OUT OUT SA SB SG DI C O M D O COMIN IN 24VDC 4 20mADC RS 485 D IG IT A LIN D IG IT ALO U T4 20...

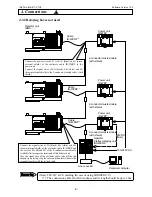
Page 14: ...not to overlap them each other Refer to 6 2 Setting detector unit numbers for the details 4 Connections Caution For wiring to the relaying box refer to the separate manual for the relaying box Caution S ERIES IM S ERIES IM S ERIES IM Cable IR WERP Detector unit IRMA Relaying box IR WEE1 or IR WEE2 The power unit IR WEP is built in 2 conductor twisted cable with shield Operator interface display un...

Page 15: ...SA black SB white and SG brown internal shield of the exclusive cable IR WERP and the wires of SA SB and SG of the 2 conductor twisted cable with shield to respective terminals of this detector unit For the signal wire of the exclusive cable take off the rod shaped tip on its top strip the cover and then insert them to the terminal together with the twisted cable Power unit IR WEP Power unit IR WE...

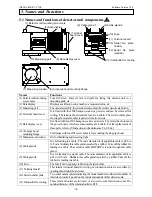
Page 16: ...and is sealed by a rubber Take off the rubber for leading in a cable The exclusive cable IR WERP is lead in through this cable gland 9 Cable gland 2 It is for leading in a signal cable The outer diameter of its applicable cable is φ8 5 to 10 5mm Ordinary this cable gland is sealed by a rubber Take off the rubber for leading in a cable 10 Fuse The fuse 10A in capacity is fitted on the fuse holder 1...

Page 17: ...or entering a setting data in the setting mode or changing the digit of a setting data For changing a setting data in the setting mode For changing a setting data in the setting mode ENT For storing a setting data in the setting mode 5 3 Terminal portion The mounting direction of the cable gland is selectable in the following two kinds Make sure to use the blind cap to cover the place not mounting...

Page 18: ... shift the blinking digit 5 Press ENT key The numeric stops blinking and the detector unit number is stored 6 Press SEL key for 2 seconds The mode returns to the measurement mode CH DATA t 0 0 CH DATA H n 1 Blinking Detector unit number setting mode CH DATA H n 4 Detector unit number The settings shown in the next paragraph can also be executed via the operator interface display unit sold separate...

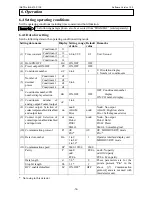
Page 19: ...00 a1 A1 0 to 9999 9 1 0000 a2 A2 0 to 9999 9 0 0000 a3 A3 0 to 9999 9 0 0000 a4 A4 0 to 9999 9 0 0000 a5 A5 0 to 9999 9 0 0000 a6 A6 0 to 9999 9 0 0000 a7 A7 0 to 9999 9 0 0000 a8 A8 0 to 9999 9 0 0000 a9 A9 0 to 9999 9 0 0000 3 Polynomial coefficient a10 AA 0 to 9999 9 0 0000 Effective numeric 5 digits b0 b0 0 to 9999 9 0 0000 b1 b1 0 to 9999 9 1 0000 4 Correction expression coefficient b2 b2 0 ...

Page 20: ...number differs by the models of IRMA 4 Correction expression coefficient b0 to b2 These coefficients are provided for the quadratic expression correction zero and span correction with reference to the constituents y Assuming that the constituents after the correction be Y we obtain Y b2y2 b1y bo 5 Low High limit constituents output These specify constituents at a low limit output and a high limit ...

Page 21: ...If the actual constituents does not correspond with the constituents on the calibration curve being preset due to the difference of one line and off line measurements or other causes correct it with the correction coefficients b0 b1 and b2 in 6 3 Setting calibration curve data These coefficients are provided for the quadratic expression correction against the measured value y Assuming that the mea...

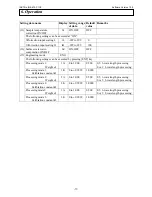
Page 22: ...nts number of analog output Contact output oC 1 to 4 1 8 Contact output Selection of contact output enabled disabled and output item do nonE ALArM Error nonE NonE No output ALArM High low alarm Error Self diagnosed error 9 Contact input Selection of contact input enabled disabled and input item di none HoLd PrSEt SMt rL nonE NonE No output HoLd Hold PrSEt Preset SMt rL Smoothing real 10 Communicat...

Page 23: ...e following settings can be executed by pressing ENT key Processing mode 1 Weight α1 1A 0 to 1 000 0 500 0 5 3 wavelength processing 0 or 1 2 wavelength processing Processing mode 1 Calibration constant k1 1K 0 to 9 9999 1 0000 Processing mode 2 Weight α2 2A 0 to 1 000 0 500 0 5 3 wavelength processing 0 or 1 2 wavelength processing Processing mode 2 Calibration constant k2 2K 0 to 9 9999 1 0000 P...

Page 24: ...t value is OFF constituent number display 7 Constituents number of analog output Contact output The setting of constituent number of analog output and contact output is possible It skips in the case of constituents 1 The setting of constituent number 1 to 4 is possible Defalut value is 1 8 Contact output Selection of contact output enabled disabled and output item Select whether the contact output...

Page 25: ...age converter with the output of 4 to 20mADC can be used When the sample temperature correction is set to ON the following settings are required Correction input scaling L Correction input scaling H These are used for scaling of 4 to 20mA correction input 14 Surface water ratio computation ON OFF For the computation of the moisture content of sands etc select the surface water coefficient computat...

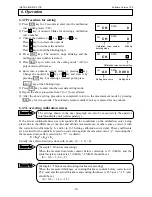
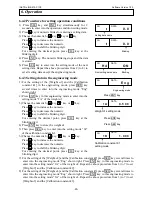
Page 26: ...igit For entering the decimal point press CH key at the blinking digit 4 Press ENT key to store the weight α1 5 Then press SEL key to enter into the setting mode 1k of the calibration constant K1 6 Change the numeric by key key or key Press key to increase the numeric Press key to decrease the numeric Press key to shift the blinking digit For entering the decimal point press CH key at the blinking...

Page 27: ...hange the numeric by key key or key Press key to increase the numeric Press key to decrease the numeric Press key to shift the blinking digit 4 Press ENT key The numeric blinking stops and the calibration curve number is displayed 5 To set the calibration curve number of constituent number 1 to 4 repeat the above procedure from 1 to 4 to set all data 6 Press SEL key for 2 seconds The mode returns ...

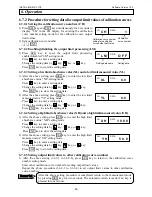
Page 28: ...ecute the calibration by pressing three keys of SEL and ENT simultaneously When the displayed absorbance x is within 0 0000 0 0050 for IRMA5100 and within 0 0000 0 0100 for IRMA5200 the calibration is completed 2 By pressing CH key display the absorbance display constituent number setting mode C0 Set the constituent number in original number 1 to 4 3 Press SEL key for 2 seconds and cancel the abso...

Page 29: ...its 3 Low limit measured value YL 0 to 9999 9 0 0000 Effective numeric 5 digits High limit absorbance value XH 0 to 9999 9 9 9999 Effective numeric 5 digits 4 High limit measured value YH 0 to 9999 9 9999 9 Effective numeric 5 digits Setting data name Description 1 Calibration curve number Any calibration curve number in 1 to 99 can be specified but it is normally specified from 1 sequentially 2 O...

Page 30: ...ENT key to store the setting data 6 7 2 4 Setting a high limit absorbance value XH and a high limit measured value YH 1 After the above setting press SEL key to enter the high limit absorbance value XH setting mode Press key to enter a setting data Change the setting data by key key or key Press ENT key to store the setting data 2 After the above setting press SEL key to enter the high limit measu...

Page 31: ...to 6 samples bit by bit so that the moisture content of each sample divides the measuring range almost evenly 5 Stir each sample with water added sufficiently put it into a polyethylene bag and then seal it tightly Leave each sample for about 2 days until its moisture content is stabilized 7 1 2 Papers sheet materials 1 Cut a sample to have a size of about 100 x 100mm Number of samples 9 sheets 2 ...

Page 32: ...t and its bottom cannot be seen 4 Put the tray at the measuring position set the calibration curve number of this detector unit to 0 and then read its display absorbance x If the measured value cannot be read easily delay the response with the smoothing function 5 Stir the sample rapidly with a spoon and measure it by this detector unit again Repeat this measurement 2 or 3 times per sample 6 Weigh...

Page 33: ...For these measurements the same surface front or back of the samples should be measured and the same measurement sequence should be taken 5 Put all samples into a dryer and dry them until they become in the absolute dry condition Drying for more than 2 hours at 105ºC is usually required 6 After drying put all samples into a desiccator containing silica gel and allow them natural cooling 7 Weigh ea...

Page 34: ...orbance x measured by this detector unit 1 3 to 5 pieces standard is required for measuring the thickness and coating thickness 3 pieces standard is the 3 samples that thickness and coating thickness differs Example The thinnest thing thickest thing or the intermediate thing 2 3 to 5 pieces of100 mm x 100 mm size is required for 1 standard 3 The struggling of thickness and coating thickness sample...

Page 35: ...measurement area completely 3 Put the sample tilt by 15 from the vertical surface and read the absorbance x 4 Measure the thickness and coating thickness y by a micro meter or other measuring methods The thickness and coating thickness y in this case is average value measured of 9 points in measurement area Measured value by micro meter No Absorbance x Thickness y 1 2 3 4 5 9 1 2 3 n IM S E R IE S...

Page 36: ...tilizing this function 10 calibration curves in one group 9 calibration curves only in the group 10 can be switched corresponding to the sample temperature Ts 99 calibration curves are available and up to 10 groups can be set accordingly 8 2 Wiring this detector unit 8 Sample temperature correction function Moisture content Y Absorbance X Calibration curve of sample temperature T3 Calibration curv...

Page 37: ...owing the procedure shown below 8 Sample temperature correction function 8 3 2 Setting with the operator interface display unit 1 Set the calibration curve number to 0 CH 0 ENT 2 Enter into the sample temperature correction enabled disabled setting mode St MODE 1 9 ENT 3 Select the sample temperature correction enabled or disabled 0 ENT OFF Correction OFF disabled 1 ENT ON Correction ON enabled Wh...

Page 38: ...urve at the sample low limit temperature T1 to the calibration curve No 1 y a3x3 a2x2 a1x a0 Only the calibration curve by polynomial expression can be used Further set the sample temperature T1 For its setting refer to 8 5 Setting sample temperature 3 Set the calibration curves at the sample temperature Ti i 2 to 10 to the calibration curve numbers 2 to 10 However Ti should fulfill the following ...

Page 39: ...tion curve number the following error display appears However the calibration curve of which sample temperature is set as 999 9 is ignored For the sample temperature lower than the sample temperature of the first calibration curve number in the group Er15 Sample temperature too low For the sample temperature higher than the sample temperature of the last calibration curve number in the group Er14 ...

Page 40: ... Check the output by the output checker plate Er01 Nonvolatile memory abnormal Writing to or reading from the nonvolatile memory is disabled Return this detector unit to CHINO Er03 Motor rotation abnormal The motor stops or rotates abnormally Replace the motor Er06 Computation error Overflow happed in computation Check the output by the output checker plate Er07 Element temperature abnormal The el...

Page 41: ...change 6 When the data remains unchanged initialize the RAM If this phenomenon is not still recovered return this detector unit to CHINO 9 3 3 Measured value fluctuates 1 Is the measuring surface flat 2 Is the measuring position correct Make sure that the detector unit does not measure such bottom face as a conveyor belt etc 3 Make sure that any disturbance light is not irradiated onto the measuri...

Page 42: ...mp bulb counterclockwise viewed from the filament side about 30 degree and pull the lamp from the socket If the lamp is not turned easily turn the lamp bulb by wrapping the rubber sheet around it which is attached to a new replacement lamp 6 Position the new lamp with the crena portion of the flange insert it into the back of the socket and then turn it clockwise viewed from the filament side abou...

Page 43: ... new motor stand too and mount it to the sector Note that the sector has front and back sides 8 Place the motor unit to make the top of the motor touch the stopper of the motor mounting base cover the motor with the motor band and then fix the motor by screwing the fixing screws of the motor band 9 Connect the motor connector and then mount the data display cover including the connections of 2 con...

Page 44: ...d with the power board with a new heat radiation sheet 5 Fix the new power board while slipping the new heat radiation sheet with 4 pieces of M3 pan screws 6 Connect the cable connector 26 pins at the display board and the connector 7 pins at the power board and then fix the date display cover The replacement of the power board is completed 9 Inspection and maintenance For replacing the power boar...

Page 45: ...e fuse is completed 9 5 Ram clearing If an abnormal condition of this detector unit is not recovered by all means initialization of the RAM is required 9 5 1 Ram clearing 1 Turn on the power by pressing SEL key and key simultaneously 2 The contents of the RAM are initialized Set the calibration curve data etc again 9 Inspection and maintenance For replacing the fuse make sure to turn off the power...

Page 46: ...y the output checker plate Detector unit number setting For the multiple detector units connection detector unit numbers can be specified by key operation CH number for the calibration curve setting CH number for the calibration curve can be specified by key operation Self diagnosis function Contact and communication output at self diagnosed abnormal conditions Correction input function Correction...

Page 47: ...ucture 4 core cab tire cable with double shield Outside diameter Ø10 5mm Length Maximum length 200m Connection Both ends tips 10 2 3 Air purge hood IR WEA It is used to shield against extraneous lights and clear the measurement window and the sight path The output checker plate can be attached at the top of the hood Purge air Flow 5 to 200Nℓ min Pressure Maximum 200kPa Use instrumentation air not ...

Page 48: ...etal portion Iron Air Flow 100 to 500Nℓ min Weight About 14kg 10 2 7 Relaying box IR WEE It is used as a relaying terminal for the multiple detector units connection and a power unit is built in The steel case and the SUS case are available The SUS case is the splash proof construction IR WEE1 IR WEE2 Working temperature range 0 to 50 C 0 to 50 C Material Steel SUS304 Color 5Y7 1 light beige Weigh...

Page 49: ...on 1 00 43 11 1 Detector unit IRMA51 IRMA52 11 Outside dimensions IMS ER IES Ø25 25 133 52 260 130 120 10 120 65 For mounting the air purge hood 4 M5 depth 6 5 Screw hole for mounting the detector unit 4 M8 depth11 Cable gland 8 Unit mm ...

Page 50: ...ection cable IR WERP 11 Outside dimensions V V OUTPUT DC24V2 1A L N AC100 240V1 3A 90 80 0 2 4 Ø4 5 75 60 0 2 M3 5 terminal screw 7 5 5 91 45 35 3 Detector unit side Power unit or operator interface display unit side 30 110 20 200 Ø10 Length is to be specified up to 200m Insulation coating Maker tube Unit mm Unit mm ...

Page 51: ... 3 Air purge hood IR WEA 11 2 4 Output checker plate IR WEB For IRMA51 IR WEB3 For IRMA52 11 Outside dimensions 31 Ø86 Ø100 Purge air inlet 4 M5 hexagon socket cap screw 1 Max 300 3 to Min 222 3 2 Max 156 5 1 IR WEA 2 IR WEA3 Unit mm 10 120 65 Unit mm ...

Page 52: ...CE Software Version 1 00 46 11 2 5 Installation adaptor IR WED1 4 Ø9 Screw hole for installation 140 120 35 45 159 100 80 70 179 36 6 8 Detector unit 4 M8 Mounting hole for the detector unit 11 Outside dimensions Unit mm ...

Page 53: ...00 47 11 2 6 Air cooling box IR WEX 11 Outside dimensions 6 Ø10 for installation 230 200 363 340 393 110 86 160 330 260 4 5 44 Measurement window portion of the detector unit Measurement distance 300 Hood length adjustable 222 to 300 Unit mm ...

Page 54: ...EE 11 2 7 1 IR WEE1 Steel 11 Outside dimensions 4 Ø8 installation hole Open the door and install 250 200 40 40 40 40 80 160 192 20 5 Ø22 cable gland Grommet with membrane 130 250 270 290 200 40 40 40 40 80 160 Mounting hole for 4 M8 Unit mm 11 2 7 2 IR WEE2 SUS304 Unit mm ...

Page 55: ...2 Telephone 81 3 3956 2171 Facsimile 81 3 3956 0915 Web site http www chino co jp INE 475 P1CE Nov 04 IM Series Infrared Multiple constituentsAnalyzer Mirror Type Multiple constituents meter Detector Unit Models IRMA51 IRMA52 Printed in Japan ...

Reviews: