background image


When setting up 


To ensure that your CPA3000 works efficiently and safely, please pay particular attention to the following issues. 


ventilation 

Your CPA3000 should have at least 5cm of clear space all around it to ensure a free flow of air at all times. We do not 

recommend  that  you  place  CPA3000  directly  on  a  carpet.  If  you  have  the  optional  integra  leg  system  fitted  it  is 

recommended that the power amplifiers sit above the CPA3000. 


AC lead and plug 

All Chord equipment comes supplied with the correct power lead and plug. This should be used at all times. 


if you need to fit a plug for UK/Europe 

Connect the blue wire to the neutral terminal 

Connect the brown wire to the live terminal 

Connect the yellow/green wire to the earth terminal 


if you need to fit a plug for US/Canada 

Connect the white wire to the neutral terminal 

Connect the black wire to the live terminal 

Connect the green to the earth terminal 


earthing issues in Europe 

In some European countries a hum may occur if your CPA3000 is connected to mains sockets that do not have an earth. If 

this is the case please ensure that: 


1. Your transport is connected via a multi-way mains block, which contains an earth point   

    at each socket outlet. This is to ensure that the chassis metalwork of each item is   

    connected together. 

2. We recommend that an earthing method for your building be implemented. 

3. Use the connecting points on your Chord unit and connect to an available earth point. 

Summary of Contents for CPA3000

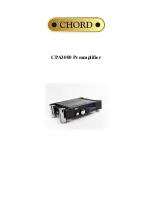
Page 1: ...CPA3000 Preamplifier ...

Page 2: ...RNINGS 5 AC POWER CONNECTION 6 CONNECTING YOUR EQUIPMENT 7 INPUT CONNECTIONS 8 OUTPUT CONNECTIONS 9 RECORDING 10 AV BYPASS 11 EVERYDAY USE OF YOUR CPA3000 12 USING THE REMOTE CONTROL 14 MAINTENANCE 16 FREQUENTLY ASKED QUESTIONS 16 TRIGGER OUTPUTS 17 PRODUCT SPECIFICATION 18 ...

Page 3: ...output selection if required but changes can also be made via the supplied remote control Cleverly situated under the main display signal detection indicators have been replaced with highly accurate VU meters These give both clear signal detection and accurate input level Naturally via the front panel control these may be selected or disabled as required Two polished and nickel plated aluminium co...

Page 4: ...to the neutral terminal Connect the brown wire to the live terminal Connect the yellow green wire to the earth terminal if you need to fit a plug for US Canada Connect the white wire to the neutral terminal Connect the black wire to the live terminal Connect the green to the earth terminal earthing issues in Europe In some European countries a hum may occur if your CPA3000 is connected to mains so...

Page 5: ...oltages and energy levels Circuit designs that embody these components conform to applicable safety requirements Precautions must be taken to prevent accidental contact with power line potentials Do not connect grounded test equipment There are no user serviceable parts within the CPA3000 Reference Preamplifier Unauthorised tampering or dismantling of this product will invalidate the warranty and ...

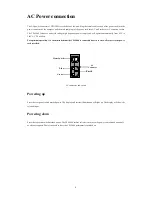
Page 6: ...AC 50 or 60Hz For optimum operation it is recommended that the CPA3000 is connected directly to the wall socket via the power cord provided AC connector and switch Powering up Press the rear panel switch marked power The display and internal illumination will light up The display will show the selected input Powering down Press the rear panel switch marked power The CPA3000 utilises soft start cir...

Page 7: ...ngths of cable with less deterioration of signal They are also less prone to interference than unbalanced inputs Balanced inputs have three pins and use Neutric XLR style connectors Pin 1 is earth pin 2 is positive and pin 3 is negative Unbalanced inputs use RCA phono connectors which are gold plated with teflon high performance dielectric insulators for optimum performance Basic system diagram 1 ...

Page 8: ...s Line 5 6 and TAPE are RCA phono style inputs Left channel connections are at the top right channel connections are at the bottom It does not matter which input you choose just select the same type of connection that your source has Note Moving coil turntables without an internal amplifier will require an external phono stage amplifier such as the Chord Symphonic before connecting to the CPA3000 ...

Page 9: ...ending on the appropriate input connection on your power amplifier Left channel connections are at the top right channel connections are at the bottom Note For optimum performance it is recommended that the balanced outputs are used where possible If you wish to bi amp then ask your interconnect manufacturer to provide you with a balanced or RCA cable splitter This will split the single output fro...

Page 10: ...t the tape recorder input to the TAPE OUT RCA connection to record the selected audio source connecting to a Tape recorder to tape an audio source Use RCA connectors to the left and right pairs marked OUT TAPE Note In these examples we have used a tape recorder but you can use any recording device with a phono input Minidisc CD DVD recorders and PC soundcards are all normally compatible R R TAPE L...

Page 11: ...witch to AV bypass mode to allow the processor to playback multichannel film content Connect the front left and right outputs from your AV processor to the inputs on the back of the CPA3000 marked A V Connect to the power amplifier as normal via either the balanced or RCA output on the CPA3000 Press the RESET button or Bypass on the remote control to activate the bypass option Note The volume cont...

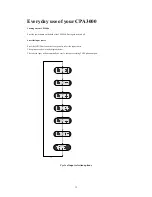
Page 12: ... the CPA3000 Press again to switch off Select the input source Press the INPUT button on the front panel to select the input source The options are shown in the diagram below The selected input will automatically be sent to the tape recording TAPE phono outputs Cycle of input selection options ...

Page 13: ...e change will un mute the outputs to prevent large changes in volume from damaging your loudspeakers The volume level is shown on the display as the word VOL and a two digit level as shown in the example diagram below Volume display changing the balance Use the balance knob to shift the balance between the left and right loudspeaker A clockwise turn of the knob will shift the balance to the right ...

Page 14: ...a universal controller for all Chord products televisions and DVD players Full instructions can be found in the System Remote Manual supplied but for the purposes of controlling the CPA3000 the main functions are listed on the next few pages Press the HIFI key to begin controlling the CPA3000 ...

Page 15: ...ol to increase the volume press the Vol button on the centre control to decrease the volume Adjusting the balance Press the Bal button to move the balance towards the right Press the Bal button to move the balance to the left Changing the output Press OP1 to select the main output Press BYPASS OP2 to select AV Bypass output OP1 2 has no function on the CPA3000 Mute Press the mute key to mute the C...

Page 16: ... it should only be serviced by Chord Electronics Limited or their expressly approved Service Agents Frequently asked questions why aren t any of the remote control buttons working Press the HIFI button to set up the remote control for pre amplifier functions I ve connected all the wires up but I can t hear any sound Ensure that you ve selected the correct input e g Line 1 and the correct output e ...

Page 17: ... via a standard 1 8th inch 3 5mm mono or stereo jack plug to the socket fitted to the rear of the unit The CPA3000 should be switched off the trigger lead inserted then the unit switched back on The connections are as follows The tip of the plug is the 5V to 12V dc connection the centre and rear connection are the 0V or ground connection 5V to 12V c 0V Ground ...

Page 18: ...Hz 20KHz Channel Separation 10 Hz 90dB 1kHz 90dB 10kHz 90dB 20kHz 85dB Channel Balance 0 01dB Input impedance Unbalanced 47kOhms Balanced 94kOhms Output impedance 100 Ohms short circuit protected Output Offset 0mV both channels Max Input Voltage 10Vrms balanced 5V rms unbalanced Max Output Voltage 15V rms balanced 7 5V rms unbalanced Potentiometer Performance 0dB 0 5dB 20dB 0 2dB 60dB 0 24dB 13 se...

Reviews: