background image

Chord Electronics

DAVE | 

Manual

_

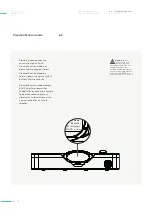
SETTINGS MEMORY: 

DAVE remembers 
previous settings, 

including volume, even when 
powered down (or with the power 
supply removed). You do not have 
to perform any special actions.

7.1  

DSD and PCM mode

7.2   Crossfeed

7.3    Settings memory & 


galvanic isolation

7.4 

Display messages

Settings memory 

& galvanic isolation

7.3

33 // 35

GALVANIC ISOLATION:


Galvanic isolation 
involves isolating the 

power rails of the data USB 
input, allowing for greater sonic 
performance. DAVE features a 
Class 2 Type-B USB input with 
this protection. Please ensure 
with you cable’s manufacturer, 
that your chosen USB cable 
is compatible with galvanic 
isolation connections. 

Summary of Contents for DAVE

Page 1: ...hord Electronics Product Communication English The Pumphouse Farleigh Lane East Farleigh Kent ME16 9NB Great Britain 44 0 1622 721444 info chordelectronics co uk chordelectronics co uk DAVE Manual V 1 1 ...

Page 2: ...he front panel 13 3 4 The rear panel 14 3 5 The remote control 15 4 0 Setting up DAVE 16 4 1 Placement 17 4 2 Connecting your source to 18 DAVE 4 3 Connecting a BLU MK II or Hugo M Scaler to DAVE 19 4 4 Connecting a preamplifier amplifier to DAVE 20 4 5 Powering DAVE 21 5 0 How to navigate the menus 22 5 1 The screen navigating the menu 23 5 2 Sample rate 24 6 0 Playback modes 25 6 1 Playback mode...

Page 3: ... Electronics DAVE Manual _ 1 1 Introduction 1 2 Protection against liquids heat 1 3 Dismantling radio frequency interference 1 4 Connecting your equipment 1 0 Safety instructions Safety instructions 1 0 3 35 ...

Page 4: ...ifier Before operation we strongly advise you read this user manual thoroughly We also recommend that you store this user manual along with your original receipt of purchase in a safe place should you require assistance in the future 1 1 Introduction 1 2 Protection against liquids heat 1 3 Dismantling radio frequency interference 1 4 Connecting your equipment ...

Page 5: ...e power supply and connected equipment and contact Chord Electronics for further advice DAVE has internal thermal protection which will shut down the unit in the event of excessive temperatures being reached Never operate DAVE near sources of heat or naked flames as this will decrease the lifespan of the internal components It is advised that you do not operate DAVE in an area of direct sunlight o...

Page 6: ...ntroduction 1 2 Protection against liquids heat 1 3 Dismantling radio frequency interference 1 4 Connecting your equipment Dismantling radio frequency interference 1 3 With a thick solid aluminium chassis DAVE s casework largely protects the sensitive internal circuitry from radio frequency interference However for optimal performance it is recommended that the following points are observed 1 Cons...

Page 7: ...ve volume levels permanent hearing damage and or loss can occur DAVE does not have internal batteries and therefore must be permanently connected to a source of power The included 10 amp IEC power cable plugs into DAVE Do not disconnect DAVE from the power cable without first switching the unit off to avoid any damage 1 1 Introduction 1 2 Protection against liquids heat 1 3 Dismantling radio frequ...

Page 8: ...Chord Electronics DAVE Manual _ 2 1 Warranty period registering your purchase 2 2 Making a claim warranty exclusions 2 0 Warranty Warranty 2 0 8 35 ...

Page 9: ...r and tear The warranty will be void if any other PSU other than that supplied is used The warranty is transferable with proof of purchase however warranty on ex demonstration units begins from the retailer s date of purchase Please use the form below to record the details of your purchase in the event that these are required at a later date We further advise that all purchases are registered with...

Page 10: ... by Chord Electronics or an approved service centre to guarantee the quality and safety of the repair WARRANTY EXCLUSIONS The warranty does not cover connected equipment personal injury or development natural patina of the metalwork and will be null and void if the following is applied wilful neglect modification or tampering of the product improper use of the product acts of God damage caused by ...

Page 11: ...Chord Electronics DAVE Manual _ 3 1 Getting to know DAVE 3 2 The front panel 3 3 The top panel 3 4 The rear panel 3 5 The remote control 3 0 Getting to know DAVE Getting to know DAVE 3 0 11 35 ...

Page 12: ...mplifier featuring multi award winning FPGA technology To get the very best out of the device for many years to come we recommend familiarising yourself with this user manual 3 1 Getting to know DAVE 3 2 The front panel 3 3 The top panel 3 4 The rear panel 3 5 The remote control Getting to know DAVE 3 1 12 35 ...

Page 13: ...he top panel 3 4 The rear panel 3 5 The remote control The front panel 3 2 13 35 DAVE features a single headphone output available on the front of the device This can accommodate headphones up to 800 Ω without the need for an additional headphone amplifier LCD screen Volume dial and confirmation button IR remote control receiver window Cycle through menu options 6 35mm headphone jack Cycle through...

Page 14: ...nel 3 4 The rear panel 3 5 The remote control The rear panel 3 4 14 35 WARNING Do not use any other power supply other than that supplied Doing so will invalidate your warranty USB digital input 4x DX digital output for future product Optical 2 digital input 10A IEC AC inlet Right XLR balanced analogue output Right unbalanced RCA output Left unbalanced RCA output Left XLR balanced analogue output ...

Page 15: ...et or place other materials products on top of the device 3 1 Getting to know DAVE 3 2 The front panel 3 3 The top panel 3 4 The rear panel 3 5 The remote control The remote control 3 5 15 35 NOTE Please only insert AAA batteries into the IR remote control and observe the correct orientation as indicated Failure to do so could result in non operation or battery leakage Menu Mute Vol Vol On off Act...

Page 16: ...E Manual _ 4 1 Placement 4 2 Connecting your source to DAVE 4 3 Connecting a BLU MK II or Hugo M Scaler to DAVE 4 4 Connecting a preamplifier amplifier to DAVE 4 5 Powering DAVE 4 0 Setting up DAVE Setting up DAVE 4 0 16 35 ...

Page 17: ...vice to convection cool during operation is advised As the infra red remote control requires a direct line of sight to the viewing portal avoid placing objects on top of DAVE or putting it within enclosures 4 1 Placement 4 2 Connecting your source to DAVE 4 3 Connecting a BLU MK II or Hugo M Scaler to DAVE 4 4 Connecting a preamplifier amplifier to DAVE 4 5 Powering DAVE Placement 4 1 17 35 ...

Page 18: ...es at once if you wish Please note that if you are using the USB input with a Mac Linux device you will not need a driver but if you are connecting a Windows device it will need a driver from the DAVE section of our website chordelectronics co uk product dave To set up your system 1 First you must ensure that DAVE and any connecting equipment is turned off 2 Locate the inputs on the back of the un...

Page 19: ...lose attention to the numbering on the units 2 Ensure the cables click into the connectors securely 4 1 Placement 4 2 Connecting your source to DAVE 4 3 Connecting a BLU MK II or Hugo M Scaler to DAVE 4 4 Connecting a preamplifier amplifier to DAVE 4 5 Powering DAVE Connecting a BLU MK II or Hugo M Scaler to DAVE 4 3 19 35 OPT OUT S PDIF DUAL BNC OUT 3 Once connected please read the manuals for ei...

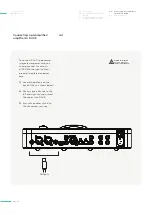
Page 20: ...n below 2 Paying close attention to the left and right channels insert the cables in to DAVE 3 Ensure the cables click into the connectors securely 4 1 Placement 4 2 Connecting your source to DAVE 4 3 Connecting a BLU MK II or Hugo M Scaler to DAVE 4 4 Connecting a preamplifier amplifier to DAVE 4 5 Powering DAVE Connecting a preamplifier amplifier to DAVE 4 4 20 35 Outputs WARNING Read section 6 ...

Page 21: ...E to complete a safety check During this stage music playback will not be possible and mute will be displayed 4 1 Placement 4 2 Connecting your source to DAVE 4 3 Connecting a BLU MK II or Hugo M Scaler to DAVE 4 4 Connecting a preamplifier amplifier to DAVE 4 5 Powering DAVE Powering DAVE 4 5 21 35 During this period do not initiate music playback NOTE DAVE can be put into standby mode with the o...

Page 22: ...Chord Electronics DAVE Manual _ 5 1 The screen navigating the menu 5 2 Sample rate 5 0 How to navigate the menus How to navigate the menus 5 0 22 35 ...

Page 23: ...under Display in the menu 5 1 The screen navigating the menu 5 2 Sample rate The screen navigating the menu 5 1 23 35 Turn the dial to increase or lower the volume Press the volume dial to mute unmute DAVE THE MENU To advance your way through the menu press the four buttons surrounding the volume dial Use the up and down buttons to cycle through menu options on the screen Using the left and right ...

Page 24: ... to 384 kHz 16 bit to 24 bit DSD 128 via DoP Optical input 44 1 kHz to 96 kHz 16 bit to 24 bit AES input 44 1 kHz to 96 kHz 16 bit to 24 bit Dual BNC Special operation DBNC 88 2 kHz to 768 kHz 24 bit USB is natively compatible with all Mac OS X and Linux machines without the use of drivers Windows machines may require a driver available on the Chord Electronics website Dual BNC is reserved for spe...

Page 25: ...Chord Electronics DAVE Manual _ 6 1 Playback modes 6 2 Headphone mode 6 3 Preamplification mode 6 4 DAC mode 6 0 Playback modes Playback modes 6 0 25 35 ...

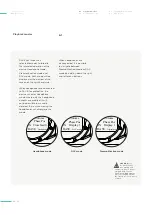
Page 26: ...will disengage the mode 6 1 Playback modes 6 2 Headphone mode 6 3 Preamplification mode 6 4 DAC mode Playback modes 6 1 26 35 When headphones are disconnected it is possible to navigate between Preamplification mode or DAC mode by holding down the right and left menu buttons WARNING For the protection of your hearing and equipment please do not navigate between the Preamp and DAC without disconnec...

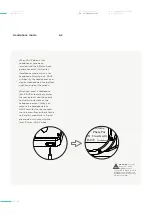
Page 27: ...uts and the volume control will only work on the headphone output When you remove the headphone jack DAVE unmutes the rear outputs the volume will revert back to the volume last used while in Digital pre mode or will revert to line level if it was in DAC mode 6 1 Playback modes 6 2 Headphone mode 6 3 Preamplification mode 6 4 DAC mode Headphone mode 6 2 27 35 WARNING For your protection when headp...

Page 28: ...ies enabling the volume to be attenuated to prevent clipping or to feed directly into a power amplifier or active speaker 6 1 Playback modes 6 2 Headphone mode 6 3 Preamplification mode 6 4 DAC mode Preamplification mode 6 3 28 35 WARNING For the protection of your hearing and equipment please do not navigate between the Preamp and DAC modes or have music playing without disconnecting DAVE from an...

Page 29: ...ack at this time Before connecting DAVE to other components for example a preamplifier or amplifier please consult the respective user manual as they may require a signal less than 2 5 V RMS to provide optimum performance If you require a line level signal less than 2 5 V please use Preamplification mode to attenuate the signal as appropriate NOTE As the output level is fixed on DAC mode the volum...

Page 30: ...Chord Electronics DAVE Manual _ 7 1 DSD and PCM mode 7 2 Crossfeed 7 3 Settings memory galvanic isolation 7 4 Display messages 7 0 Special features Special features 7 0 30 35 ...

Page 31: ...two seconds PCM Use this for PCM playback up to 768 KHz DSD playback up to DSD256 is also supported but it is decimated and not optimised in this mode DSD Use this for DSD64 128 and 256 single dual and quad speed playback There is no decimation PCM can still be played and this mode is ideal for streaming video with audio as it has a lower delay 7 1 DSD and PCM mode 7 2 Crossfeed 7 3 Settings memor...

Page 32: ...on during headphone listening This option is only available in Headphone mode DAVE has four available modes of crossfeed shown as Crossfeed on the display Crossfeed 0 No crossfeed Crossfeed 1 Minimal crossfeed Crossfeed 2 Moderate crossfeed Crossfeed 3 Broad crossfeed 7 1 DSD and PCM mode 7 2 Crossfeed 7 3 Settings memory galvanic isolation 7 4 Display messages Crossfeed 7 2 32 35 ...

Page 33: ...ossfeed 7 3 Settings memory galvanic isolation 7 4 Display messages Settings memory galvanic isolation 7 3 33 35 GALVANIC ISOLATION Galvanic isolation involves isolating the power rails of the data USB input allowing for greater sonic performance DAVE features a Class 2 Type B USB input with this protection Please ensure with you cable s manufacturer that your chosen USB cable is compatible with g...

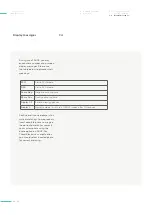
Page 34: ...ch or correct your system phase using the phase option on DAVE For Chord Electronics amplification you should select inverted phase for correct matching 7 1 DSD and PCM mode 7 2 Crossfeed 7 3 Settings memory galvanic isolation 7 4 Display messages Display messages 7 4 34 35 PCM Set to PCM mode DSD Set to DSD mode Phase Neg Negative output phase Phase Pos Positive output phase Display 1 3 3 menu vi...

Page 35: ......

Reviews: