Section 2: Installation and Setup
M Series User Manual
2-3
020-100009-05 Rev. 1 (09-2010)
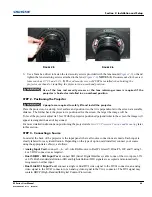
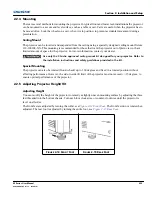
6. Use a 5mm hex driver to fasten the red security screws provided with the lens mount (
Figure 2-5
), or hand
tighten the lens retaining screws attached to the lens (
Figure 2-6
).
NOTES:
1)
Recommended for heaviest
lenses such as 0.73:1 and 1.2:1
.
2)
The red security screws MUST be installed when hoisting the
projector overhead, or installing the projector in an overhead position.
Use of the lens red security screws or the lens retaining screws is required if the
projector is hoisted or installed in an overhead position.
STEP 2 - Positioning the Projector
2 people are required to safely lift and install the projector.
Place the projector on a sturdy, level surface and position it so that it is perpendicular to the screen at a suitable
distance. The further back the projector is positioned for the screen, the larger the image will be.
To level the projector adjust its 3 feet. With the projector positioned perpendicular to the screen the image will
appear rectangular instead of keystoned.
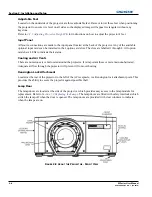
For more detailed instructions on positioning the projector refer to
2.2.3 Projector Position and Mounting
later
in this section.
STEP 3 - Connecting a Source
Located at the back of the projector is the input panel where all source connections are made. Each input is
clearly labeled for easy identification. Depending on the type of option card installed, connect your source
using the appropriate cable(s), as follows:
•
Analog Input Card
, connect 3-, 4-, or 5-wire RGB source to Red/Pr, Green/Y, Blue/Pb, H/C and V using 3,
4 or 5 BNC connectors as required.
•
Dual SD/HD - SDI Input Card
, connect SDI (Serial Digital Interface) cable to one of the two inputs, 1-IN
or 2-IN. Both standard-definition (SD) and high-definition (HD) signals are accepted and automatically
recognized on either input.
•
Dual Link DVI Input Card
, connect a single or dual DVI video signal to the DVI-I connector, an analog
video signal to the DVI-I connector or an analog video signal to the VGA connector. The DVI signal may
contain HDCP (High-Bandwidth Digital Content Protection).
F
IGURE
2-5 F
IGURE
2-6
Summary of Contents for M Series
Page 1: ...M Series U S E R M A N U A L 020 100009 05 ...
Page 2: ......
Page 3: ...M Series U S E R M A N U A L 020 100009 05 ...
Page 14: ......
Page 46: ......
Page 120: ......
Page 131: ...Section 6 Troubleshooting M Series User Manual 6 7 020 100009 05 Rev 1 09 2010 FIGURE 6 1 ...
Page 132: ......
Page 148: ......
Page 152: ......
Page 167: ......


