background image

6. To re-install, follow these steps in reverse order.

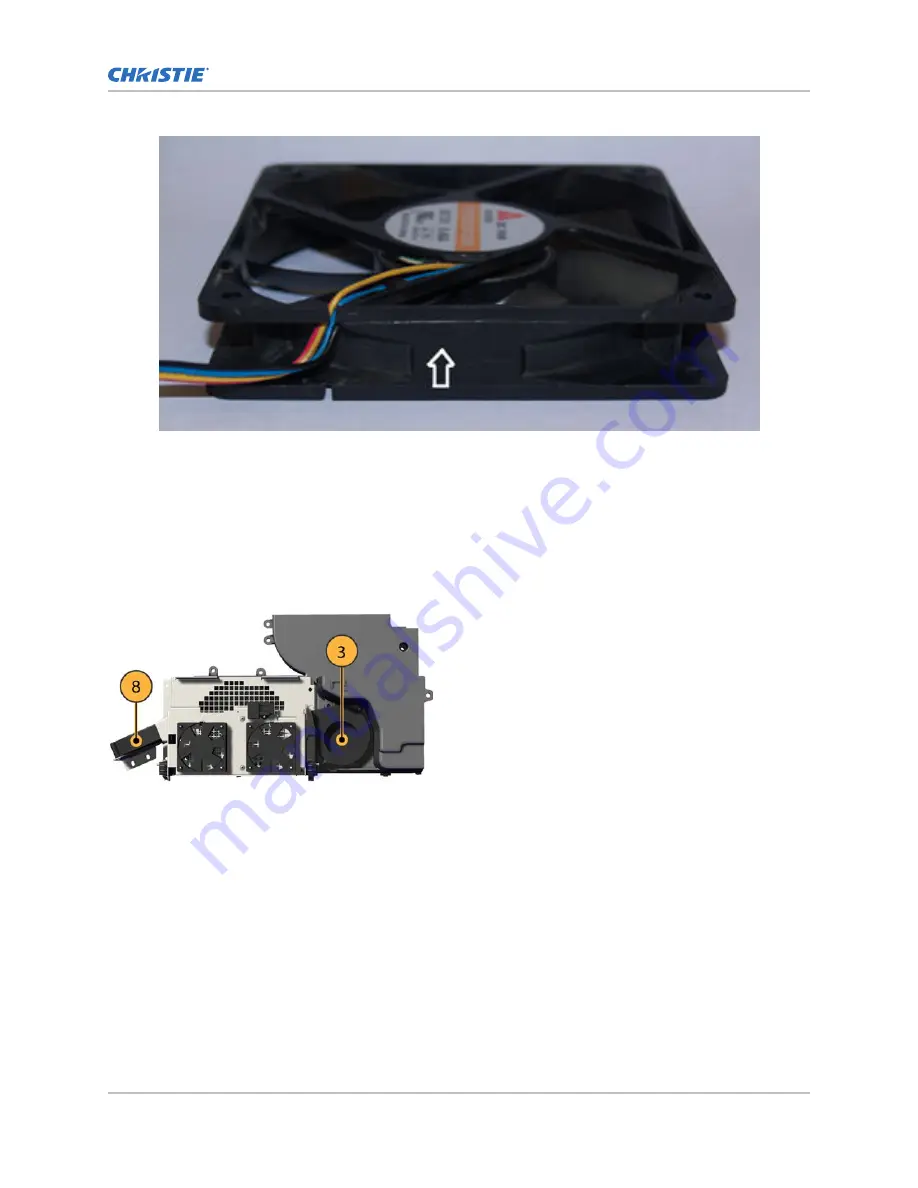
Removing the lamp fans (#3 and #8)

Fan #3 is located outside the #2 lamp compartment and provides cooling to lamp #2. Fan #8 is

located outside the #1 lamp compartment and provides cooling to lamp #1. A guide pin is used so the

fan can only fit one way.
Estimated replacement time: 10 minutes per fan.

1. Remove the top cover (on page 45).
2. Remove the two screws from the fan.
3. Disconnect the fan wire at the quick disconnect coupling.
4. Cut the cable tie holding the wire to fan #9.
5. Remove the fan.
6. To re-install, follow these steps in reverse order.

Ventilation and cooling

M Series Service Guide

54

020-100551-11 Rev. 1 (01-2019)

Copyright 

©

 2019 Christie Digital Systems USA, Inc. All rights reserved.

Summary of Contents for M Series

Page 1: ...Service Guide 020 100551 11 M Series ...

Page 2: ...amage caused by use of a product on a motion platform or other movable device where such product has not been designed modified or approved by Christie for such use i Problems or damage caused by use of a projector in the presence of an oil based fog machine or laser based lighting that is unrelated to the projector j For LCD projectors the warranty period specified in the warranty applies only wh...

Page 3: ...d cleaning 14 Guidelines for cleaning 14 Maintaining the cooling system 15 Ventilation 15 Power supplies 15 Power cord and attachments 16 Maintaining optics 16 Service setups 18 Aligning the boresight 18 Adjusting convergence 20 Removing the light engine cover 20 Adjusting convergence 21 Adjusting the fold mirror 23 Adjusting the integrator tilt 24 Adjusting the integrator focus lens 24 Troublesho...

Page 4: ...edures 44 Projector covers and feet 45 Removing the top cover 45 Removing the rear panel 45 Removing the lamp side panel 46 Removing the intake side panel 47 Removing the front cover 48 Removing the front feet 48 Removing the rear foot 49 Filtration 50 Replacing the dust air filter 50 Replacing the fog oil filter 50 Ventilation and cooling 52 Removing the electronics intake fan 2 52 Removing the e...

Page 5: ...ptical housing 70 Removing the fold mirror on the front optical housing 70 Removing the rear optical housing 70 Removing the light sensor module LSM LiteLOC 72 Removing the dynamic iris assembly 72 Removing the yellow notch filter assembly YNF 73 Removing the shutter assembly 74 Removing the integrator assembly 75 Removing the fold mirror 75 Installing the fold mirror 76 Removing the lens 76 Insta...

Page 6: ... Removing the rear infrared IR sensor 89 Removing the remote temperature sensor module RTSM 4 89 Removing the remote temperature sensor module RTSM 3 90 Removing the remote temperature sensor module RTSM 2 90 Interconnections 92 Interconnect diagram 93 Content M Series Service Guide 6 020 100551 11 Rev 1 01 2019 Copyright 2019 Christie Digital Systems USA Inc All rights reserved ...

Page 7: ...ors These projectors are based on next generation DLP technology provided by Texas Instruments Model name Part number DLV 1400 DL 118 044109 XX DLV 1920 DL 118 042107 XX DS 6K M 118 014106 XX DS 10K M 118 013105 XX DS 14K M 118 010113 XX HD6K M 118 012104 XX HD10K M 118 011103 XX HD14K M 118 019101 XX WU7K M 118 016108 XX WU12K M 118 015107 XX WU14K M 118 011114 XX WX7K M 118 018100 XX WX10K M 118...

Page 8: ...or the projector Operating temperature range 5 to 40ºC 41 to 104ºF Storage temperature range 40 to 70ºC 40 to 158ºF Humidity range 10 to 80 non condensing Operating altitude 10 000 ft maximum IR remote keypad The IR remote keypad controls the projector by way of wireless communications from a battery powered infrared IR transmitter To use the IR remote direct the keypad toward the projector s fron...

Page 9: ...t ratio dialog C Turns off the light source and puts the projector in standby D Selects an active or inactive input on any slot E Not supported Introduction M Series Service Guide 9 020 100551 11 Rev 1 01 2019 Copyright 2019 Christie Digital Systems USA Inc All rights reserved ...

Page 10: ...t supported S Initiates a custom action when a number is selected T Selects a projector in multi projector installations U Returns to the previous menu level or exits menus if at the top level V Displays context sensitive help W Arrows adjust the lens offset X Adjust the lens zoom Y Opens the on screen display position menu Z Shows or hides the on screen display menus AA Turns the remote backlight...

Page 11: ...age ultraviolet exposure and high temperatures are authorized to assemble install and service Christie equipment To make sure you remain safe when servicing energized live Christie equipment Locate the main AC power shut off prior to servicing the equipment This will allow you to turn the power off quickly in an emergency Disconnect the projector from the communication and management network so it...

Page 12: ...art removed Observe all electrostatic precautions Use a grounded wrist strap and insulated tools when handling servicing or cleaning electronic assemblies TIP HAZARD Stacked frames must be secured together using all locking pins UV EXPOSURE Protective UV safety glasses with side shields and Christie approved protective safety clothing must be worn when performing optical adjustments or servicing t...

Page 13: ...upply is not within the specified voltage and current as specified on the license label Never compromise the ground or earth connection of the product FIRE HAZARD Do not use a power cord harness or cable that appears damaged SHOCK HAZARD The AC power cord must be inserted into an outlet with grounding Lamp precautions Lamps used in the projector must be handled with caution Lamps can cause serious...

Page 14: ...lean Lamp Wear protective gear approved by Christie and handle by the lamp housing only Never grip the glass portion of the lamp Fingerprints reduce output quality and shorten lamp life Remove any contaminants with pure isopropyl alcohol and a clean lint free cloth Illumination Optics System Never touch or blow on exposed components Wear gloves supplied Use ionized pneumatic guns only Keep imaging...

Page 15: ...atures Regular checkup and maintenance of the entire cooling system is critical to prevent overheating and sudden projector failure and helps make sure reliable operation of all projector components over time Ventilation Use the following guidelines when maintaining ventilation Do not place the projector near a heat source or in an enclosure unless proper ventilation is provided Do not insert obje...

Page 16: ...rating standards Maintaining optics Use the following guidelines when maintaining optics Warning If not avoided the following could result in death or serious injury SHOCK HAZARD Disconnect the product from AC before installing moving servicing cleaning removing components or opening any enclosure Cleaning optics excluding lens Unnecessary cleaning of optics can be more harmful than helpful by inc...

Page 17: ...he surface dampen a clean microfiber cloth with coated optics cleaner solution damp not dripping Wipe gently until clean Cleaning fingerprints smudges or oil from the lens Check the lens periodically A small amount of dust or dirt on the lens has minimal effect on image quality To avoid the risk of scratching the lens clean only if absolutely necessary 1 Brush away most of the dust with a camel ha...

Page 18: ...or screen to projector tilt 1 Display the boresight test pattern a On the remote keypad press Test On the built in keypad press the soft key that displays Test on the display panel b To cycle to Boresight press the Up Arrow key c Press Enter 2 Focus the image on cross hair image I 3 Evaluate the focus on cross hair image II and III If all three images are in focus no further action is required If ...

Page 19: ...in focus with minimal flare 7 To fine tune cross hair pattern III adjust the appropriate adjustment screw until the cross hair image is in focus with minimal flare 8 Repeat step 5 to 7 as required until all three cross hair patterns are in equal sharp focus If the boresight is acceptable proceed with step 11 If the boresight does not appear to be converging to an acceptable level of image quality ...

Page 20: ... before installing moving servicing cleaning removing components or opening any enclosure UV EXPOSURE Protective UV safety glasses with side shields and Christie approved protective safety clothing must be worn when performing optical adjustments or servicing the product Removing the light engine cover Complete the following procedure to remove the light engine cover Before removing the light engi...

Page 21: ... when adjusting convergence Boresight must be correct before adjusting convergence Do not adjust the plungers Convergence adjustment screws are sensitive A small rotation can cause a large convergence shift Warning If not avoided the following could result in death or serious injury UV EXPOSURE Protective UV safety glasses with side shields and Christie approved protective safety clothing must be ...

Page 22: ...ter the color in the cross hair at the center of the screen Screw A Screw A Screw B C Screw B C Service setups M Series Service Guide 22 020 100551 11 Rev 1 01 2019 Copyright 2019 Christie Digital Systems USA Inc All rights reserved ...

Page 23: ... shift except in the opposite direction c Gradually tighten the four lock down screws to lock the formatter d If convergence is still necessary repeat the previous steps 8 For the blue formatter repeat steps 2 to 7 Adjusting the fold mirror One of the two fold mirrors has the adjustment screws located under the top cover The cover must be removed to adjust the mirror The other fold mirror is locat...

Page 24: ... tilt 1 Remove the top cover on page 45 2 Loosen the screw 3 Adjust the integrator tilt by moving the hex driver up down left or right 4 Tighten the screw once you achieved adjustment Adjusting the integrator focus lens Complete the following procedure to adjust the integrator focus lens 1 Remove the top cover on page 45 2 Loosen the two setscrews Do not loosen the focus lens handle Service setups...

Page 25: ...s lens by moving the focus lens handle forward or back 4 Tighten the two setscrews Service setups M Series Service Guide 25 020 100551 11 Rev 1 01 2019 Copyright 2019 Christie Digital Systems USA Inc All rights reserved ...

Page 26: ... up sequence on page 27 Check the status display window for any error codes present Correct these if possible Check source reliability Switch sources if possible Use RS232 serial communications to communicate with the projector during diagnosis Make sure cables are connected and not damaged Help with troubleshooting If a performance problem still exists after referring to the chart and replacing t...

Page 27: ...ndby mode use the down arrow on the keypad to interact with the projector Time approximate Rear status LEDs LCD display Lamp 1 COMM Status Shutter 0 seconds Amber Amber Amber Amber Please Wait 30 seconds Off Off Off Off Please Wait 40 seconds Off Off Off Off Initializing projector 1 minute and 40 seconds to 1 minute and 50 seconds Off Off Off Off Initializing projector 1 minute and 50 seconds to 1...

Page 28: ...gle wire Located on slot 3 option card and monitors option card temperature 16 Single wire Located on slot 4 option card and monitors option card temperature Fan temperature sensors ID Location 2 Card cage cooling 3 Lamp 2 blower 4 Lamp house exhaust 5 Light engine intake 6 Light engine exhaust 7 Lamp driver cooling 8 Lamp 1 blower 9 Cold mirror cooling Obtaining an error log For the interrogator ...

Page 29: ... popup blocker 1 In Internet Explorer navigate to Tools Internet Options Privacy 2 Clear the Turn On Pop up Blocker option 3 Click OK Enabling the File Download prompt Complete the following procedure to enable the File Download prompt 1 In Internet Explorer navigate to Tools Internet Options 2 Switch to the Security tab 3 Click Custom level 4 Scroll down the list until you see Downloads 5 Enable ...

Page 30: ... the Christie website LCD error message list If the projector displays an error message not documented below or you cannot correct the issue using the recommended procedure contact Christie technical support Error message Conditions Blue Bias Blue bias under voltage Replace the light engine Blue Comm Blue satellite communication error Check the blue satellite communication cables for loose connect...

Page 31: ...ent lamp drivers are in the projector Ensure both lamp drivers are of the same type and revision E Shutdown Emergency shutdown has occurred to protect the projector from damage Check and resolve the most recent critical status message shown when the projector reaches standby Eng Config Engine configuration failed Re install the projector software Eng Init Critical engine initialization failure Re ...

Page 32: ...er voltage Replace the light engine Green Reset Green reset under voltage Replace the light engine Green Therm Green DAD thermal shutdown Allow the projector to cool down HW Install Critical hardware installation failure Check engine communication cables for loose connections Check thermal sensor cables for loose connections Check fan cables for loose connections LCDVErr File number LCD firmware f...

Page 33: ...unication cables for loose connection Replace the blue satellite communication cable Replace the light engine TI Green FW Failed to load Green TI firmware Check the green satellite communication cables for loose connection Replace the green satellite communication cable Replace the light engine TI Green Sys Green channel TI system failure Check the green satellite communication cables for loose co...

Page 34: ...harness check for loose connection If sensor is attached to a board replace the board Thermal Dev Fan failed to initialize Re install the projector software Replace the panel driver Thermal number Configuration file error Re install the projector software Replace the panel driver Ver Data N A Configuration file error Re install the projector software Replace the panel driver YNF Yellow notch filte...

Page 35: ...lt errors The following details the Critical Hardware Fault 12C Thermal Device errors Troubleshooting M Series Service Guide 35 020 100551 11 Rev 1 01 2019 Copyright 2019 Christie Digital Systems USA Inc All rights reserved ...

Page 36: ...n the product license label Projector Model Projector Serial Number Manufacture Date Projector components The following diagrams provide an exploded view of the projector components M Series Service Guide 36 020 100551 11 Rev 1 01 2019 Copyright 2019 Christie Digital Systems USA Inc All rights reserved ...

Page 37: ...12 15 16 17 9 18 19 20 21 22 23 24 25 26 27 28 29 See Light Engine Compartment Parts and module replacement M Series Service Guide 37 020 100551 11 Rev 1 01 2019 Copyright 2019 Christie Digital Systems USA Inc All rights reserved ...

Page 38: ... 4 5 6 7 10 9 8 11 13 14 12 15 16 17 29 28 27 26 25 24 23 22 21 20 19 18 1 2 3 Parts and module replacement M Series Service Guide 38 020 100551 11 Rev 1 01 2019 Copyright 2019 Christie Digital Systems USA Inc All rights reserved ...

Page 39: ... 2 blower 003 110854 XX Fan 3 lamp 2 blower 450W 003 111697 XX 15 Fan 4 lamp exhaust 003 121114 XX 30 Fan 5 intake on light engine module 003 100730 XX Fan 5 intake on light engine module 450W 003 111699 XX 32 Fan 6 exhaust on light engine module 003 100730 XX Fan 6 exhaust on light engine module 450W 003 111699 XX Parts and module replacement M Series Service Guide 39 020 100551 11 Rev 1 01 2019 ...

Page 40: ...es Dust filters 118 100104 X Fog filters 118 100105 XX Door filter black 003 005432 XX 17 Lamp 200W 003 100856 XX Lamp 350W 003 100857 XX Lamp 450W 003 102385 XX Lamp duct 450W 003 005711 XX Light engine Light engine handle 003 002389 XX 33 HD light engine 003 100864 XX SXGA light engine 003 100865 XX WUXGA light engine 003 101268 XX WXGA light engine 003 101326 XX Light engine harness 003 003062 ...

Page 41: ...n card 108 311101 XX VDIC option card 108 310101 XX 27 Keypad membrane 003 002295 XX 26 LCD display 003 110819 XX 7 Passive back plane PBP 003 100465 XX 9 Dual image processor card 003 100470 XX Single image processor card 003 002556 XX Covers 28 ASSY lamp side panel includes Lamp side panel P N 011 101882 XX Lamp door 1 P N 011 101879 XX Lamp door 2 P N 011 101880 XX 2 Lamp hinges P N 011 101893 ...

Page 42: ...1 Remote temp sensor modules RTSM 2 3 and 4 003 100585 XX Packaging kit 003 004631 XX Lens mount plug 003 005710 XX Lens safety screw 003 003922 XX Lens connector 003 003351 XX 120 mm ground strap harness 003 100438 XX Accessories Learn about the accessories available for the projector Product name Part number Sold with product Sold separately Standard image processor 08 315101 XX X X Dual image p...

Page 43: ...X 1 8 2 6 HD zoom 118 100113 XX X 2 8 4 5 SX 2 6 4 1 HD zoom 118 100114 XX X 4 5 7 5 SX 4 1 6 9 HD zoom 118 100115 XX X 7 5 11 2 SX 6 9 10 4 HD zoom 118 100116 XX X Lamps Lamp 200W 003 100856 XX X X Lamp 350W 003 100857 XX X X Lamp 450W 003 102385 XX X X Lamp Driver 200W 003 120330 XX X X Lamp Driver 350W 003 100272 XX X X Lamp Driver 450W 003 120554 XX X X Miscellaneous Portrait adapter 118 11610...

Page 44: ...afety warnings and guidelines on page 12 Always read and understand all instructions before starting the procedure When re installing a module follow removal instructions in reverse unless otherwise indicated When re connecting harnesses see Interconnections on page 92 Parts and module replacement M Series Service Guide 44 020 100551 11 Rev 1 01 2019 Copyright 2019 Christie Digital Systems USA Inc...

Page 45: ... of the air intake side panel 3 Remove the two screws along the top of the front cover 4 Remove the two screws along the top of the rear cover 5 Remove the top cover 6 To install the top cover complete these steps in reverse order Removing the rear panel The input panels and processor slots are located within the rear panel Estimated replacement time 30 minutes M Series Service Guide 45 020 100551...

Page 46: ...panel and are removed with the cover The lamp side panel is an assembly kit that includes the following side panel doors hinges and pipe light lamp doors Estimated replacement time 20 minutes 1 Remove the lamps on page 81 2 Remove the two screws located inside the lamp door compartment 3 Remove the top cover on page 45 4 Remove the front cover on page 48 5 Remove two captive screws securing the co...

Page 47: ...he front cover on page 48 3 Loosen the two captive screws at the top of each filter door and remove the air filter covers 4 Place the projector on its side with the filter side facing up 5 Remove the two screws securing the corner through a silver metal bracket 6 Remove the five screws on the bottom of the projector on the intake side 7 Remove the bottom of the panel by raising it until the bottom...

Page 48: ...lens on page 76 2 Remove the top cover on page 45 3 Disconnect the front IR harness P108 from the IR PCB J108 When reconnecting remove the two screws from the IR PCB reconnect the harness and reinstall the IR PCB onto the front cover 4 Remove the two screws located in each corner under the top cover 5 Remove the three screws located along the bottom of the front cover 6 Remove the front cover 7 To...

Page 49: ...he card cage lid on page 59 4 Remove the two screws securing the card cage to the ballast 5 Remove the two screws securing the card cage to the bottom cover 6 Remove the clip screw 7 Place projector on its side 8 Remove the five screws from the bottom rear of the projector 9 Lift the card cage slightly to remove the rear cover 10 Remove the c clip locking the foot bolt in place 11 Turn the rear fo...

Page 50: ...flow and can lead to overheating and failure of the projector Check monthly by inspecting its color through the side vent grille with a flashlight Replace grey colored filters Leave the filters in their sealed packaging until ready for use 1 Unscrew the two captive screws at the top of each filter door Allow the door to rest down and away from the projector 2 Slide the air filter out and replace v...

Page 51: ...uts down Each filter is a two stage filter the black activated charcoal layer faces out and the white layer faces the projector 1 Loosen the two captive screws at the top of each filter door 2 Slide the filter out 3 Insert the new filter with the white layer facing into the projector and the black layer facing out 4 Secure the filter door by tightening the two captive screws loosened in step 1 Fil...

Page 52: ...e the top cover on page 45 2 Remove the card cage lid on page 59 3 Remove the bridge on page 60 4 Remove the card cage on page 61 5 Remove the panel driver on page 62 6 Remove the processor board on page 88 7 Remove the input cards from the rear of the card cage on page 63 8 Remove the fan by removing the four isolator pads in each corner To remove the fan the card cage must be removed The backs o...

Page 53: ...h corner To remove the fan the card cage must be removed The backs of the isolator pads are not accessible after removing the card cage Almost the entire inside of the card cage must be removed to access them Replacement isolator pads are part of the service kit The proper orientation of this fan is with the label on the fan hub facing inward towards the card cage An airflow indicator arrow on the...

Page 54: ...the fan can only fit one way Estimated replacement time 10 minutes per fan 1 Remove the top cover on page 45 2 Remove the two screws from the fan 3 Disconnect the fan wire at the quick disconnect coupling 4 Cut the cable tie holding the wire to fan 9 5 Remove the fan 6 To re install follow these steps in reverse order Ventilation and cooling M Series Service Guide 54 020 100551 11 Rev 1 01 2019 Co...

Page 55: ...Remove the optical assembly on page 78 6 Remove the four screws from the bottom of the lamp cage 7 Remove the lower section of the lamp cage 8 Remove the two screws from the card cage exhaust duct 9 Disconnect J53 from the panel driver 10 Remove the exhaust duct 11 Remove the remote temperature sensor module 4 on page 89 12 Disconnect fan 4 wire from the quick disconnect 13 Remove the five screws ...

Page 56: ... the front cover on page 48 3 Cut the cable tie 4 Disconnect fan 9 at the quick disconnect coupling 5 Remove the three screws holding exhaust duct to base 6 Slide the fan and the base out of projector 7 Remove four rubber isolators holding fan to duct Replacement isolator pads are part of the service kit 8 Remove fan 9 9 To re install follow these steps in reverse order Removing the intake and exh...

Page 57: ...ner of the fan 9 Remove intake fans 5 and 6 For fan 5 only The proper orientation of this fan is with the label on the fan hub facing inward towards the light engine An airflow indicator arrow on the fan must be pointing inward towards the light engine For fan 6 only The proper orientation of this fan is with the label on the fan hub facing outward away from the light engine An airflow indicator a...

Page 58: ...10 To re install follow these steps in reverse order Ventilation and cooling M Series Service Guide 58 020 100551 11 Rev 1 01 2019 Copyright 2019 Christie Digital Systems USA Inc All rights reserved ...

Page 59: ...eplacement time 7 minutes 1 Remove the top cover on page 45 2 Remove the card cage cover by removing the nine screws and one clip 3 Remove the two screws securing the card cage lid to the bridge 4 Remove the card cage lid 5 To re install follow these steps in reverse order During assembly make sure that the wires are not pinched between the lid and the card cage M Series Service Guide 59 020 10055...

Page 60: ...d cage 5 Remove the card cage plate 6 To re install follow these steps in reverse order Removing the bridge The bridge is located between the card cage and the light engine compartment It allows wires to pass from the light engine to the card cage while doubling as an EMI shield Estimated replacement time 8 minutes 1 Remove the top cover on page 45 2 Remove the card cage lid on page 60 3 Remove th...

Page 61: ... P86 P85 P84 from the panel driver 6 Disconnect the 12V power supply cable J26 7 Disconnect the two power cable connected to the lamp drivers 8 Remove the four screws on the rear of the projector in the top and bottom corners of the input panel 9 Remove the bridge on page 60 10 Remove the silver brackets for the anode cathode lamp harness on top of the lamp cage 11 Remove the three screws from the...

Page 62: ... replacement time 20 minutes 1 Remove the top cover on page 45 2 Remove the remote temperature sensor module RTSM 2 on page 90 3 Remove the card cage lid on page 60 4 Disconnect the following wires J48 J65 J40 J38 J47 J42 J60 J50 J52 J54 J59 J43 J44 J45 J26 J29 and J41 5 Remove the card cage plate on page 60 6 Disconnect the three engine cable connections P86 blue P85 green and P84 red from the pa...

Page 63: ...OM which contains all the projector operational settings Estimated replacement time 60 minutes Before replacing the PBP module software settings must be saved Do not power the projector back on until the PBP module is replaced Creating a software backup Create a software backup before removing the passive back panel PBP module 1 Power the projector on 2 Using the remote keypad navigate to Main Men...

Page 64: ...d right guides that snap into the grid 12 Remove the four screws securing the PBP to the base of the card cage 13 Remove the two screws on the left side 14 Remove the two screws on the right side by putting the screw driver through the fan to remove the screws The bottom screw may require some pressure on the fan to be pushed to the right to be removed 15 Gently remove the PBP and guide together b...

Page 65: ... side of the projector towards the front and sits directly under the LCD screen Estimated replacement time 22 minutes 1 Remove the lamps on page 81 2 Remove the top cover on page 45 3 Remove the front cover on page 48 4 Disconnect wire J78 from the keypad 5 Remove the lamp side panel on page 46 6 Disconnect the flex cable from the LCD PCB located on the inside of the lamp panel 7 Remove seven scre...

Page 66: ...8 Remove the LCD 9 Before installing the new status display control panel screen ensure the face of the LCD and the inside surfaces of the clear plastic cover on the side panel are clean 10 To re install follow these steps in reverse order Removing the lamp drivers The lamp drivers are located inside the card cage and are held in place by two screws Estimated replacement time 24 minutes 1 Remove t...

Page 67: ...ews from each lamp driver board a total of four screws 11 Carefully lift the top lamp driver board up and slide it out The anode and cathode harness is still connected The harness is long enough for the driver to slide out 12 Disconnect the anode and cathode harness from the lamp driver 13 Remove the lamp driver Electronics M Series Service Guide 67 020 100551 11 Rev 1 01 2019 Copyright 2019 Chris...

Page 68: ...underneath the card cage and comes as an assembly with two fans To gain access the card cage must be removed and all connections disconnected On 200W and 350W units the power supply is rated for 1100W On 450W units the power supply is rated for 1400W 1 Remove the top cover on page 45 2 Remove the remote temperature sensor module RTSM 2 on page 90 3 Remove the card cage lid on page 59 4 Remove the ...

Page 69: ...to the panel driver at location P46 Estimated replacement time 4 5 minutes per interlock switch 1 Remove the top cover on page 45 2 Disconnect the interlock wiring harness J46 from the panel driver location P46 3 Remove the nut 4 Remove the ground wire 5 Remove the interlock by sliding it off the locking post 6 Remove the red and black wires 7 For the other lamp door interlock repeat steps 1 to 6 ...

Page 70: ...engine cover 8 Remove the front optical housing 9 To re install follow these steps in reverse order Removing the fold mirror on the front optical housing Complete the following procedure to remove the front optical housing fold mirror Estimated replacement time 8 minutes 1 Remove the four screws holding the clips to the fold mirror 2 Before removing the clips note the orientation of the clip to th...

Page 71: ...he optical assembly on page 78 5 Remove the dynamic iris assembly on page 72 6 Remove the yellow notch filter on page 73 7 Remove the light sensor module on page 72 8 Remove the four screws connecting the rear optical housing to the front optical housing 9 Remove the rear optical housing and the integrator from the front optical housing 10 Remove the four screws connecting the integrator assembly ...

Page 72: ...ove the wire J1 LSM from the LSM 6 Remove the LSM assembly by sliding it out of the optical assembly 7 Remove the two self tapping screws from the LSM assembly 8 Remove the LSM cover 9 Remove the PCB sensor 10 To re install follow these steps in reverse order Removing the dynamic iris assembly The dynamic iris assembly is part of the optical assembly The dynamic iris assembly can be serviced witho...

Page 73: ...ling duct 6 Slide the dynamic iris assembly out 7 To re install follow these steps in reverse order Removing the yellow notch filter assembly YNF The yellow notch filter YNF assembly is a motorized assembly Estimated replacement time 8 minutes Yellow notch filter is only applicable on 200W and 350W models Optics M Series Service Guide 73 020 100551 11 Rev 1 01 2019 Copyright 2019 Christie Digital ...

Page 74: ...ment time 18 minutes 1 Remove the top cover on page 45 2 Remove the light engine intake duct on page 81 3 Remove the card cage lid on page 59 4 Disconnect fans 5 and 6 located on the light engine cover at the quick disconnect coupling 5 To remove the top portion of the housing remove the seven screws from the light engine cover One of the screws is connected to a ground 6 Remove the top portion of...

Page 75: ... integrator One integrator is shorter because the light travels a shorter distance 1 Remove the top cover on page 45 2 Remove the card cage lid on page 59 3 Remove the bridge on page 60 4 Remove the optical assembly on page 78 5 Remove the four screws securing the rear optical housing to the front optical housing 6 Remove the rear optical housing and integrator from the front optical housing 7 Rem...

Page 76: ...e 60 minutes The reflective surface of the mirror must be placed inwards to the light path 1 Check which is the reflective surface gently place an object against the glass surface If the object and the reflective image touch this is the reflective surface 2 Replace the mirror and the clips in the same orientation 3 Carefully tighten the screws securing the clips 4 Align the fold mirror frame on th...

Page 77: ...om the lens 5 Align the lens interface plate with the lens mount 6 Align the lens electrical connector with the mating connector on the lens mount 7 Fully insert the assembly straight into the lens mount opening without turning pressing with your hand The lens may become damaged if it is inserted into the lens mount at an angle 8 While holding the lens flat against the lens mount rotate the lens c...

Page 78: ...op cover on page 45 2 Remove the light engine intake duct on page 81 3 Disconnect fans 5 and 6 located on the light engine cover at the quick disconnect coupling 4 Remove the seven screws from the light engine cover to remove the top portion of the housing 5 Remove the card cage lid on page 59 6 Disconnect the shutter harness at the panel driver 7 Remove the six screws and disconnect the three lig...

Page 79: ...amps 18 Remove the anode and cathode connection from the integrator housing 19 Remove the wires from two clips on the optical assembly where the front and rear housings meet 20 Disconnect J81 from the dynamic iris driver 21 Disconnect J1 LSM from the light sensor module 22 Disconnect the yellow notch filter wire J62 from the panel driver 23 Remove the front cover on page 48 24 Remove the four scre...

Page 80: ...d to the light engine box 27 Disconnect fan 4 at the quick disconnect coupling When reassembling connect fan 4 before fastening screws in steps 27 and 28 28 Remove the three screws and lock washers from inside the light engine compartment 29 Remove the one screw and lock washer outside the light engine compartment 30 Remove the optical assembly by lifting it up and out of the projector 31 To re in...

Page 81: ...uct to the base plate 3 Remove the wires from the spring clips located along the intake duct 4 On 450W models only a Loosen one screw on the lock arm and swing the lock arm out of the slot b Pull the front cover forward and pull the side cover outward 5 Remove the light engine intake duct by carefully lifting it up and out The Intake RTSM harness is attached and comes out with the duct 6 To re ins...

Page 82: ...igns of adherence degradation replace the tape Installing the lamps If replacing lamps due to a lamp explosion both lamps should be removed from the lamp housing area including fan 4 and exhaust ducts Ensure they are carefully vacuumed before lamp replacement Estimated replacement time 3 minutes per lamp Warning If not avoided the following could result in death or serious injury UV EXPOSURE Prote...

Page 83: ...engine cover The engine is secured by three screws holding it to the base plate The light engine can be removed without having to remove the entire optical assembly Estimated replacement time 40 minutes Caution If not avoided the following could result in minor or moderate injury Observe all electrostatic precautions Use a grounded wrist strap and insulated tools when handling servicing or cleanin...

Page 84: ...light engine signal cables to the panel driver 2 Loosen the three screws that hold the engine to the shipping plate Do not remove the screws as they are used to fasten the light engine to the base 3 Lower the light engine onto the optical assembly base 4 Align the light engine dowel pin holes to the dowels on the base Ensure the engine sits flat on the three pads on the base 5 Make sure the green ...

Page 85: ...over top of the light engine through the P clip and secure to the panel driver with two screws 8 To reconnect the remaining assemblies compete steps 9 to 1 in Removing the light engine on page 83 Optics M Series Service Guide 85 020 100551 11 Rev 1 01 2019 Copyright 2019 Christie Digital Systems USA Inc All rights reserved ...

Page 86: ...projector is an assembly of mechanical and electrical components that securely holds and positions the projection lens Two motors are attached to the lens mount One for vertical adjustment One for horizontal adjustment The axes of motion are guided by linear shafts and bushings designed to reduce vibration and unintended motion Two wires for each adjustment run to the panel driver the horizontal s...

Page 87: ...crews from the corners of the lens mount 7 Remove the lens mount The horizontal and vertical adjustment have posts that the motors sit on they look like manual slotted adjustment screws They are not adjustment screws If these posts are cranked with a slotted screw driver major damage to the lens mount occurs 8 To re install follow these steps in reverse order Lens mount components M Series Service...

Page 88: ...e guides 4 To re install follow these steps in reverse order Removing the front infrared IR sensor The front IR sensor board receives command codes from the IR remote to control the projector operation The front IR sensor is located on the inside of the front cover The printed circuit board PCB is held by two small screws to the front cover Estimated replacement time 6 minutes 1 Remove the top cov...

Page 89: ...nsor module RTSM 4 This sensor relays the temperature of the exhaust from the light engine It is located on the outside of the engine housing across from the exhaust fan attached to the card cage by one screw Estimated replacement time 4 minutes 1 Remove the top cover on page 45 2 Disconnect the RTSM thermal harness J53 from the printed circuit board PCB 3 Remove the one screw securing the PCB 4 R...

Page 90: ...SM PCB 5 To re install follow these steps in reverse order Removing the remote temperature sensor module RTSM 2 The RTSM sensor relays the temperature from the lamp and power supply exhaust duct It is located inside a trap door beside the lamp compartment in the exhaust duct Estimated replacement time 10 minutes 1 Remove the top cover on page 45 2 Remove the two screws from the card cage exhaust d...

Page 91: ...these steps in reverse order When installing the exhaust duct ensure that the duct pins align with the holes for a snug fit Make sure all wiring is on top of the duct and not caught inside the duct Printed circuit boards and sensors M Series Service Guide 91 020 100551 11 Rev 1 01 2019 Copyright 2019 Christie Digital Systems USA Inc All rights reserved ...

Page 92: ...strates the path of electrical connections between modules Manufacturer s part numbers are included Part numbers are subject to change M Series Service Guide 92 020 100551 11 Rev 1 01 2019 Copyright 2019 Christie Digital Systems USA Inc All rights reserved ...

Page 93: ... P46 J46 001 100701 XX 001 100702 XX 001 100702 XX 001 100713 XX 001 100714 XX Wired Keypad 001 100717 XX 001 100710 XX 001 100732 XX 001 100709 XX 001 100709 XX 001 100706 XX 001 100739 XX 350W 002 120655 XX 450W 001 110927 XX 200W P58 J58 Rear IR P58 J58 Spare0 001 100649 XX To F an 6 on SHDPD Side Exhaust F an Lamp 1 Intake Blower Lamp 2 Intake Blower M Dynamic Iris ASSY 001 100715 XX J81 P81 D...

Page 94: ...lic of South Africa ph 27 0 11 510 0094 Korea Seoul ph 82 2 702 1601 Japan Tokyo ph 81 3 3599 7481 India ph 91 080 6708 9999 Germany ph 49 2161 664540 France ph 33 0 1 41 21 44 04 Russian Federation and Eastern Europe ph 36 0 1 47 48 100 China Shanghai ph 86 21 6278 7708 China Beijing ph 86 10 6561 0240 Brazil ph 55 11 2548 4753 Australia ph 61 0 7 3624 4888 Worldwide offices Italy ph 39 0 2 9902 1...

Page 95: ......

Reviews: