background image

S

+

12K / 14K / 16K / 20K Lamp & Filter Instructions 


013-100049-03 (Rev.1)


4 of 8 Pages


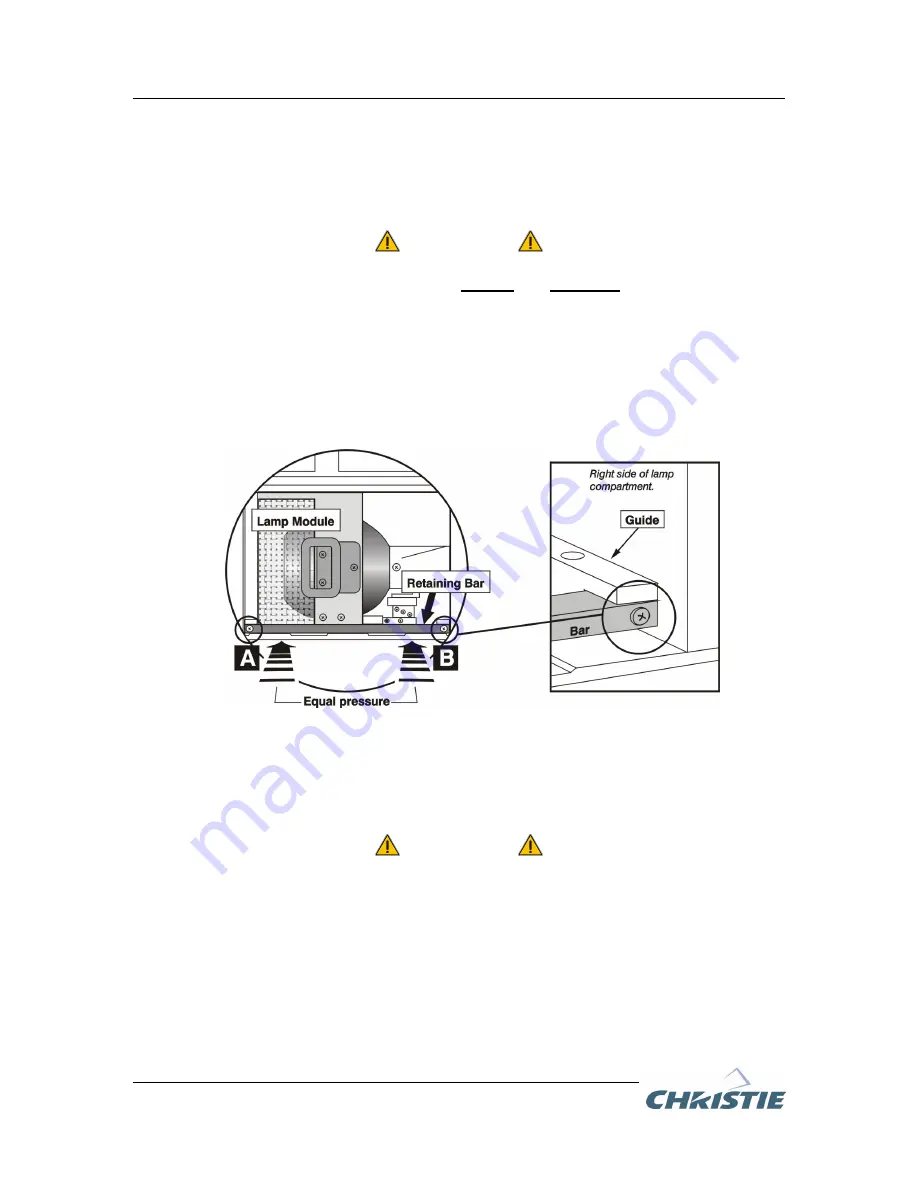
STEP 7 - RE-INSTALL LAMP RETAINING BAR


(a) 

Position the retaining bar along the bottom edge of the lamp module, with the ends 

positioned under the alignment guides. If the bar does not fit, push the lamp 
module in further. 

 IMPORTANT 


The tightening order of the screws is 

critical for proper lamp 

contact

 and 

alignment


(b) 

Secure screw 

B

 until just engaged. 

(c) 

Secure screw 

A

 until just engaged. 

(d) 

Go back and forth between 

A

 and 

to lock the bar in place with even pressure and 

correctly position the lamp module. Refer to Figure 5. 


STEP 8 — CLOSE LAMP DOOR


Close the lamp door and lock the ¼-turn lock screws (2). 

 IMPORTANT 


The lamp module is calibrated for maximum  

performance and brightness in this projector.  

Do not attempt to re-align or adjust the lamp module. 

STEP 9 - INSTALL THE AIR FILTER 

While the projector is still off, replace the air filter. For more information, refer to the 

Filter 

Replacement Procedure, on page 6. 

Figure 5. Install Retaining Bar 


OFFICIALLY RELEASED 

Document Control 

August 29, 2006 


Summary of Contents for Mirage S+14K

Page 1: ...1P 03 900518 51P Mirage S 14K 38 DSP214 04 38 DSP214 54 2 4kW 03 900518 01P 03 900518 51P Roadster S 20K 104 001001 104 001101 01 3 0kW 003 000306 003 000306 02 Warnings Lamp replacement MUST be perfo...

Page 2: ...R When the cooling fans have stopped turn the projector s main switch off and unplug from the main power source STEP 3 OPEN THE LAMP DOOR WARNING Protective gear required Wear a face shield Use a 2 Ph...

Page 3: ...must make full contact with the lamp connectors Increased resistance indicates initial contact with the connectors push firmly at this point to make full contact Align the base plate of the new lamp...

Page 4: ...engaged d Go back and forth between A and B to lock the bar in place with even pressure and correctly position the lamp module Refer to Figure 5 STEP 8 CLOSE LAMP DOOR Close the lamp door and lock the...

Page 5: ...he lamp life limit to expire prematurely a Plug in the projector and power it up b In the Lamp menu select Change Lamp Refer to Figure 6 shown below c In the Lamp S N text box enter the serial number...

Page 6: ...ristie approved Lamp and Filter Kit for the specific projector model For more information refer to Table 1 Projector Models STEP 1 TURN OFF THE PROJECTOR COOL and UNPLUG Before removing or installing...

Page 7: ...Ensure the triangular metal filter brace is installed after the filter has been positioned Refer to Figure 9 Available Filter Replacement Kits 03 900546 01P Five pack filter kit for 2 0kW and 2 4kW pr...

Page 8: ...8 977 8112 CHRISTIE Digital Systems Inc Willicher Damm 129 D 41061 M nchengladbach Germany Tel 49 2161 664540 Fax 49 2161 664546 CHRISTIE Digital Systems Inc 7 av Georges Pompidou 92593 Levallois Perr...

Reviews: