background image

32

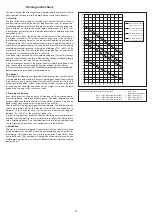
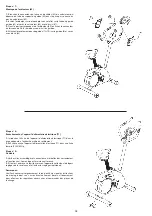
Mesure des pulsations1. Mesure des pulsations à la poignée

Les poig-

nées droite et gauche comportent chacune un capteur (pièces de contact 
métalliques.) Connectez le câble à la prise 21 de l’ordinateur. Attention, veillez 
à ce que la paume de vos mains repose 

simultanément

 sur les capteurs, 

avec une pression normale.  Dès que les pulsations sont enregistrées, un 
cœur apparaît en surbrillance à côté de l’affi chage F des pulsations.

La mesure des pulsations à la poignée n’a qu’une valeur indicative. En 
effet, tout mouvement, frottement, la transpiration etc. peuvent entraîner 
des variations par rapport aux pulsations réelles. Chez certaines personnes, 
la mesure des pulsations peut être erronée. En cas de problèmes avec la 
mesure des pulsations aux mains, nous vous recommandons d’utiliser une 
sangle de poitrine cardiologique. 

Mesure des pulsations cardiologiques


Dans le commerce, on trouve les appareils de mesure cardiologique, qui 
consiste en une sangle de poitrine pourvue d’un émetteur et d’une montre-
récepteur. 

Appuyer absolument sur la touche START, sinon l’appareil ne fera 
aucune mesure des pulsations.

FITNESS NOTE / FONCTION DE LA PHASE DES PULSATIONS DE RÉ-
CUPÉRATION 
Votre ergomètre vous offre la possibilité de faire une évaluation de votre 
forme physique personnelle sous la forme d’une « Fitness Note ». Le principe 
de cette évaluation se fonde que le fait que chez les personnes en bonne 
condition physique et en bonne santé, la fréquence de pulsations au cours 
d’une certaine période diminue plus rapidement après un entraînement 
que chez les personnes en bonne santé, mais en moins bonne condition 
physique.  Le calcul de votre condition physique se fait donc sur la diffé-
rence de fréquence des pulsations à la fi n de l’entraînement (pulsations 
de début) et la fréquence prise une minute après la fi n de l’entraînement 
(pulsations fi nales). 
N’utilisez cette fonction qu’après vous être entraîné pendant déjà un certain 
temps. Avant le début de la fonction de la phase des pulsations de récu-
pération, vous devez affi cher la fréquence actuelle de vos pulsations, en 
posant vos mains sur les capteurs du guidon. 

1. 

Appuyez sur la touche « Test » et posez vos deux mains sur les capteurs 

pour mesurer vos pulsations

2.

 L’ordinateur se met en mode STOPP, l’écran affi che, en son centre, une 

grande icône sous forme de cœur et la mesure automatique des pulsations 
de récupérations est en cours. 

3.

 La durée sur l’écran est ramenée à 0 :60. 

4.

 Après une minute, la durée est remise à zéro et un signal sonore se fait 

entendre.  Le moteur revient en arrière. Dans la zone F « Puls », les pulsations 
fi nales sont indiquées au moment 0 :00.  Vous pouvez maintenant enlever 
vos mains des capteurs de pulsations.  Après quelques secondes, appa-
raît au milieu de l’écran n votre « fi tness note », de 

F 1,0 – F 6,0

 (système 

allemand de notation scolaire). 

5.

 Si vous voulez continuer à vous entraîner, appuyer sur la touche START 

M. 

Summary of Contents for 98062

Page 1: ... für Bestell Nr Notice de montage et d utilisation du No de commande Assembly and exercise instructions for Order No Montage en bedieningshandleiding voor Bestellnummer GB D F NL RU Инструкция по монтажу и эксплуатации заказа 98062 Schwarz 98062 A Silber 98063 Rot ...

Page 2: ...erät nicht für therapeutische Zwecke geeignet ist 8 Mit dem Gerät nur trainieren wenn es einwandfrei funktioniert Für even tuelle Reparaturen nur Original Ersatzteile verwenden 9 Bei der Einstellung von verstellbaren Teilen auf die richtige Position bzw die markierte maximale Einstellposition und ordnungsgemässe Sicherung der neu eingestellten Position achten 10 Sofern in der Anleitung nicht ander...

Page 3: ...3 Deutsch ...

Page 4: ...n 22Ø 2 6 39 9847 2 Schraube 2 3 39 10076 SW 3 Pulssensor 2 6 36 9806206 BT 4 Pulskabel 1 3 36 9806207 BT 5 Lenkerüberzug 2 6 36 9806208 BT 6 Lenker 1 60 33 9806205 SI 7 L Lenkerverkleidung Links 1 7R 60 Schwarz 36 9806204 BT Silber 36 9806204 BT Rot 36 9806304 BT 7R Lenkerverkleidung Rechts 1 7L 60 Schwarz 36 9806205 BT Silber 36 9806205 BT Rot 36 9806305 BT 8 Unterlegscheibe 1 9 36 9806228 BT 9 ...

Page 5: ...lachriemen 1 47 52 36 9806223 BT 54 Fußkappe incl transportrolle 2 55 36 9806224 BT 55 Fuß vorne 1 28 33 9806203 SI 56 Unterlegscheibe gebogen 8 19 8 32 57 39 10271 57 Schraube M8x20 4 28 60 39 9888 58 Stellmotorkabel 1 51 63 36 9806225 BT 59 Schnellverschluß 1 28 36 9806226 BT 60 Lenkerstützrohr 1 28 33 9806202 SI 61 Schraube M5x12 4 62 36 9329712 BT 62 Computer 1 60 36 9806203 BT 63 Verbindungsk...

Page 6: ... des Trainings ausgeschlossen werden Schritt 2 Montage der Pedalen 21L 21R an den Pedalarmen 22L 22R 1 Schrauben Sie die rechte Pedale 21R auf der in Fahrtrichtung rechten Seite befindlichen Pedalkurbel 20R ein Achtung Schraubrichtung im Uhrzeigersinn 2 Die linke Pedale 21L schrauben Sie auf der in Fahrrichtung linken Seite in die Aufnahme der Pedalkurbel 22L ein Achtung Schraubrichtung entgegen d...

Page 7: ...st 2 Legen Sie den Sattelschlitten 12 in die Aufnahme am Sattelstützrohr 16 und befestigen Sie diesen in gewünschter horizontaler Stellung mit der Sterngriffmutter 15 der Unterlegscheibe 14 und der Schraube 11 Schritt 6 Montage des Sattelstützrohres 16 am Grundrahmen 28 1 Schieben Sie die Sattelstützrohmanschette 17 auf das Sattelstützrohr 16 und dann in die entsprechende Aufnahme am Grundrahmen 1...

Page 8: ...s dem Lenkerstützrohr 60 ragt in die auf der Rückseite des Computers 62 befindliche Buchse 2 Schieben Sie den Computer auf die dafür vorgesehene Platte des Lenkerstützrohres 60 und schrauben Sie ihn mit den Schrauben 61 fest 3 Den Stecker des Pulskabels 4 der aus der Lenkereinheit ragt stecken Sie in die entsprechende Buchse des Computers 62 4 Stecken Sie die Lenkerverkleidung 7L 7R über den Lenke...

Page 9: ...ern Sie die Werte nur blinkende Angaben können im Wert geändert werden ANZEIGEN START Anzeige des Start Modus Alle verfügbaren Werte werden angezeigt STOP Anzeige von Stopp Modus Es können Vorgaben eingestellt werden PROGRAMM Anzeige von eingestelltem Programm 1 13 Progr 1 7 Fitness Programme Progr 8 U1 U4 individuelle Benutzerprogram me Progr 9 Wattprogramm Progr 10 12 Pulsprogramme Progr 13 Körp...

Page 10: ...il 5 9 Type 2 Fettanteil 10 14 Type 3 Fettanteil 15 19 Type 4 Fettanteil 20 24 Type 5 Fettanteil 25 29 Type 6 Fettanteil 30 34 Type 7 Fettanteil 35 39 Type 8 Fettanteil 40 44 Type 9 Fettanteil 45 49 Widerstandsprofil Die gewünschte Trainingsdauer kann im Bereich A ZEIT vor eingestellt werden Diese Vor eingestellte Zeit wird vom System in 10 Teilintervalle unterteilt Jeder Balken auf der Zeitachse ...

Page 11: ...n Sensoren aufliegen Sobald eine Pulsabnahme erfolgt blinkt ein Herz neben der Pulsanzeige F Die Handpulsmessung dient nur zur Orientierung da es durch Bewegung Reibung Schweiß etc zu Abweichungen vom tatsächlichen Puls kommen kann Bei einigen weni gen Personen kann es zu Fehlfunktionen der Handpulsmessung kommen Sollten Sie Schwierigkeiten mit der Handpulsmessung haben so empfehlen wir Ihnen die ...

Page 12: ...estehen Aufwärm Phase Trainings Phase und Abkühl Phase In der Aufwärm Phase soll die Körpertemperatur und die Sauerstoffzufuhr langsam gesteigert werden Dieses ist durch gymnastische Übungen über eine Dauer von fünf bis zehn Minuten möglich Danach sollte das eigentliche Training Trainings Phase beginnen Die Trainingsbelastung sollte erst einige Minuten gering sein und dann für eine Periode von 15 ...

Page 13: ...ay expose yourself and can give you precise information on the correct posture during training the targets of your training and your diet Never train after eating large meals 8 Only train on the machine when it is in correct working order Use original spare parts only for any necessary repairs 9 When setting the adjustable parts observe the correct position and the marked maximum setting positions...

Page 14: ...p 22Ø 2 6 39 9847 2 Screw 2 3 39 10076 SW 3 Pulse unit 2 6 36 9806206 BT 4 Pulse cable 1 3 36 9806207 BT 5 Handlebar wrapping 2 6 36 9806208 BT 6 Handlebar 1 60 33 9806205 SI 7 L Handlebar cover left 1 7R 60 Black 36 9806204 BT Silver 36 9806204 BT Red 36 9806304 BT 7R Handlebar cover right 1 7L 60 Black 36 9806205 BT Silver 36 9806205 BT Red 36 9806305 BT 8 Washer 1 9 36 9806228 BT 9 Hand grip sc...

Page 15: ...T 53 Flat belt 1 47 52 36 9806223 BT 54 End cap incl Transportroller 2 55 36 9806224 BT 55 Front foot 1 28 33 9806203 SI 56 Curved washer 8 32 57 39 10271 57 Screw M8x20 4 28 60 39 9888 58 Motor cable 1 51 63 36 9806225 BT 59 Quick release 1 28 36 9806226 BT 60 Handlebar support 1 28 33 9806202 SI 61 Screw M5x12 4 62 36 9329712 BT 62 Computer 1 60 36 9806203 BT 63 Connection cable 1 58 62 36 98062...

Page 16: ...up that the equipment does not move of its own accord during a training session Step 2 Attach the pedal 21 at pedal crank 22 1 Screw the right pedal 21R into the locator in the right hand side as seen in operation for the pedal crank 22R warning the screw direction is clockwise 2 Screw the left pedal 21L into the locator in the left hand side as seen in operation for the pedal crank 22L Warning th...

Page 17: ...desired position and screw it onto the saddle support 16 by screw 11 washer 14 and star grip nut 15 Step 6 Attach the saddle support 16 at main frame 28 1 Push the saddle support wrapping 17 over the saddle support tube 18 Place the saddle support 16 into the matching locator in the main frame 28 set it at the desired position and lock it by inserting the bolt with the quick release 59 in place an...

Page 18: ... keep the tool set and the instructions in a safe place as these may be required for repairs or spare parts orders becoming necessary later Step 7 Attach the computer 62 at handlebar support 60 1 Push the plug of the connecting cable 4 projecting from the handlebar support 60 into the associated socket of the computer 62 2 Place the computer on the plate provided for it on the handlebar support 60...

Page 19: ... TIME HEIGHT WEIGHT DISTANCE WATT TARGET HEART RATE AGE and 10 columns Test key Starts the function of PULSE RECOVERY ABOUT DISPLAY A START Indicates the program selected has started B STOP Indicates the program selected has stopped and users are free to change the programs and the value of functions applied C PROGRAM Indicates the programs selected from PROGRAM 1 to PROGRAM 13 D LEVEL Indicates t...

Page 20: ... profile of the loading in each interval column With the value of TIME counting up each interval is 3 minutes that all the columns make up 30 minutes With the value of TIME counting down each interval is the value of setup TIME divided by 10 For example if the time value is setup to 40 minutes each interval will be 40 minutes divided by 10 intervals 40 10 4 Then each interval will be 4 minutes The...

Page 21: ...val by pressing or key and they will not change the level of loading stored in the memory With the input of age the computer may suggest a target heart rate to exercise The suggested heart rate is 85 220 age So if the heart rate detected equals to or greater than the TARGET H R the value of HEART RATE will keep flashing Please note that it is a warning for users to speed down or to lower the level...

Page 22: ...sessions a week are required to improve one s condition and reduce one s weight Of course the ideal frequency of training is five sessions a week 3 Planning the training Each training session should consist of three phases the warm up phase the training phase and the cool down phase The body temperature and oxygen intake should be raised slowly in the warm up phase This can be done with gymnastic ...

Page 23: ...ntraîner après un repas lourd 8 Ne s entraîner avec l appareil que lorsque celui ci est en parfait état de fonctionnement Pour les réparations éventuelles n utiliser que des pièces de rechange originales 9 Pour le réglage des pièces faire attention à régler la bonne position ou la position de réglage maximale marquée et à bloquer correctement la nouvelle position réglée 10 Si rien d autre n est in...

Page 24: ...6 39 9847 2 Vis 2 3 39 10076 SW 3 Unité de pouls 2 6 36 9806206 BT 4 Cable de pouls 1 3 36 9806207 BT 5 Revêtement de guidon 2 6 36 9806208 BT 6 guidon 1 60 33 9806205 SI 7 L Revêtement gauche pour de guidon 1 7R 60 Black 36 9806204 BT Silver 36 9806204 BT Red 36 9806304 BT 7R Revêtement droit pour de guidon 1 7L 60 Black 36 9806205 BT Silver 36 9806205 BT Red 36 9806305 BT 8 Rondelle 1 9 36 98062...

Page 25: ...er 2 55 36 9806224 BT 55 Tube de piet avant 1 28 33 9806203 SI 56 Rondelle intercalaire 8 19 8 32 57 39 10271 57 Vis M8x20 4 28 60 39 9888 58 Câble de connexion du moteur 1 51 63 36 9806225 BT 59 Fermeture à vis à clé 1 28 36 9806226 BT 60 Tube d appui du guidon 1 28 33 9806202 SI 61 Vis M5x12 4 62 36 9329712 BT 62 Ordinateur 1 60 36 9806203 BT 63 Câble de connexion de tube support 1 58 62 36 9806...

Page 26: ...e puisse pas se mettre à bouger au cours de l entraînement Etape n 2 Montage des pédales 21 1 Vissez la pédale droite 21R sur le support à droite 22R dans le sens de fonctionnement de la manivelle de pédalier Attention Serrage des vis dans le sens d horloge 2 La pédale gauche 21L doit ensuite être vissée dans le support de manivelle de pédalier 22L à gauche et dans le sens de fonctionnement Attent...

Page 27: ...oile 15 de la rondelle 14 et de la vis 11 Etape n 6 Montage du manchette 17 et d appui de selle 16 1 Emmanchez la manchette 17 du tube d appui de selle 16 sur ce dernier Insérez le tube de la selle 16 dans le support prévu à cet effet du corps de l appareil 28 ajustez la position désirée et bloquez la en insérant la vis à poignée en croix 59 et la serrant à fond Pour desserrer la fermeture rapide ...

Page 28: ...Remarques Veuillez à conserver soigneusement le jeu d outils ainsi que les instructions de montage dont vous aurez éventuellement besoin ultérieurement pour effectuer les réparations nécessaires et commander des pièces de rechange Etape n 7 Montage de l ordinateur 62 1 Branchez le connecteur du faisceau de câbles 63 du calculateur qui dépasse du tube de support du guidon 60 dans la prise qui se tr...

Page 29: ...chages START Mode du commencement Toutes les valeurs sont affichées STOP Affichage du mode Arrêt Les données par défaut peuvent être rétablies PROGRAMME Affichage du programme engagé 1 13 programme 1 7 programme fitness programme 8 programmes individuels programme 9 programme en watts programme 10 12 programmes des pulsations DEGRÉ Affichage de la résistance à l effort de 1 à 16 Plus le chiffre es...

Page 30: ... 10 min chaque levier 1 min Chacun des 10 leviers correspond à cet intervalle Le levier de l intervalle actuel est marqué par un clignotement Si aucune durée n est prédéterminée chaque levier durera 3 minutes c est à dire qu après trois minutes la surbrillance passera du levier 1 au levier 2 et ainsi de suite pendant 30 minutes Si le programme est interrompu entre temps par la touche S la durée s ...

Page 31: ...les sont prévus Vous pouvez intervenir à tout moment dans ce programme pour modifier la résistance à la marche ou la durée En outre les leviers apparaissent dans la zone d affichage PROGRAMME 8 U1 U4 Programme d entraînement individuel PROGRAMME 9 Watts Introduisez ici vos données personnelles en watts Dans les limites de certaines tolérances l ordinateur règle automatiquement la résistance in dép...

Page 32: ...se fonde que le fait que chez les personnes en bonne condition physique et en bonne santé la fréquence de pulsations au cours d une certaine période diminue plus rapidement après un entraînement que chez les personnes en bonne santé mais en moins bonne condition physique Le calcul de votre condition physique se fait donc sur la diffé rence de fréquence des pulsations à la fin de l entraînement pul...

Page 33: ...ement et les exercices physiques trois ou quatre fois par semaine Un adulte normal doit s entraîner deux fois par semaine pour conserver la forme actuelle Mais au moins trois fois par semaine pour améliorer et modifier son poids Cinq fois par semaine étant idéal 3 Programmation de l entraînement Chaque séance d entraînement devrait comprendre trois phases phase d échauffement phase d entraînement ...

Page 34: ...ag blootstellen en kan nauw keurige inlichtingen met betrekking tot een correcte lichaamshouding bij de training de doelstellingen van de training en de voeding geven Er mag niet na uitgebreide maaltijden getraind worden 8 Met het toestel slechts trainen wanneer het foutloos functioneert Voor eventuele herstellingen uitsluitend van originele reserveonderdelen gebruik maken 9 Bij de instelling van ...

Page 35: ...n Aantal Gemonteerd aan ET nummer nr mm stuks afbeeldingsnr 1 Ronde stop 22Ø 2 6 39 9847 2 Schroef 2 3 39 10076 SW 3 Polsunit 2 6 36 9806206 BT 4 Polskabel 1 3 36 9806207 BT 5 Overtrek handgreep 2 6 36 9806208 BT 6 Stuur 1 60 33 9806205 SI 7 L Stuur Bekleiding 1 7R 60 Black 36 9806204 BT Silver 36 9806204 BT Red 36 9806304 BT 7R Stuur Bekleiding 1 7L 60 Black 36 9806205 BT Silver 36 9806205 BT Red...

Page 36: ...36 9806223 BT 54 Eindkappen met transportrol 2 55 36 9806224 BT 55 Voetbuis voor 1 28 33 9806203 SI 56 Onderlegplaatje 8 19 8 32 57 39 10271 57 Ronde kopschroef met binnenzeskant M8x20 4 28 60 39 9888 58 Stelmotorkabel 1 51 63 36 9806225 BT 59 Snelslot 1 28 36 9806226 BT 60 Steunbuis 1 28 33 9806202 SI 61 Kruiskopschroef M5x12 4 62 36 9329712 BT 62 Computer 1 60 36 9806203 BT 63 Verbindingskabel v...

Page 37: ... zo worden opgesteld dat het tijdens de training niet uit zichzelf beweegt Stap 2 Montage van de pedalen 21 1 Schroef het rechter pedaal 21R in de pedaalcrank 22R aan de zijde die tijdens de training rechts is Let op De schroefrichting is in wijzerrichting 2 Schroef het linker pedaal 21L in de pedaalcrank 22L aan de zijde die tijdens de training links is Let op De schroefrichting is in tegenwijzer...

Page 38: ...n 14 en het bevestigingsschroef 11 Stap 6 Montage van de zadelsteunbuis 16 en manchet 17 1 Draai de zadelsteunbuismanchet 17 over de zadelsteunbuis 16 Plaats de zadelbuis 16 in de bijbehorende buis van het onderstel 28 Stel de gewenste positie in en borg deze door de bout met stergreep 59 te plaatsen en vast te draaien de snelsluiting 59 moet losgemaakt worden door deze een beetje te draaien en da...

Page 39: ...bekleding 7 middels de schroeven 64 eveneens vast Stap 8 Aansluiting van het nettoestel 71 1 Steek de stekker van het nettoestel 71 in de desbetreffende bus op het achterste uiteinden van de bekleding 2 Steek daarna het nettoestel 71 in een contactdoos 230V 50Hz Stap 9 Controle 1 Alle schroef en stekkerverbindingen op een correcte montage en juiste werking controleren Daarmee is de montage beëindi...

Page 40: ... P voert u de waarden in en door de toets E opnieuw in te drukken worden deze bevestigd Tegelijkertijd springt het knipperende display naar het volgende invoerveld U1 U4 met deze toets kunt u uw U1 U4 noteren Test met deze toets kunt u uw fitnesscijfer noteren en met de toetsen wijzigt u de waarden uitsluitend knipperende gegevens kunnen qua waarde gewijzigd worden Displays START weergave van de m...

Page 41: ...5 29 Type 6 vetgehalte 30 34 Type 7 vetgehalte 35 39 Type 8 vetgehalte 40 44 Type 9 vetgehalte 45 49 Weerstandsprofiel de gewenste duur van de training kan binnen het bereik A TIJD vooraf ingesteld worden Deze vooraf ingestelde tijd wordt door het systeem in 10 gedeeltelijke intervallen onderverdeeld Ieder balkje op de tijdas horizontaal 1 10 van de vooraf ingevoerde tijd bijvoorbeeld trainingstij...

Page 42: ...us en in tijdintervallen U kunt echter steeds op het programma beroep doen om trapweerstand of tijdverloop te wijzigen Bovendien volgt er een overeenkomstige balkweergave in het displayveld Programma 8 U1 U4 individuele trainingsprogramma Programma 9 wattprogramma Hier kunt u uw individuele wattvermelding invoeren Binnen een bepaalde tolerantiezone wordt de trapweerstand automatisch onafhankelijk ...

Page 43: ...sonen de polsslagfrequentie binnen een bepaalde tijdspanne na de trai ning sneller daalt dan bij gezonde minder goed getrainde personen Voor de vaststelling van de fitnesstoestand wordt er daarom op het verschil van de polsslagfrequentie op het einde van de training beginpolsslag en één minuut na het einde van de training eindpolsslag beroep gedaan Start deze functie pas wanneer u een tijdje getra...

Page 44: ...ij minimaal driemaal per week trainen Natuurlijk is de ideale trainingsfrequentie vijf maal per week 3 Planning van de training Iedere trainingssessie moet uit drie fasen bestaan een warming up een trainingsfase en een cooling down In de warming up moet de lichaamstemperatuur en de zuurstoftoevoer langzaam toenemen Dit kan worden bereikt door vijf tot tien minuten lang gymnastiekoefeningen te doen...

Page 45: ...ую информацию о правильном положении тела во время тренировки о целях тренировки и о питании Запрещается тренироваться после обильной еды 8 Тренироваться на тренажере только тогда когда он работает безупречно Для возможного ремонта использовать только оригинальные запасные части 9 Настраивая регулируемые детали следить за правильным положением или соотв учитывать помеченную максимальную позицию на...

Page 46: ...ерения пульса 1 3 36 9806207 BT 5 Оболочка руля 2 6 36 9806208 BT 6 Руль 1 60 33 9806205 SI 7 L Оболочка рукоятки слева 1 7R 60 Black 36 9806204 BT Silver 36 9806204 BT Red 36 9806304 BT 7R Оболочка рукоятки справа 1 7L 60 Black 36 9806205 BT Silver 36 9806205 BT Red 36 9806305 BT 8 Подкладная шайба 1 9 36 9806228 BT 9 Грибковый болт 1 60 36 9806209 BT 10 Седло 1 12 36 9806210 BT 11 Болт M10x35 1 ...

Page 47: ... Концевой колпачок с транспортировочными роликами 2 55 36 9806224 BT 55 Передняя ножка 1 28 33 9806203 SI 56 Изогнутая подкладная шайба 8 19 8 32 57 39 10271 57 Болт M8x20 4 28 60 39 9888 58 Кабель серводвигателя 1 51 63 36 9806225 BT 59 Быстрозакрывающийся затвор 1 28 36 9806226 BT 60 Опорная труба руля 1 28 33 9806202 SI 61 Болт M5x12 4 62 36 9329712 BT 62 Компьютер 1 60 36 9806203 BT 63 Соедини...

Page 48: ...крутите правую педаль 21R на шатун педали 20R находящийся с правой стороны в направлении движения Внимание Направление закручивания болта по часовой стрелке 2 Прикрутите левую педаль 21L на шатун педали 20L находящийся с левой стороны в направлении движения Внимание Направление закручивания болта против часовой стрелки 3 Установите фиксирующие ленты педалей на соответствующие педали Для упрощения ...

Page 49: ...орной трубе седла 16 и закрепите в желаемом горизонтальном положении с помощью грибковой шайбы 15 подкладной шайбы 14 и болта 11 Шаг 6 Монтаж опорной трубы седла 16 на основную раму 28 1 Вставьте манжету опорной трубы седла 17 на опорную трубу седла 16 ивсоответствующеекреплениенаосновнойраме 1 изафиксируйте ее в желаемом положении с помощью быстродействующего затвора 59 Быстродействующий затвор 5...

Page 50: ...е оболочки рукоятки Stecken 7L 7R на руль и крепко прикрутите с помощью болтов 64 Шаг 8 Подключение блока питания 1 Вставьте штекер блока питания 71 в соответствующее гнездо на заднем конце обшивки 2 Вставьте блок питания 71 в штепсельную розетку 230V 50Hz Шаг 9 Контроль 1 Проверьте все соединения на правильность сборки и проведите проверку функциональности При этом монтаж считается законченым 2 Е...

Page 51: ...ние в область следующей настраеваемой функции Выбранная задаваемая функция мигает после чего путем клавиш О и Р введите необходимые данные и еще раз нажмите клавишу E данные фиксируются Одновременно начинает мигать следующее поле для введения данных U1 U4 ВС помощью этой клавиши Вы можете устанавливать индивидуальные показатели пользователя U1 U4 Test Тест при помощи этой клавишиможно определить в...

Page 52: ...Тип 8 Жировая часть 40 44 Тип 9 Жировая часть 45 49 Соответствующему типу тела в программах 14 и 15 предлагаются соответствующие тренировочные программы Профиль нагрузки Желаемую продолжительность тренировки можно выставить в районе индикации А Путем ввода времени Это время делится системой в следующем порядке каждая колонна на оси времени горизонталь 1 10 задаваемого времени к примеру задано трен...

Page 53: ... Однако вы можете в любое время войти и изменить нагрузку или время Кроме этого протекание програмы показывается на дисплее Программа 8 U1 U4 Индивидуальные тренировочные программы Программа 9 Ватт программа Здесь вы можете задать вашу индивидуальную нагрузку в ваттах и компьютер с учетом определенной толерантности будет независимо от частоты вращения держать эту нагрузку в заданном вами пределе П...

Page 54: ...ценку фитнеса Принцип основан на том что у тренированного человека частота пульса снижается быстрее чем у не тренированного на определенном отрезке времени Для определения состояния фитнеса сравнивается частота пульса в конце тренировки начальный пульс и одной минуты после окончания тренировки Конечный пульс Стартуйте эту функцию после того как вы некоторое время тренировались Перед началом востан...

Page 55: ...з в неделю 3 Планирование тренировок Каждая тренировка должна состоять из трех фаз разогрев разминка непосредственно тренировка и остывание после тренировки заключительная фаза Температура тела и поступление кислорода в организм должно медленно возрастать во время фазы разогрева Выполняйте гимнастические упражнения в течение 5 10 минут Затем приступайте к основной фазе тренировки Нагрузка должна б...

Page 56: ...lbestellungen oder Reparaturen wenden Sie sich bitte an unsere Service Abteilung Service Top Sports Gilles GmbH Tel 49 0 2051 6067 0 Friedrichstrasse 55 info christopeit sport com Fax 49 0 2051 6067 44 D 42551 Velbert http www christopeit sport com by Top Sports Gilles GmbH D 42551 Velbert Germany ...

Reviews: