


15
GB
Important Recommendations and
Safety Instructions
Our products are all tested and therefore represent the highest current safety
standards. However, this fact does not make it unnecessary to observe the
following principles strictly.
1.
Assembly the machine exactly as described in the installation instructions
and use only the enclosed, specific parts of the machine. Before assembling,
verify the completeness of the delivery against the delivery notice and the
completeness of the carton against the assembly steps in the installation
and operating instructions.
2.
Check the firm seating off all screws, nuts and other connections before
using the machine for the first time and at regular intervals to ensure that
the trainer is in a safe condition.
3.
Set up the machine in a dry, level place and protect it from moisture and
water. Uneven parts of the floor must be compensated by suitable measures
and by the provided adjustable parts of the machine if such are installed.
Ensure that no contact occurs with moisture or water.
4.
Place a suitable base (e.g. rubber mat, wooden board etc.) beneath the
machine if the area of the machine must be specially protected against
indentations, dirt etc.
5.
Before beginning training, remove all objects within a radius of 2 metres
from the machine.
6.
Do not use aggressive cleaning agents to clean the machine and employ
only the supplied tools or suitable tools of your own to assemble the machine
and for any necessary repairs. Remove drops of sweat from the machine
immediately after finishing training.
7.
WARNING!
Systems of the heart frequency supervision can be inexact.
Excessive training can lead to serious health damage or to the death. Consult
a doctor before beginning a planned training programme. He can define
the maximum exertion (pulse, Watts, duration of training etc.) to which you
may expose yourself and can give you precise information on the correct
posture during training, the targets of your training and your diet. Never
train after eating large meals.
8.
Only train on the machine when it is in correct working order. Use original
spare parts only for any necessary repairs.
WARNING!
Replace the worm
parts immediately and keep this equipment out of use until repaired.
9.
When setting the adjustable parts, observe the correct position and the
marked, maximum setting positions and ensure that the newly adjusted
position is correctly secured.
10.
Unless otherwise described in the instructions, the machine must only
be used for training by one person at a time. The exercise time should not
overtake 60 min./daily.
11.
Wear training clothes and shoes which are suitable for fitness training
with the machine. Your clothes must be such that they cannot catch dur-
ing training due to their shape (e.g. length). Your training shoes should be
appropriate for the trainer, must support your feet firmly and must have
non-slip soles.
12.
WARNING!
If you notice a feeling of dizziness, sickness, chest pain or
other abnormal symptoms, stop training and consult a doctor.
13.
Never forget that sports machines are not toys. They must therefore
only be used according to their purpose and by suitably informed and
instructed persons.
14.
People such as children, invalids and handicapped persons should
only use the machine in the presence of another person who can give aid
and advice. Take suitable measures to ensure that children never use the
machine without supervision.
15.
Ensure that the person conducting training and other people never move
or hold any parts of their body into the vicinity of moving parts.
16.
At the end of its life span this product is not allowed to dispose over
the normal household waste, but it must be given to an assembly point for
the recycling of electric and electronic components. You may find the symbol
on the product, on the instructions or on the packing.
The materials are reusable in accordance with their marking. With the re-use,
the material utilization or the protection of our environment. Please ask the
local administration for the responsible disposal place.
17.
To protect the environment, do not dispose of the packaging materials,
used batteries or parts of the machine as household waste. Put these in
the appropriate collection bins or bring them to a suitable collection point.
18.
This machine is a speed-dependant machine, i.e. the power increases
with increasing speed, and the reverse.
19.
The machine is equipped with 8-speed resistance adjustment. This
makes it possible to reduce or increase the braking resistance and thereby
the training exertion. Turning the adjusting knob for the resistance setting
towards stage 1 reduces the braking resistance and thereby the training
exertion. Turning the adjusting knob for the resistance setting towards
stage 8 increases the braking resistance and thereby the training exertion.
20.
The maximum permissible load (=body weight) is specified as 150 kg.
This machine has been tested and certified in compliance with EN ISO
20957-1 and EN 957-5 „H,C“. This item’s computer corresponds to the
basic demands of the EMV Directive of 2004/108/EC.
Contents
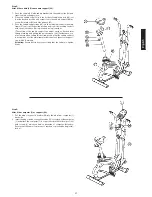
1. Summary of Parts
Page 3
2. Important Recommendations and Safety Information Page 15
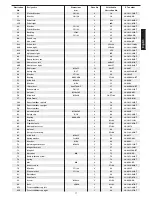
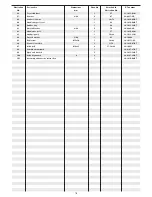
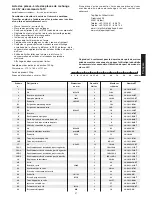
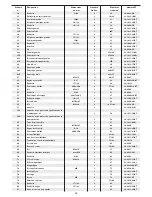
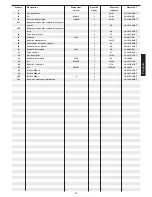
3. Parts List
Page 16 - 18
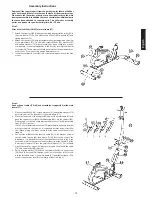
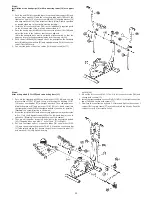
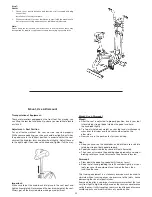
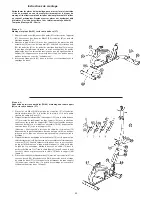
4. Assembly Instructions With Exploded Diagrams
Page 19 - 22
Mount, Use & Dismount
Page 22
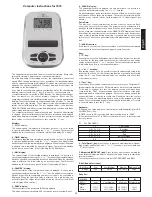
6. Computer instructions
Page 23
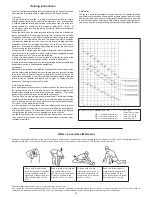
7. Training Instructions, Warm up exercises (Warm Up) Page 24
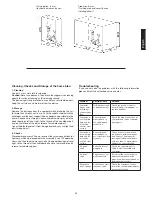
8. Cleaning, Storage, Checks, Troubleshooting
Page 25
Dear customer,
We congratulate you on your purchase of this home training sports unit and
hope that we will have a great deal of pleasure with it. Please take heed
of the enclosed notes and instructions and follow them closely concerning
assembly and use.
Please do not hesitate to contact us at any time if you should have any
questions.
Top-Sports Gilles GmbH
Friedrichstr. 55
42551 Velbert
English
Summary of Contents for AL 3
Page 63: ...63 ...


