background image

42

ИНСТРУКЦИЯ ПО ТРЕНИРОВКЕ

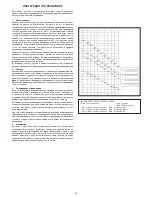
Вы  должны  учитывать  следующие  факторы,  чтобы  определить 
верные параметры тренировок для достижения ощутимых физических 
результатов и пользы для здоровья.

1. 

Интенсивность

Уровень  физических  нагрузок  при  тренировках  должен  превышать 
уровень  нормальных  физических    нагрузок,  но  вы  не  должны 
задыхаться и сильно переутомляться. Удобной мерой эффективности 
тренировки  может  служить  частота  пульса.  Во  время  тренировки 
частота  пульса  может  достигать  70-85%  от  максимальной  (смотри 
таблицу и формуляр для определения и расчета). В первую неделю 
частота пульса должна оставаться на нижней отметке этой области, т.е. 
около 70% от максимальной. В последующие недели и месяцы частоту 
пульса  следует  постепенно  наращивать  до  85%  от  максимальной. 
Лучше  всего  для  физического  состояния  человека,  выполняющего 
упражнения,  если  частота  пульса  возрастает,  оставаясь  в  пределах 
70-85%  от  максимальной.  Это  достигается  увеличением  времени 
тренировки или уровня сложности. 

Если частота пульса не показана на дисплее компьютера или Вы хотите 
проверить  частоту  пульса,  которая,  возможно,  показана  неверно, 
вследствие какой-либо ошибки . Вы можете предпринять следующее:
А) измерить частоту пульса обычным способом (подсчитать количество 
ударов пульса в минуту на запястье)
В)  измерить  частоту  пульса  с  помощью  специального  устройства 
(которое можно купить у продавцов специализированного оборудования)

2. 

Частота

Большинство  экспертов  рекомендуют  комбинацию  здоровой  диеты, 
которая основана на цели Ваших тренировок, и физические занятия 
3 раза в неделю. Нормальный взрослый человек может тренироваться 
дважды  в  неделю  для  поддержания  его  нормальной  физической 
формы. Трехразовые тренировки необходимы для улучшения Вашей 
физической формы и уменьшения веса. Идеальная частота тренировок 
- 5 раз в неделю. 

3. 

Планирование тренировок

Каждая тренировка должна состоять из трех фаз: разогрев (разминка), 
непосредственно  тренировка  и  остывание  после  тренировки, 
заключительная  фаза. Температура  тела  и  поступление  кислорода 
в организм должно медленно возрастать во время фазы разогрева. 
Выполняйте гимнастические упражнения в течение 5-10 минут.

Затем приступайте к основной фазе тренировки. Нагрузка должна быть 
относительно низкой в первые несколько минут, а затем возрастать в 
течение 15-30 минут, чтобы частота пульса была в пределах 70-85% 
от максимальной. 

Для того, чтобы поддержать циркуляцию крови после основной фазы 
тренировки,  предупредить  возникновение  болей  или  напряжения  в 
мышцах необходима заключительная фаза тренировки: выполнение в 
течение 5-10 минут упражнений на растяжку или легких гимнастических 
упражнений.

4. 

Мотивация 

Ключевым  моментом  успеха  программы  являются  регулярные 
тренировки.  Вам  следует  установить  конкретное  время  и  место  на 
каждый  день  для  тренировок  и  внутренне  подготовить  себя  к  ним. 
Тренируйтесь  только  тогда,  когда  у  Вас  есть  настроение  и  всегда 
помните  свою  цель.  Если  Вы  продолжаете  свои  занятия,  то  через 
какое-то время сможете увидеть свой прогресс день ото дня и будете 
приближаться к поставленной цели шаг за шагом.

ФОРМУЛА РАСЧЕТА ЧАСТОТЫ ПУЛЬСА
Макс. частота пульса 


=   220 - возраст 
    (220  - Ваш возраст)

 90% от макс. частоты пульса =   (220 - возраст) х 0.9
 85% от макс. частоты пульса =   (220 - возраст) х 0.85
 70% от макс. частоты пульса =   (220 - возраст) х 0.7

Summary of Contents for CPS 3.3

Page 1: ...eitung für Bestell Nr 99131 Assembly and exercise instructions for Order No 99131 GB D Notice de montage et d utilisation du No de commande 99131 Montage en bedieningshandleiding voor Bestellnummer 99131 F NL RU Инструкция по монтажу и эксплуатации заказа 99131 ...

Page 2: ...paraturen nur Original Ersatzteile verwenden 9 Bei der Einstellung von verstellbaren Teilen auf die richtige Position bzw die markierte maximale Einstellposition und ordnungsgemässe Sicherung der neu eingestellten Position achten 10 Sofern in der Anleitung nicht anders beschrieben darf das Gerät nur immer von einer Person zum Trainieren benutzt werden 11 Es sind Trainingskleidung und Schuhe zu tra...

Page 3: ...3 Deutsch ...

Page 4: ... 10450 VC 4 Kreuzschlitzschraube 3x20 4 5 7 39 10187 5 Lenkerverkleidung vorn 1 7 36 9913104 BT 6 Kreuzschlitzschraube 4 2x18 3 5 7 11 36 9111 38 BT 7 Lenkerverkleidung hinten 1 5 36 9913105 BT 8 Distanzstück 12x1 5x30L 1 9 36 9613209 BT 9 Flügelschraube M8x60 1 10 36 9613210 BT 10 Lenkeraufnahme 1 11 33 9613208 SI 11 Lenkerstützrohr 1 23 33 9913102 SI 12 Endstopfen 2 14 39 9847 13 Lenkerüberzug 2...

Page 5: ...BT 63 Schraube M8x25L 1 61 39 10455 64 Unterlegscheibe Ø20xØ8 2x1 2T 2 63 39 10018 CR 65 Selbstsichernde Mutter M8 2 63 39 9918 CR 66 Kugellager 6300ZZ 2 63 39 9946 67L Verkleidung Links 1 23 67R 36 9913131 BT 67R Verkleidung rechts 1 23 67L 36 9913132 BT 68 Schraube M5x20 4 67 39 10190 69 Kreuzschlitzschraube M4x20 4 67 39 10187 70 Gummieinsatz 2 67 36 9613235 BT 71L Pedalarm Links 1 54 33 961320...

Page 6: ... 21 mit der Widerstandseinstell Einheit 20 Montage des Lenkerstützrohrs 11 am Grundrahmen 23 mittels der Rundkopfschrauben mit Innensechskant M8x15 18 der Federringe 76 und der gebogenen Unterlegscheiben 17 1 Das untere Ende des Lenkerstützrohr 11 zum Grundrahmen 23 führen Die Enden der beiden Computerkabelstränge 2 und 22 die aus 23 und 11 ragen zusammenstecken 2 Die beiden Enden der Seilzüge 20 ...

Page 7: ...is der Schnellverschluss einrastet und Ihn danach wieder festdreht Schritt 5 Montage des Lenkers 14 und des Computers 1 am Stützrohr 11 1 Führen Sie den Lenker 14 zur geöffneten Lenkeraufnahme 10 am Stützrohr 11 und schließen Sie diese über den Lenker 14 2 Stecken Sie die vordere Lenkerverkleidung 7 über den Lenker 14 und befestigen Sie den Lenker 14 in gewünschter Position am Stützrohr 11 mittels...

Page 8: ...e ohne vorherige Absprache mit unserer Service Abteilung vorgenommen werden erlischt die Garantie Bitte bewahren Sie falls möglich die Originalverpackung für die Dauer der Garantiezeit auf um im Falle einer Retournierung die Ware ausreichend zu schützen und senden Sie keine Ware unfrei zur Service Abteilung ein Schritt 6 Montage des rechten Pedale 74R und der linken Pedale 74L an den Pedalarmen 71...

Page 9: ...ückzulegende Strecke angezeigt Wird der vorgegebene Wert erreicht wird dieses durch ein akustisches Signal angezeigt Eine Speicherung der zuletzt erreichten Werte in dieser Funktion erfolgt Höchstgrenze der Anzeige 999 km 4 KALORIEN Anzeige Es wird der aktuelle Stand der verbrauchten Kalorien angezeigt Eine Vorgabe eines bestimmten Wertes mittels der E Taste ist möglich Ist eine bestimmte Verbrauc...

Page 10: ...cher Ertüchtigungen drei bis fünfmal in der Woche Ein normaler Erwachsener muß zweimal pro Woche trainieren um seine derzeitige Verfassung zu erhalten Um seine Kondition zu verbessern und sein Körpergewicht zu verändern benötigt er mindestens drei Trainingsein heiten pro Wochen Ideal bleibt natürlich eine Häufigkeit von fünf Trainings einheiten pro Woche 3 Gestaltung des Trainings Jede Trainingsei...

Page 11: ... Only train on the machine when it is in correct working order Use original spare parts only for any necessary repairs 9 When setting the adjustable parts observe the correct position and the marked maximum setting positions and ensure that the newly adjusted position is correctly secured 10 Unless otherwise described in the instructions the machine must only be used for training by one person at ...

Page 12: ...tension cable 1 19 36 9613212 BT 21 Lower tension cable 1 20 59 36 9613215 BT 22 Sensor cable with sensor 1 2 36 9613216 BT 23 Main frame 1 33 9913107 SI 24 Saddle 1 25 36 9913106 BT 25 Saddle adjust set 1 30 33 9913103 SI 26 Square bushing 2 25 39 9954 27 Saddle movable set 1 25 36 9913107 BT 28 Washer Ø20xØ10 2x1 5T 1 29 39 10207 29 Adjust knob for saddle M10 1 27 36 9814 14 BT 30 Saddle post 1 ...

Page 13: ... spring 18x2x81L 1 23 61 36 9613234 BT 63 Bolt M8x25L 1 61 39 10455 64 Flat washer Ø20xØ8 2x1 2T 2 63 39 10018 CR 65 Nylon nut M8 2 63 39 9918 CR 66 Bearing 6300ZZ 2 63 39 9946 67L Chain cover left 1 23 67R 36 9913131 BT 67R Chain cover right 1 23 67L 36 9913132 BT 68 Screw M5x20 4 67 39 10190 69 Thilit Screw M4x20 4 67 39 10187 70 Rubber cover on chain cover 2 67 36 9613235 BT 71L Crank left 1 54...

Page 14: ...istance adjusting unit 20 and installation of the handlebar support 11 on the main frame 23 with the roundheaded Allen screws M8x15 18 spring washers 76 and washers 8 20 17 1 Place the lower end of the handlebar support 11 against the main frame 23 Plug the ends of the two computer cable harnesses 2 and 22 projecting from 23 and 11 together 2 Join the two ends of the cables 20 and 21 as indicated ...

Page 15: ...he saddle adjusted Then secure the new setting by tightening the rapid action catch Step 5 Installation of the handlebar 14 and computer 1 on the handlebar support 11 1 Guide the preassembled handlebar unit 14 through the upper part of the handlebar post 11 and close the bracket of handlebar holder 10 2 Attach the front handlebar cover 7 at the handlebar holder 10 of handlebar support 11 and screw...

Page 16: ...t pedal 74R into the threaded hole on the right hand side of the pedal arm 71R and tighten firmly Note Right and left are specified as viewed seated on the machine during training It must also be observed that the threaded part of the right pedal must be screwed clockwise into the threaded hole of the pedal crank 3 Screw the left pedal 74L into the threaded hole on the left hand side of the pedal ...

Page 17: ...ed the remaining distance is displayed When the specified value is attained this is indicated by an acoustic signal The values last attained by this function are stored Limit of the display 999 km 4 CALORY display The current status of the consumed calories is displayed It is possible to specify a particular value using the E key If a particular consumption has been specified the remaining number ...

Page 18: ...mbination of health conscious nutrition which must be determined on the basis of your training goal and physical training three times a week A normal adult must train twice a week to maintain his current level of condition At least three training sessions a week are required to improve one s condition and reduce one s weight Of course the ideal frequency of training is five sessions a week 3 Plann...

Page 19: ...ales 9 Pour le réglage des pièces faire attention à régler la bonne position ou la position de réglage maximale marquée et à bloquer correctement la nouvelle position réglée 10 Si rien d autre n est indiqué dans le mode d emploi l appareil ne doit être utilisé que par une personne pour l entraînement 11 Il faut porter des vêtements et des chaussures adaptés à un entraînement fitness avec l apparei...

Page 20: ... brut à tête bombée et collet carré 2 33 39 9953 36 Tube de pied arrière 1 23 33 9913106 SI 37 Coiffe 2 36 36 9913110 BT 38 Ecrou borgne M8 4 35 75 39 9900 VC 39 Ecrou d axe M10x1 0 2 45 39 9804 40 Ecrou M10x1 0x5L 2 45 39 9820 41 Pièce d ecartement Ø14x1 5Tx11L 2 45 36 9613227 BT 42 Pièce d ecartement 15x1 5x6L 1 45 36 9913111 BT 43 Roulement à billes 6000zz 4 44 39 9998 Après avoir ouvert l emba...

Page 21: ...serrage 18x2x81L 1 23 61 36 9613234 BT 63 Vis M8x25L 1 61 39 10455 64 Rondelle Ø20xØ8 2x1 2T 2 63 39 10018 CR 65 Ecrou autobloquant M8 2 63 39 9918 CR 66 Roulement à billes 6300ZZ 2 63 39 9946 67L Revêtement gauche 1 23 67R 36 9913131 BT 67R Revêtement droit 1 23 67L 36 9913132 BT 68 Vis M5x20 4 67 39 10190 69 Vis M4x20 4 67 39 10187 70 Revêtement Rondelle 2 67 36 9613235 BT 71L Bras de pédale gau...

Page 22: ...du faisceau de câble d ordinateur palpeur y compris 22 avec le faisceau de câble d ordinateur 2 raccordement du câble de transmission du réglage de la résistance 20 avec le câble de transmission 21 et montage du tube support de guidon 11 sur le cadre de base 23 à l aide des vis à tête ronde à six pans creux 18 des rondelles 17 et des rondelles élastiques bombées pour M8 76 1 Diriger l extrémité in...

Page 23: ...glage de la position souhaitée la position d ajustement A la plus haute qui est marquée en couleur Etape 5 Montage du guidon 14 et de l ordinateur 1 sur le support de guidon 11 1 Placez le guidon 14 dans le guide de fixation 10 ouvert du le tube de support 11 et serrez y le guidon 14 2 Fixez la garniture de fixation avant du guidon 7 dans son guide de fixation Vissez le guidon 14 au tube 11 en vou...

Page 24: ... avec un L 2 Visser la pédale droite 74R dans le trou taraudé situé sur la partie latérale droite de la manivelle de pédalier 71R et serrer à bloc Attention La direction de visée est à droite et à gauche lorsque l on se trouve sur l appareil et que l on s entraîne En outre le filet de la pédale droite doit être vissé dans le sens des aiguilles d une montre dans le trou taraudé de la manivelle de p...

Page 25: ... à consommer est affichée Si la valeur fixée est atteinte un signal acoustique l indique Cette fonction permet de sauvegarder les valeurs obtenues jusqu à présent Affichage limité au maximum à 999 calories 4 Affichage DIST affichage des km Permet d afficher les kilomètres parcourus jusqu à présent La touche E permet de fixer préalablement une valeur déterminée Si un parcours déterminé est fixé pré...

Page 26: ... contrôle du pouls au moyen d un dispositif approprié vendu dans un magasin spécialisé 2 Fréquence La majorité des experts recommandent de combiner une alimentation comme pour la santé qui sera choisie en fonction de l objectif recherché par l entraînement et les exercices physiques trois ou quatre fois par semaine Un adulte normal doit s entraîner deux fois par semaine pour conserver la forme act...

Page 27: ...etraind worden 8 Met het toestel slechts trainen wanneer het foutloos functioneert Voor eventuele herstellingen uitsluitend van originele reserveonderdelen gebruik maken 9 Bij de instelling van verstelbare onderdelen op respectievelijk de correcte positie of de gemarkeerde maximale instelpositie alsook op een reglementair voorgeschreven positie letten 10 Voor zover in de gebruiksaanwijzing niet an...

Page 28: ...3 36 9613220 BT 33 Voetbuis voor 1 23 33 9913105 SI 34 Eindkappen met transportrol 2 33 36 9913109 BT 35 Sluitschroef 2 33 39 9953 36 Voetbuis achteren 1 23 33 9913106 SI 37 Ronde kappen met hoogtecompensatie 2 36 36 9913110 BT 38 Dopmoer M8 4 35 75 39 9900 VC 39 Asmoer M10x1 0 2 45 39 9804 40 Moer M10x1 0x5L 2 45 39 9820 41 Afstandsstuk Ø14x1 5Tx11L 2 45 36 9613227 BT 42 Afstandsstuk 15x1 5x6L 1 ...

Page 29: ...61 36 9613234 BT 63 Schroef M8x25L 1 61 39 10455 64 Onderlegplatje Ø20xØ8 2x1 2T 2 63 39 10018 CR 65 Zelfborgende moer M8 2 63 39 9918 CR 66 Kogellager 6300ZZ 2 63 39 9946 67L Bekleiding links 1 23 67R 36 9913131 BT 67R Bekleiding rechts 1 23 67L 36 9913132 BT 68 Schroef M5x20 4 67 39 10190 69 Schroef M4x20 4 67 39 10187 70 Rubberen ring 2 67 36 9613235 BT 71L Pedaalkruk Links 1 54 33 9613209 SI 7...

Page 30: ...Bowdenkabel van de weerstandsinstelling 20 met de Bowdenkabel 21 en montage van de stuurbuis 11 op het basisframe 23 met behulp van de inbusbouten 18 de tussenringen 17 en de veerringen voor M8 76 1 Het onderste uiteinde van de stuurbuis 11 naar het basisframe 23 leiden De uiteinden van de beide computerkabels 2 en 22 die uit 23 en 11 steken verbinden 2 De beide uiteinden van Bowdenkabels 20 en 21...

Page 31: ...ie met een kleur is gemarkeerd Stap 5 Montage van de stuur 14 en de computer 1 aan het stuurbuis 11 1 Voer het stuur 14 door de geopende stuurhouder 10 op de stuurframe 11 en sluit u deze over het stuur 14 2 Steekt u de voorste stuurbekleding 7 over de stuurophanging en schroeft u het stuur 14 in de gewenste positie op het stuurbuis 11 middels de afstandstuk 8 en de sterformige schroef 9 vast 3 Ne...

Page 32: ...s aangeduid 2 De rechter trapper 74R in het schroefdraadgat op de rechterzijde van de pedaalkruk 71R draaien en stevig vastdraaien Let op Rechts en links is vanuit de kijkrichting gezien wanneer men op het apparaat staat en traint Bovendien moet erop worden gelet dat het draadeind van de rechter trapper in wijzerrichting in het schroefdraadgat van de pedaalkruk is gedraaid 3 De linker trapper 74L ...

Page 33: ... calorieën weergegeven Wanneer de ingestelde waarde wordt bereikt wordt dat door een akoestisch signaal weergegeven De laatst bereikte waarde bij deze functie wordt automatisch opgeslagen De maximale waarde bedraagt 999 calorieën 4 DIST weergave De actuele stand van het aantal afgelegde kilometers wordt weergegeven Een bepaalde waarde kan worden ingesteld met behulp van de E toets Wanneer een bepa...

Page 34: ... moet worden afgestemd en drie tot vijf maal per week een lichamelijke training Een normale volwassene moet tweemaal per week trainen om zijn huidige conditie te behouden Om zijn conditie te verbeteren en zijn lichaamsgewicht te veranderen moet hij minimaal driemaal per week trainen Natuurlijk is de ideale trainingsfrequentie vijf maal per week 3 Planning van de training Iedere trainingssessie moe...

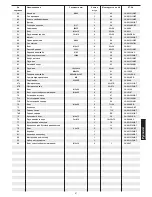
Page 35: ... использовать только оригинальные запасные части 9 Настраивая регулируемые детали следить за правильным положением или соотв учитывать помеченную максимальную позицию настройки и обеспечивать надлежащую фиксацию заново настроенного положения 10 Если в руководстве не указано иного то тренажером может пользоваться только один человек 11 Необходимо носить тренировочную одежду и обувь которые подходят...

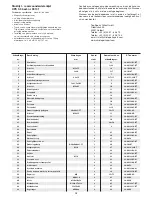
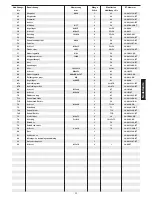
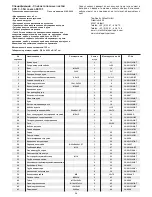
Page 36: ...6 9111 38 BT 7 Задний кожух руля 1 5 36 9913105 BT 8 Промежуточное тело 12x1 5x30L 1 9 36 9613209 BT 9 Барашковый винт M8x65 1 10 36 9613210 BT 10 Крепление руля 1 11 33 9613208 SI 11 Опорая труба руля 1 23 33 9913102 SI 12 Концевые заглушки 2 14 39 9847 13 Оболочка руля 2 14 36 9613206 BT 14 Руль 1 10 33 9613204 SI 15 Датчик измерения пульса 1 14 36 9613204 BT 16 Кабель пульса 1 1 15 36 9613205 B...

Page 37: ...1 61 39 10455 64 Подкладная шайба Ø20xØ8 2x1 2T 2 63 39 10018 CR 65 Самоконтрящаяся гайка M8 2 63 39 9918 CR 66 Подшипник 6300ZZ 2 63 39 9946 67L Обшивка слева 1 23 67R 36 9913131 BT 67R Обшивка справа 1 23 67L 36 9913132 BT 68 Болт M5x20 4 67 39 10190 69 Болт с крестообразным шлицем M4x20 4 67 39 10187 70 Резиновая вставка 2 67 36 9613235 BT 71L Рычаг педали слева 1 54 33 9613209 SI 71R Рычаг пед...

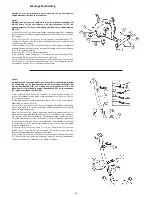
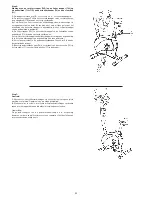
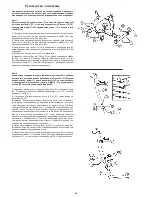
Page 38: ...2 и регулировки сопротивления 20 с тягой 21 Монтаж опорной трубы руля 11 на основную раму 23 с помощью болта с полукруглой шестигранной головкой M8x15 18 пружинящего кольца 76 и гнутой подкладной шайбы 17 1 Подведите нижнюю часть опорной трубы руля 11 к основной раме 23 Соедининте оба конца кабелей компьютера 2 и 22 которые выходят из 23 и 11 2 Соедините оба конца тросовой тяги 20 и 21 как показан...

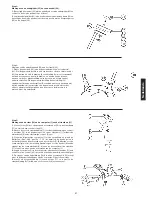
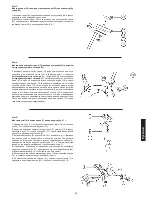
Page 39: ...р 32 посредством небольшого поворачивания затем вытянуть его для освобождения фиксации высоты и переставить высоту седла в желаемое положение После желаемой настройки быстродействующий затвор 32 снова закрепить посредством закручивания Шаг 5 Монтаж руля 14 и компьютера 1 на опорную трубу 11 1 Подведите руль 14 к открытому креплению руля 10 на опорной трубе 11 и закройте его над рулем 14 2 Наденьте...

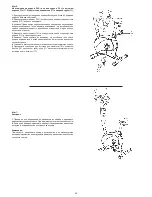
Page 40: ...педаль обозначена буквой R 2 Вверните правую педаль 74R в отверстие на правой стороне рычага педали 71R и крепко прикрутите Внимание Право и лево определяются в положении сидя на тренажере во время тренировки Также примите во внимание что резьбовое тело правой педали вкручивается в резьбовое отверстие в шатуне педали по часовой стрелке 3 Вверните левую педаль 74L в отверстие на левой стороне рычаг...

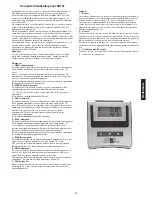
Page 41: ...определенного значения возможно посредством клавиши E Если задано определенное расстояние то производится индикация еще оставшегося для прохождения расстояние Достижение заданного значения сигнализируется посредством акустического сигнала Производится сохранение последних достигнутых параметров для данной функции Верхняя граница показаний 999 9 км Функция KALORIEN КАЛОРИИ Производится индикация фа...

Page 42: ...ия 3 раза в неделю Нормальный взрослый человек может тренироваться дважды в неделю для поддержания его нормальной физической формы Трехразовые тренировки необходимы для улучшения Вашей физической формы и уменьшения веса Идеальная частота тренировок 5 раз в неделю 3 Планирование тренировок Каждая тренировка должна состоять из трех фаз разогрев разминка непосредственно тренировка и остывание после т...

Page 43: ...43 ...

Page 44: ...ellungen oder Reparaturen wenden Sie sich bitte an unsere Service Abteilung Service Top Sports Gilles GmbH Tel 49 0 2051 6067 0 Friedrichstrasse 55 info christopeit sport com Fax 49 0 2051 6067 44 D 42551 Velbert http www christopeit sport com by Top Sports Gilles GmbH D 42551 Velbert Germany ...

Reviews: