background image


Studio Force D Phosphor User Manual 

12 

V1.4 December 2014 


www.chroma-q.com 

appears only when Level

Level

Level

Level is the assigned mode. 

3.


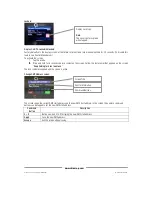
Create your Looks through the external DMX console using the assigned Level 

Level 

Level 

Level 

channels. 

4.


On the Change Mode screen, tap Look

Look

Look

Look    Store

Store

Store

Store. 

5.


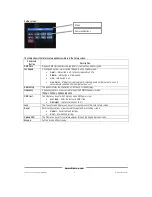
On the Look Store screen, tap the up or down arrows to select which Look number to 

store the created Look. 

6.


Then tap CaptureDMX

CaptureDMX

CaptureDMX

CaptureDMX to assign the Look number. 

7.


Repeat steps 3 to 6 to create and capture other Looks. 

To save all the captured Looks in a series, 

8.


Press and hold SaveLooks, 

SaveLooks, 

SaveLooks, 

SaveLooks, then follow the text prompt which appears on the screen - 

>Hold SaveLooks

>Hold SaveLooks

>Hold SaveLooks

>Hold SaveLooks, then >Looks Saved.

>Looks Saved.

>Looks Saved.

>Looks Saved. 

The screen goes back to the Main Menu after 30 seconds or you may tap the Escape 

Escape 

Escape 

Escape button to 

go to the Main Menu. 


Slave

Slave

Slave

Slave    


In this mode, the fixture is set as the slave unit when connected to other units. The settings of 
the master unit will be automatically applied to all the slave units. 
To set the fixture as the slave unit, 

1.


On the Main Menu, tap Change Mode

Change Mode

Change Mode

Change Mode. 

2.


On the Change Mode screen, tap Slave

Slave

Slave

Slave, and then tap Apply

Apply

Apply

Apply. 

The screen goes back to the Main Menu showing Mode: Slave. 


Manual

Manual

Manual

Manual/Mstr

/Mstr

/Mstr

/Mstr    


In  this  mode,  the  fixture  is  set  as  the  Master  standalone  unit.  Level 

Level 

Level 

Level  (intensity)  is  set  in  the 

Manual Mode Settings screen. (See Manual Mode Setting below.) 
To access Manual

Manual

Manual

Manual/Mstr

/Mstr

/Mstr

/Mstr    mode, 

1.


From the Main Menu, tap Change Mode

Change Mode

Change Mode

Change Mode. 

2.


From the Change Mode screen, tap Manual

Manual

Manual

Manual/Mstr

/Mstr

/Mstr

/Mstr, and then tap Apply

Apply

Apply

Apply. 

The screen goes back to the Main Menu showing Mode: Manual/Mstr. 
The fixture output goes to the previously set manual settings. 


Setup Menu

Setup Menu

Setup Menu

Setup Menu 


In this menu, internal settings of the Studio Force D Phosphor can be re-configured. 

DMX Data

DMX Data

DMX Data

DMX Data    
Fan Speed

Fan Speed

Fan Speed

Fan Speed    
RotateDisp

RotateDisp

RotateDisp

RotateDisp    
Frequency

Frequency

Frequency

Frequency    
DMX Lost

DMX Lost

DMX Lost

DMX Lost    
Lock

Lock

Lock

Lock    
Reset

Reset

Reset

Reset    
Upload ENG

Upload ENG

Upload ENG

Upload ENG    


DMX Data

DMX Data

DMX Data

DMX Data    


The screen shows the DMX start address, and the equivalent value for each of the DMX channels 
assigned to the fixture. 
To show DMX Data, 

1.


On the Main Menu

Main Menu

Main Menu

Main Menu, tap Setup Menu

Setup Menu

Setup Menu

Setup Menu. 

2.


On the Setup screen, tap DMX Data

DMX Data

DMX Data

DMX Data. 

3.


Tap Escape

Escape

Escape

Escape to go to the Setup screen. 


Fan Speed

Fan Speed

Fan Speed

Fan Speed    


The internal fan of the fixture can be set to four speed options to regulate noise levels and the 
cooling process.  

Summary of Contents for Studio Force D Phosphor

Page 1: ...Chroma Q Studio Force D Phosphor User Manual Version 1 4 December 2014 Software Version 1 07 PN 634 0502...

Page 2: ...used by the above e by modification repair or service by anyone other than Chroma Q who has not applied for and been approved by Chroma Q to do such modification repair or service unless the Customer...

Page 3: ...io Force Phosphor range have been designed specifically for the lighting industry Regular maintenance should be performed to ensure that the products perform well in the entertainment environment If y...

Page 4: ...5 5 5 2 1 Unpacking the Units 5 2 2 Cabling 5 2 3 Mounting 5 2 4 Optical Accessories 5 2 5 Control 6 2 6 DMX Protocol Studio Force D Phosphor 15 2 7 Thermal Performance 15 3 Troubleshooting 16 16 16 1...

Page 5: ...units and a range of optional accessories The Studio Force D Phosphor Studio Force D Phosphor Studio Force D Phosphor Studio Force D Phosphor features two light engines with 24 Blue LEDs each for a t...

Page 6: ...Data Plus Power Cable International Colour Code North American Colour Code Connections Green and Yellow Green Earth E Ground Green Blue White Neutral N Neutral Silver Brown Black Live L Hot Gold Impor...

Page 7: ...present DMX appears when the fixture is set at Manual and also the source of the DMX data signal DMX line is busy When the warning screen appears follow the display When the warning screen appears fo...

Page 8: ...text prompt that appears on the screen Keep holding for 5sec to unlock The lock symbol disappears and the screen is active Change DMX Address screen The screen shows the current DMX start address and...

Page 9: ...ed internal effects and looks are accessed and stored through the Look Store screen A total of 32 looks can be stored in the fixture s internal memory Manual Manual Manual Manual Mstr Mstr Mstr Mstr T...

Page 10: ...ically switched off when light output is off RotateDisp The button rotates the orientation of the Touch Screen Display Frequency 4 frequency options are accessed through the PWM Frequency screen 1200H...

Page 11: ...cription Description Description Up Arrow Increase intensity Level corresponding Value shown above Down Arrow Decrease intensity Level corresponding Value shown above M1 M1 M1 M1 Playback the look rec...

Page 12: ...n Menu tap Change Mode Change Mode Change Mode Change Mode 2 On the Change Mode screen tap Level Level Level Level 3 Tap Apply Apply Apply Apply to save or Escape Escape Escape Escape to cancel The di...

Page 13: ...e Main Menu showing Mode Slave Manual Manual Manual Manual Mstr Mstr Mstr Mstr In this mode the fixture is set as the Master standalone unit Level Level Level Level intensity is set in the Manual Mode...

Page 14: ...sed with the video camera to avoid a flickering effect Frequency options 1200 Hz 1200 Hz 1200 Hz 1200 Hz 2400 Hz 2400 Hz 2400 Hz 2400 Hz 4800 Hz 4800 Hz 4800 Hz 4800 Hz 9600 Hz 9600 Hz 9600 Hz 9600 Hz...

Page 15: ...Reset Reset Reset 3 On the Reset Setting screen tap User User User User 4 Press and hold Apply Apply Apply Apply for 3 seconds to restore the saved user settings The screen reboots to the opening scr...

Page 16: ...1 Saved M1 Saved M1 Saved M1 Saved or Hold Hold Hold Hold Rec2 Rec2 Rec2 Rec2 M2 Saved M2 Saved M2 Saved M2 Saved To play back the recorded setting 1 On the Main Menu tap Manual Manual Manual Manual 2...

Page 17: ...offices listed in this manual Symptom Possible Cause Solution Fixture does not respond to DMX control Set to wrong or different DMX address Bad cable connecting DMX control and fixture Bad in through...

Page 18: ...orced 1 fan Operating Temperature 0 C to 40 C Construction Anodised aluminium extrusion Colour Black Built In Hardware Quick release lever for tilt adjustment IP Rating IP20 Approvals CISPR 22 2006 EN...

Page 19: ...r Box For Force 12 CHCFLBA12 Lightbank Adaptor Speedring For Force 12 CHCFLB12 Lightbank For Force 12 CHCFLBK K Lightbank Kit For Force 12 consists of Lightbank Adaptor Speedring Lightbank 5 Maintenan...

Reviews: