background image

EN

Operation

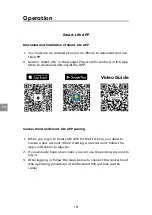
Smart Life APP 

Download and Intallation of Smart Life APP 

Video Guide

1. You must use an Android phone or an iPhone to download and use

this APP.

2. Search “Smart Life” in the Googel Play store for Android or IOS App

Store to download and install the APP.

Cooker Hood and Smart Life APP pairing 

1. When you log in to Smart Life APP for the first time, you need to

create a new account. When creating a new account, follow the

app’s instruction to register.

2. If you already have an account, you can use the existing account to

log in.

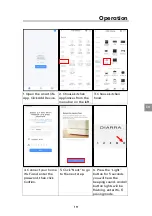
3. After logging in, follow the steps below to connect the cooker hood

(the operating procedures of Android and IOS systems are the

same)

18

Summary of Contents for CBCS4820

Page 1: ...Model Number CBCS4820 www ciarraappliances com ...

Page 2: ......

Page 3: ...k you so much for your purchase please read this instruction manual carefully before installation use If you have any question please contact us at E mail info ciarraappliances com Scan this QR code to get installation video ...

Page 4: ...tallation 7 Installation 8 16 Install the Hood 8 15 Carbon Filter Installation 16 Operation 17 21 Cleaning and Maintenance 22 24 Grease Filter 22 Carbon Filter 22 Stainless Steel Cleaning 22 Painted Finish Cleaning 22 LED Replacement 23 24 Troubleshooting 25 Environmental Protection 26 2 ...

Page 5: ...codes and standards including fire rated construction Sufficient air is needed for proper combustion and exhausting of gases through the flue chimney of fuel burning equipment to prevent back drafting When cutting or drilling into a wall or ceiling do not damage electrical wiring and other hidden utilities Ducted fans must always be vented to the outdoors Ensure the requirements of the local autho...

Page 6: ... For indoor use only For general ventilating use only Do not use to exhaust hazardous or explosive materials and vapors To avoid motor bearing damage and noisy and or unbalanced fan blade keep drywall spray construction dust etc off cooker hood Your hood motor has a thermal overload which will automatically shut off the motor if it becomes overheated The motor will restart when it cools down If th...

Page 7: ...wer of Motor 1 x 85W Power of lamps 1x8W Appliance Dimension Note The manufacturer reserves the right to change any technological improvement or modification without prior notice CBCS4820 405 405 2000mm MAX W x D x H 405mm 405mm 44 5m m 2000mm MAX ...

Page 8: ... and does not accept responsibility for appliance warranty in the event of damage caused by incorrect installation COMPONENTS YOU WILL BE NEEDING THESE TOOLS FOR INSTALLATION 1 Protective Gloves 2 Spirit Level Ruler 3 Measuring Tape 4 Double Sided Tape or Tape 5 Cross Head Screwdriver Set 6 Electric drill and 8mm drill 6 Part 1 6 40mm Screws X 6 Part 2 Expansion Bolt X 6 Part 5 Steel Cable X 5 Par...

Page 9: ...lation a Ventilation Mode Recirculation Mode Recirculating with carbon filter required the smells and odors can be filtered and vented through the top vented hole and the exhaust pipe is not required b Before installation don t connect the power 7 ...

Page 10: ...ood 1 Remove all protective poly film from the hood and or parts 2 Recommend installation height 65 75cm above the cooktop for best extraction Required height over gas hob 750mm Required height over electric hob 650mm 750mm 650mm 8 ...

Page 11: ... accommodate the Hanging plate tighten the bracket onto the ceiling with the Expansion bolt holes provided Attention If the ceiling is made of wood there is no need to drill holes and the hanging plate are directly fixed on the ceiling with 4pcs 6 40mm Screws Hanging plate COMPONENTS Part 2 Expansion Bolt X 9 Part 6 Hanging Plate X 1 9 ...

Page 12: ... and the power cord through the decorative plate 5 Put the four Steel cables through the Cable holder of cooker hood N L N L Steel cables Cable holder Decorative Plate COMPONENTS Part 3 Steel Cables X 4 COMPONENTS Part 7 Decorative Plate X 1 10 ...

Page 13: ... two persons Pass the four steel cables through the corresponding cable holder on the hanging plate Adjust the height of the hood according to the actual scene and the cable will be automatically locked by the cable holder N L N L L N L N 11 ...

Page 14: ...TE The cables can only be adjusted when the Cable holder tips are pressed 8 Adjust the hight of those 4 Steel cables and use a Spirit Level Ruler to adjust the hood to horizontal position Spirit Level Ruler 650 750mm 12 ...

Page 15: ...cable to the power connector on the ceiling If there is no power connector on the ceiling connect the power cable to the power connector not necessarily need to put the power cord through the Decorative plate N L N L L N L N Insulating tape Attention Qualified electricians are required to install the power cord Please pay attention to personal safety to prevent electric shock 13 ...

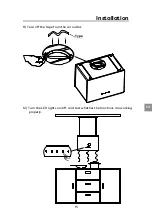
Page 16: ...EN Installation 10 Push the Decorative plate up so it can be attached to the magnets from the Hanging plate 14 ...

Page 17: ...EN Installation 11 Tear off the tape from the air outlet 12 Turn the LED lights on off and test whether the functions are working properly Type 15 ...

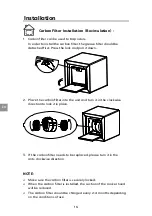
Page 18: ...should be changed every 2 4 months depending on the conditions of use 1 Carbon filter can be used to trap odors In order to install the carbon filter the grease filter should be detached first Press the lock and pull it down 2 Place the carbon filter into the unit and turn it in the clockwise direction to lock it in place 3 If the carbon filter needs to be replaced please turn it in the anti clock...

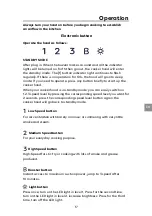
Page 19: ...in standby mode you can easily switch on 1 2 3 speed level by pressing the corresponding speed level you want for 2 seconds press the corresponding speed level button again the cooker hood will go back to standby mode Low Speed button For air ventilation with barely no noise or simmering with very little smoke and steam Medium Speed button For your everyday cooking purpose High Speed button High S...

Page 20: ...ownload and install the APP Cooker Hood and Smart Life APP pairing 1 When you log in to Smart Life APP for the first time you need to create a new account When creating a new account follow the app s instruction to register 2 If you already have an account you can use the existing account to log in 3 After logging in follow the steps below to connect the cooker hood the operating procedures of And...

Page 21: ... the menu bar on the left 3 Choose kitchen hood 4 Connect your home Wi Fi and enter the password then click Confirm 6 Press the Light button for 5 seconds you will hear the beeping sound and all button lights will be flashing enter Wi Fi pairing mode 19 5 Click Next to go to the next step ...

Page 22: ...ce it means you have successfully connected your device 10 Click Me and select Message Center 11 You can create a home or join a home in this area Click my family management 12 Select Add members and share to members after members are successfully join the same family they can remotely control Cooker Hood through WiFi 20 ...

Page 23: ...g When cooker hood is working you can set the delay timer through delay function Push this button the cooker hood will stop working in 5 minutes Operation About operation interface ON Off Button Light Button When lights are OFF press once to turn ON the lights Press this button again to turn OFF the lights 21 ...

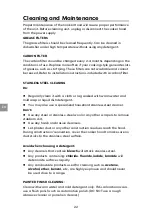
Page 24: ...ild soap or liquid dish detergent You may also use a specialized household stainless steel cleaner Don t Use any steel or stainless steel wool or any other scrapers to remove stubborn dirt Use any harsh or abrasive cleansers Let plaster dust or any other construction residues reach the hood During construction renovation cover the cooker hood to make sure no dust sticks to the stainless steel surf...

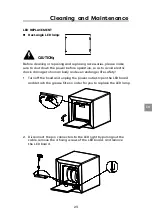
Page 25: ...ore operation so as to avoid electric shock damage to human body and even endanger life safety 1 Turn off the hood and unplug the power outlet Open the LED board 2 Disconnect the pin connectors to the LED light by pulling out the cable remove the 4 fixing screws of the LED board and remove the LED board and detach the grease filter in order for you to replace the LED lamp ...

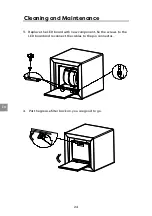
Page 26: ...EN Cleaning and Maintenance 24 3 Replace the LED board with new component fix the screws to the LED board and reconnect the cables to the pin connectos 4 Put the grease filter back on you are good to go ...

Page 27: ...pe holding down the damper flaps at the vent hole are removed before use Remove the tape holding down the damper Grease filters clogged with grease build up Clean the grease filters or replace the grease filters Carbon filters clogged with grease build up Replace new carbon filters Motor is running but no extraction Please contact CIARRA Customer Care Service My range hood is noisy Check inside th...

Page 28: ...he environment and human health which could otherwise be caused by inappropriate waste handling of this product The symbol on the product indicates that this product may not be treated as household waste Instead it shall be handed over to the applicable collection point for the recycling of electrical and electronic equipment Disposal must be carried out in accordance with local environmental regu...

Page 29: ...27 ...

Page 30: ...en Einkauf bitte lesen Sie diese Bedienungsanleitung vor der Installation Verwendung sorgfältig durch Bei Fragen kontaktieren Sie uns bitte unter E mail info ciarraappliances com Für die Video zur Installation der scannen Sie bitte diesen QR Code ...

Page 31: ...Installation 34 Installation 35 43 Installation der Dunstabzugshaube 35 42 Installation von Aktivkohlefiltern 43 Bedienung 44 48 Reinigung und Instandhaltung 49 51 Fettfilter 49 Aktivkohlefilter 49 Reinigung von Edelstahl 49 Reinigung von Lackierten Oberflächen 49 LED Ersatz 50 51 Störungssuche 52 Umweltschutz 53 ...

Page 32: ...rschriften und Normen durchgeführt werden Für die ordnungsgemäße Verbrennung und Abführung von Gasen durch den Rauchabzug Kamin von Brennstoffverbrennungsanlagen wird ausreichend Luft benötigt um ein Zurückziehen zu verhindern Beschädigen Sie beim Schneiden oder Bohren in Wände oder Decken keine elektrischen Leitungen und andere versteckte Einrichtungen Kanalventilatoren müssen immer nach außen en...

Page 33: ... der Klasse ABC und wissen wie man ihn bedient b Das Feuer ist klein und befindet sich in dem Bereich in dem es begonnen hat c Die Feuerwehr ist bereits angerufen worden d Sie können das Feuer mit dem Rücken zu einem Ausgang bekämpfen VORSICHT Nur für Gebrauch im Innenbereich Nur zur allgemeinen Belüftung Das Gerät darf nicht zum Abführen gefährlicher oder explosiver Materialien und Dämpfe verwend...

Page 34: ...ng 1 x85W Leistung von Lampen 1 x8W Gerätedimension 405 405 2000mm MAX W x T x H Hinweis Der Hersteller behält sich das Recht vor technologische Verbesserungen oder Modifikationen ohne vorherige Ankündigung vorzunehmen 32 CBCS4820 405mm 405mm 44 5m m 2000mm MAX ...

Page 35: ...tung für unsachgemäße Installation ab und übernimmt keine Garantie für das Gerät im Falle von Schäden die durch unsachgemäße Installation verursacht wurden SIE BRAUCHEN DIESE WERKZEUGE FÜR DIE INSTALLATION 1 Schutzhandschuhe 2 Wasserwaage Lineal 3 Maßband 4 Doppelseitiges Klebeband oder Klebeband 5 Kreuzschlitzschraubendre her Satz 6 Elektrischer Bohrer und 8 mm Bohre KOMPONENTEN 33 Teil 1 6 40 mm...

Page 36: ...a Umluftbetrieb Umluftmodus Umluft mit Aktivkohlefilter erforderlich die Gerüche und Odeure können durch die obere Entlüftungsöffnung gefiltert und entlüftet werden und das Auspuffrohr wird nicht benötigt b Schließen Sie die Stromversorgung vor der Installation nicht an 34 ...

Page 37: ...Absaugung 1 Entfernen Sie alle Schutzfolien von der Haube und oder Teilen 2 Empfohlene Installationshöhe 65 75cm über dem Kochfeld für beste Absaugung Erforderliche Höhe über Gaskochfeld 750 mm Erforderliche Höhe über Elektrokochfeld 650 mm 750mm 650mm 35 ...

Page 38: ...eplatte aufzunehmen und schrauben Sie die Halterung mit den mitgelieferten Dehnschraubenlöchern an der Decke fest ACHTUNG Wenn die Decke aus Holz besteht müssen keine Löcher gebohrt werden und die Hängeplatte wird mit vier 6 40 mm Schrauben direkt an der Decke befestigt Hänge platte KOMPONENTEN Teil 2 Dehnschraube X 4 Teil 6 Hängeplatte X 1 36 ...

Page 39: ...Stahlkabel und das Netzkabel durch die Dekorplatte 5 Führen Sie die vier Stahlkabel durch den Kabelhalter der Dunstabzugshaube N L N L Drahtseil Kabel Halter Dekorplatte KOMPONENTEN Teil 3 Drahtseil X 4 KOMPONENTEN Teil 7 Dekorplatte X 1 37 ...

Page 40: ...ei Personen und führen Sie die vier Drahtseile durch die entsprechenden Kabelhalter an der Hängeplatte Passen Sie die Höhe der Dunstabzugshaube entsprechend der tatsächlichen Szene an und das Kabel wird automatisch durch den Kabelhalter verriegelt N L N L L N L N 38 ...

Page 41: ...nur eingestellt werden wenn die Spitze der Kabelhalter gedrückt werden 8 Regeln Sie die Höhe dieser 4 Drahtseile und verwenden Sie eine Wasserwaage um die Dunstabzugshaube in die horizontale Position zu bringen Wasserwaage Lineal 650 750mm 39 ...

Page 42: ...chluss an der Decke anschließen Wenn an der Decke kein Stromanschluss vorhanden ist schließen Sie das Netzkabel an den Stromanschluss an es ist nicht unbedingt erforderlich das Netzkabel durch die Dekorplatte zu führen N L N L L N L N Isolierband ACHTUNG Nur eine Elektrofachkraft darf die elektrische Installation ausführen Bitte achten Sie auf die persönliche Sicherheit um einen Stromschlag zu ver...

Page 43: ...DE Installation 10 Schieben Sie die Dekorplatte nach oben damit sie an den Magneten der Hängeplatte befestigt werden kann 41 ...

Page 44: ...DE Installation 11 Reißen Sie das Klebeband vom Luftauslass ab 12 Schalten Sie die LED Leuchten ein aus und prüfen Sie ob die Funktionen ordnungsgemäß funktionieren Klebeband 42 ...

Page 45: ...en Sie den Fettfilter nach unten 2 Stecken Sie bitte einen Aktivkohlefilter in das Gerät ein und drehen Sie ihn im Uhrzeigersinn bis er einrastet 3 Installieren Sie den Fettfilter Zum Austausch drehen Sie es bitte gegen den Uhrzeigersinn HINWEISE Stellen Sie sicher dass die Filter sicher verriegelt sind Wenn Aktivkohlefilter angebracht sind ist die Saugleistung geringer Die Aktivkohlefilter sollte...

Page 46: ...tufe 1 2 3 ganz einfach einschalten indem Sie die entsprechende gewünschte Taste von Lüfterstufe 2 Sekunden lang drücken Wenn Sie diese entsprechende Taste erneut drücken kehrt die Dunstabzugshaube in den Standby Modus zurück Taste für niedrige Geschwindigkeit Für eine fast geräuschlose Belüftung oder kochen mit sehr wenig Rauch und Dampf Taste für mittlere Geschwindigkeit Für Ihre täglichen kulin...

Page 47: ...installieren Sie die App Dunstabzugshaube mit Smart Life App verbinden 1 Wenn Sie sich zum ersten Mal in der Smart Life App anmelden müssen Sie ein neues Benutzerkonto erstellen Wenn Sie ein neues Benutzerkonto erstellen folgen Sie den Anweisungen in der App um sich zu registrieren 2 Wenn Sie bereits ein Benutzerkonto haben können Sie sich mit diesem vorhandenen Konto anmelden 3 Befolgen Sie nach ...

Page 48: ...3 Wählen Sie die Dunstabzugshau be 4 Verbinden Sie Ihr Zuhause Wi Fi und geben Sie die ein Passwort und klicken Sie dann auf Weiter 6 Drücken Sie Light Ein Aus für 5 Sekunden Dann hören Sie den Piepton und alle Tastenleuchten blinken Dunstabzugshaube wechselt in den Wi Fi Paarung Modus 46 5 Klicken Sie auf Weiter um zum nächsten Schritt zu gelangen ...

Page 49: ...folgreich verbunden haben 10 10 Klicken Sie auf Profil und wählen Sie Nachricht 11 In diesem Bereich können Sie ein Zuhause erstellen oder an einem Zuhause teilnehmen Klicken Sie auf Familienverwaltung 12 Wählen Sie Mitglied hinzufügen und teilen Sie es mit den Mitgliedern Nachdem die Mitglieder erfolgreich dem gleichen Zuhause beigetreten sind können sie die Dunstabzugshaube durch Wi Fi fernsteue...

Page 50: ...ngsfunktion einstellen Drücken Sie diesen Knopf und die Kochhaube hört innerhalb von 5 Minuten auf zu arbeiten Wenn Sie diese Taste drücken hört die Dunstabzugshaube nach 5 Minuten auf zu arbeiten Bedienung Über das Bedienfeld Ein Aus Schalter Licht Ein Aus Wenn die Beleuchtung ausgeschaltet ist drücken Sie diese Taste einmal um die Beleuchtung einzuschalten Drücken Sie diese Taste erneut um die B...

Page 51: ...nzol usw Sie sind hochexplosiv und sollten niemals in der Nähe einer Dunstabzugshaube verwendet werden REINIGUNG VON LACKIERTEN OBERFLÄCHEN Reinigen Sie lackierte Oberfläche nur mit warmem Wasser und einem milden Reinigungsmittel Wenn Verfärbungen auftreten verwenden Sie eine Politur wie Autopolitur Verwenden Sie bitte KEINEN groben Scheuermittel oder Porzellanreiniger Die ordnungsgemäße Wartung d...

Page 52: ...m Stromschläge Schäden am menschlichen Körper und sogar Lebensgefahr zu vermeiden 50 1 Schalten Sie die Haube aus und ziehen Sie den Stecker aus der 2 Trennen Sie die Steckverbindungen zur LED Leuchte durch Herausziehen des Kabels entfernen Sie die 4 Befestigungsschrauben der LED Platine und nehmen Sie die LED Platine heraus Steckdose Öffnen Sie die LED Platine und nehmen Sie den Fettfilter ab um ...

Page 53: ...altung 4 Setzen Sie den Fettfilter wieder ein es kann losgehen 51 3 Ersetzen Sie die LED Platine durch ein neues Bauteil befestigen Sie die Schrauben an der LED Platine und schließen Sie die Kabel wieder an die Stiftleisten an ...

Page 54: ... das lebeband das die lappen an der Lftungsffnung festhlt vor der erwendung entfernt wurde Entfernen Sie das lebeband das den Dmpfer festhlt Durch Fettablagerungen verstopfte Fettfilter Reinigen Sie die Fettfilter oder tauschen Sie die Fettfilter aus Durch Fettablagerungen verstopfte ohlefilter Neue ohlefilter auswechseln it te kontaktieren Sie den CIARRA Āundendienst Meine Dunstabzugsh aube ist l...

Page 55: ...tive Folgen für die Umwelt und die menschliche Gesundheit zu vermeiden die andernfalls durch einen unangemessenen Umgang mit diesem Produkt verursacht werden könnten Das Symbol auf dem Produkt weist darauf hin dass dieses Produkt nicht als Hausmüll behandelt werden darf Stattdessen ist es an die zuständige Sammelstelle für das Recycling von Elektro und Elektronik Geräten zu übergeben Die Entsorgun...

Page 56: ...54 ...

Page 57: ... vous prions de lire ce mode d emploi soigneusement avant de l installation et la mise en service de cet appareil Si vous avez des questions veuillez nous contacter par cette adresse E mail info ciarraappliances com Scannez ce QR Code pour accéder à Vidéo d installation ...

Page 58: ...iran 60 Préparations pour le mont 61 Montage 62 70 Installer la hotte 62 69 Installer le filtre à charbon 70 Fonctionnement 71 75 Nettoyage et entretien 76 78 Filtre à graisses 76 Filtre à charbon 76 Acier inoxydable 76 Finition peinte 76 Remplacement de LED 77 78 Dépannage 79 Protection de l environnement 80 ...

Page 59: ...plicables y compris la construction coupe feu Une quantité suffisante d air est nécessaire pour une bonne combustion et l évacuation des gaz par le conduit de fumée cheminée des appareils à combustible afin d éviter tout refoulement Lors du perçage dans le mur ou le plafond prenez garde à ne pas causer de dommages aux connexions électriques et ou aux canalisations Les conduits de ventilation doive...

Page 60: ...attre le feu en tournant le dos à une sortie AVERTISSEMENT Uniquement pour la ventilation générale Ne pas utilisez pour évacuer des matières et vapeurs dangereuses ou explosives Le moteur de votre hotte est équipé d une surcharge thermique qui arrête automatiquement le moteur en cas de surchauffe Le moteur redémarrera lorsqu il aura refroidi Si le moteur continue à s arrêter et à redémarrer contac...

Page 61: ...moteur 1 x 85W Puissance des lampes 1 x8W Dimensions de l appareil 405 405 2000mm MAX W x D x H Remarque le fabricant se réserve le droit de modifier toute amélioration ou modification technologique sans préavis 59 CBCS4820 405mm 405mm 44 5m m 2000mm MAX ...

Page 62: ...rrecte et n accepte aucune responsabilité de la garantie de l appareil en cas de dommages causés par un montage incorrect Composants Vous aurez besoin de ces outils pour le montage 1 Gants de protection 2 Règle horizontale 3 Mètre à ruban 4 Ruban adhésif double face ou ruban 5 Tournevis cruciforme 6 Perceuse électrique et perceuse 8mm 60 Partie 1 Vis 6 40 mm X 6 Partie 2 Cheville d expansion X 6 P...

Page 63: ...tion Mode de recyclage filtrer de l air avec filtre à charbon requis les odeurs peuvent être éliminés et expulsé par le trou de ventilation supérieure le tuyau d évacuation n est pas requis b Débrancher l appareil de l alimentation électrique avant de procéder à l installation 61 ...

Page 64: ...ne de la hotte et ou des pièces détachées 2 Hauteur d installation proposé 65 75 cm au dessus de la table de cuisson pour une meilleure aspiration Hauteur requise au dessus du table de cuisson à gaz 750 mm Hauteur requise au dessus du plaque de cuisson électrique 650 mm 750mm 650mm 62 ...

Page 65: ...er le plaque d accrochage Vissez le support au plafond par les chevilles d expansion Attention si le plafond est en bois il n est pas nécessaire de percer des trous Fixez directement la plaque d accrochage avec 4 vis 6 40 mm au plafond Plaque d accrochage COMPOSANTS Partie 2 Cheville d expansion X 4 Partie 6 Plaque d accrochage X 1 63 ...

Page 66: ... et le cordon d alimentation à travers la plaque décorative 5 Passez les quatre câbles d acier par le support de câble de la hotte N L N L Câble d acier Plaque décorative COMPOSANTS Partie 3 Câble d acier X 4 COMPOSANTS Partie 7 Plaque décorative X 1 64 ...

Page 67: ...rsonnes et passez les quatre câbles d acier par les portes câbles correspondants sur la plaque de suspension Ajustez la hauteur de la hotte selon la situation réelle et les câbles seront automatiquement fixés par le porte câble N L N L L N L N 65 ...

Page 68: ...es ne peuvent être ajustés que lorsque les pointes des portes câbles sont appuyés 8 Ajustez la hauteur de ces 4 câbles d acier Utilisez une règle à bulle pour mettre la hotte en position horizontale Règle horizontale 650 750mm 66 ...

Page 69: ...a prise au plafond Sinon connectez le cordon d alimentation directement à la prise il n est pas nécessaire de faire passer le cordon d alimentation par la plaque décorative N L N L L N L N Ruban isolant Attention Un électricien qualifié est indispensable pour faire le branchement électrique Veuillez faire attention à votre sécurité personnelle et éviter tout risque de décharge électrique 67 ...

Page 70: ...FR Montage 10 Relevez la plaque décorative pour qu elle puisse être attachée aux aimants de la plaque d accrochage 68 ...

Page 71: ...FR Montage 11 Déchirez le ruban adhésif de la sortie d air 12 Allumez et éteignez les lumières LED et vérifiez si les fonctions marchentbien Ruban adhésif 69 ...

Page 72: ... filtre à charbon dans l appareil et le tourner dans le sens horaire Répéter la même étape dans l autre côté 3 En cas de remplacement du filtre à charbon veuillez tourner dans le sens anti horaire pour détacher le filtre REMARQUES Assurez vous que le filtre à charbon est bien fixé Lorsque le filtre à charbon est installé la puissance de l aspiration de la hotte sera plus faible Le filtre à charbon...

Page 73: ...ent changer la vitesse entre 1 2 3 en appuyant pendant 2 secondes sur la touche correspondant Pressez à nouveau la touche correspondante la hotte revient en mode veille Touche de vitesse basse Pour la ventilation fonctionne presque sans bruit ou pour mijoter avec très peu de fumée et de vapeur Touche de vitesse moyenne Pour votre cuisine quotidienne Touche de vitesse haute Haute vitesse pour la fr...

Page 74: ...élécharger cette application Connexion de la hotte et l APP Smart Life 1 Si vous installez l APP Smart Life pour la première fois vous avez besoin de créer un nouveau compte Après avoir créé le compte suivez les instructions de l application pour vous inscrire 2 Si vous avez déjà un compte vous pouvez utiliser le compte existant pour vous connecter 3 Après la connexion suivez les étapes ci dessous...

Page 75: ...dans le menu à gauche 3 Choisissez le kitchen hood 4 Connectez votre Wi Fi Cliquez sur Next 6 Appuyez sur la touche de lumière pendant 5 secondes Vous entendrez un bip et toutes les diodes clignoteront Vous accédez au mode de connexion de Wi Fi 73 5 Cliquez sur Suivant pour passer à l étape suivante ...

Page 76: ... que l appareil est bien connecté 10 Touchez Me et choisissez Message Center 11 Vous pouvez créer un home ou rejoindre un home Touchez CIARRA Family 12 Choisissez Add Member et partagez avec votre famille Une fois que vos membres de la famille ont rejoint la même famille ils peuvent gérer à distance la hotte par Wifi 74 ...

Page 77: ...e est en marche vous pouvez définir un délai avec cette fonction Appuyez sur la touche la hotte s arrêtera dans 5 minutes Fonctionnement Interface d opération Touche ON Off Touche de lumière Lorsque les lumières sont éteintes appuyez sur cette touche une fois pour allumer les lumières Appuyez à nouveau sur cette touche pour éteindre les lumières 75 ...

Page 78: ...r spécialisé pour l acier inoxydable Non Il ne faut pas utiliser les tissus d acier ou d acier inoxydable ou tout autre grattoir pour éliminer les saletés tenaces Il ne faut pas utiliser des nettoyants agressifs ou abrasifs Il ne faut pas laissez la poussière de plâtre ou tout autre résidu de construction atteindre la hotte Couvrez la hotte pendant la construction rénovation afin d assurer qu aucu...

Page 79: ...d éviter les chocs électriques les dommages au corps humain et même le danger de la vie 77 1 Éteignez la hotte et débranchez la prise de courant Ouvrez le 2 Déconnectez les connecteurs à broche de l éclairage LED en tirant sur le câble retirez les 4 vis de fixation de la carte LED et retirez la carte LED tableau des LED et détachez le filtre à graisse afin de pouvoir remplacer la lampe LED ...

Page 80: ...FR Nettoyage et Entretien 4 Enfin remettez le filtre à graisses 78 3 Remplacez la carte LED par un nouveau composant fixez les vis à la carte LED et rebranchez les câbles aux broches de connexion ...

Page 81: ... clapet au niveau du trou d aération est retiré avant l utilisation Retirez le ruban adhésif qui maintient le clapet Filtres à graisse obstrués par l accumulation de graisse Nettoyez les filtres à graisse ou remplacez les Filtres à charbon bouchés par l accumulation de graisses Remplacer les nouveaux filtres à charbon Le moteur tourne mais pas d extraction Veuillez contacter le service clientèle d...

Page 82: ... environnement et à la santé qui pourraient autrement être causé par une mise au rebut inadéquate de ce produit Le symbole figurant sur le produit et sur la documentation qui l accompagne indique que cet appareil ne doit être traité comme déchet ménager mais doit être remis à un centre de collecte spécialisé dans le recyclage des équipements électriques et électroniques La mise en rebut de ce prod...

Page 83: ......

Page 84: ......

Reviews: