background image

©


CIAS Elettronica S.r.l. 

     Ed 1.1 

Installation Manual 

Page 

30 

of

 51 

Sioux Pro 2 


2.1.2  Fence WITH separation of panels  

Example: perimeter of  2270m with panels of 2,5m  (for panel we mean a single section of fence 
that cannot transmit movement to the adjacent one) 


Calculation of sensors


  Each panel needs one sensor 


  2270m / 2,5m = 908 sensors 

  Keep in mind that each Sioux-CU-Pro2 1400m can manage maximum 280 sensors 

  908 sensors / 280 = 3,24 Sioux-CU-Pro2 = 4 Sioux-CU-Pro2 


Calculation of sensors, cables, plastic boxes with kit conversion 

  The number of cables and plastic boxes is equal to the number of sensors 

  To obtain the kits divide by 7 

ALWAYS

 approximating in excess 

  908 / 7 = 129,71 = 130 kits of cables and plastic  


Lead cable calculation 

  The  total  length  of  a  line 

(LINE1  or  LINE2) 

added  to  the  lead  cable, 

cannot  exceed  800 

meters.


  Keep in mind that 

each cable patch is 3,5m 

  Subtract from 800m (available for each line) the number of cables obtained and multiplied by 

3,5m 


Regardless of the number obtained above, the total length of the lead cable  

     cannot exceed 300m for each single line 

  The lead cable (50m roll) can be distributed in any part of the line 


Calculation of RJ45 connectors 

  The lead cable already contains 2 RJ45 connectors 

  Each gate requires two RJ45 connectors 

  It is recommended to provide some extra connectors as a spare 


2.1.3  Installation according to the different type of fence  

Install the plastic box referring to the type of fence, checking that there is transmission of 
vibrations between the previous and subsequent panels. If the panels are not connected or the 
connection between them is not sufficient to guarantee the transmission of vibrations, a sensor 
must be installed per panel. 

The sensor must be installed at least 50 cm from the pole and a maximum  of 2.5 meters 
from the corner. 

Don’t install the sensor on a pole. 


In case of doubts contact CIAS (service@cias.it). 


Woven wire mesh, welded, coated in plastic or galvanized 

  These types of fences are subject to climbing, cutting and lifting. 

  Install sensor at a height from the ground of about 1m both for fences of 2 or 3m in height. 


Rigid metallic bars / thin grids 

  These types of fences are subject to climbing and cutting. 

  Install sensor at a height from the ground of about 1m both for fences of 2 or 3m in height. 


Rigid metallic bars / thick grids 

  These types of fences are subject to climbing, rarely cutting. 

  Install the sensor at the point of maximum transmission from the vertex. 

Summary of Contents for SIOUX PRO 2

Page 1: ...20MACIE0412 SIOUX PRO 2 Sistema di protezione recinzioni Manuale di installazione Fence Protection System Installation manual Edizione Edition 1 1...

Page 2: ...OUXPRO2 LINE 10 2 4 SIOUXPRO2 LFI ISOLATORI DI LINEA OPZIONALI 10 2 5 SIOUXPRO2 REDUND OPZIONALE 10 2 6 INSTALLAZIONE DI SIOUX CU PRO2 10 2 7 CONFIGURAZIONE DEL SISTEMA 10 3 COLLEGAMENTI 11 3 1 DESCRI...

Page 3: ...LINE 34 2 4 SIOUXPRO2 LFI LINE INSULATORS OPTIONAL 34 2 5 SIOUXPRO2 REDUND OPTIONAL 34 2 6 INSTALLATION OF THE SIOUX CU PRO2 34 2 7 SYSTEM CONFIGURATION 34 3 CONNECTIONS 35 3 1 CIRCUIT DESCRIPTIONS AN...

Page 4: ...azione o scavalcamento I sensori dislocati lungo la recinzione rilevano le perturbazioni provocate da un tentativo di intrusione e le convertono in segnali elettrici che sono raccolti da ciascuna sche...

Page 5: ...le Sioux CU Pro2 2540m 1400m 1140m Calcolo dei sensori dei cavi dei contenitori plastici con conversione in kit Il numero dei cavi e dei contenitori plastici uguale al numero dei sensori Perimetro dis...

Page 6: ...dei connettori RJ45 Il lead cable contiene gi 2 connettori RJ45 Ogni cancello o varco di accesso necessita di due connettori RJ45 Si consiglia di prevedere alcuni connettori in pi come ricambio 2 1 3...

Page 7: ...io Muro e o materiali similari Questi tipi di materiali sono soggetti allo sfondamento e perforazione Installare il sensore ogni 3 m considerando un raggio di copertura di 1 5 m Sioux Pro 2 per questo...

Page 8: ...2 ha un bollino ARANCIO La Master Pro2 gestisce 6 Slave Pro2 3 alla sua sinistra e 3 alla sua destra Vedere Figura 5 sotto per la corretta installazione di tutti i sensori Figura 4 4 Assemblare le par...

Page 9: ...e Pro2 DEVONO essere installati Figura 7 indicazione F 8 Alla fine di ogni ramo concludere come di seguito Figura 7 indicazione G 1 Master Pro2 terminazione linea o ridondanza 1 2 o 3 Slave Pro2 dopo...

Page 10: ...LFI per ogni linea riferirsi allo specifico manuale di installazione 2 5 SiouxPro2 Redund opzionale SiouxPro2 Redund un modulo da installare alla fine di ogni ramo per ottenere la ridondanza riferirsi...

Page 11: ...Pro2 sono 2 Linee seriali RS485 per il collegamento ai moduli SiouxPro2 Line vedere specifico manuale di installazione a cui si connettono le linee sensori con relativa alimentazione 1 Linea RS485 max...

Page 12: ...mentazione LINE 2 led colore verde RX Ricezione dati LINE 2 led colore giallo TX Trasmissione dati LINE 2 led colore giallo SET LINE 2 3 dip switch per il settaggio della LINE 2 vedi nota FUNCTION Com...

Page 13: ...nza alimentazione LINE 3 led colore verde RX Ricezione dati LINE 3 led colore giallo TX Trasmissione dati LINE 3 led colore giallo SET LINE 3 3 dip switch per il settaggio della LINE 3 vedi nota INPUT...

Page 14: ...razione alternativa a quanto gi configurabile attraverso il software possibile scegliere tra pi funzioni che si possono selezionare tramite il commutatore esadecimale premere il pulsante SET BUTTON pe...

Page 15: ...ilasciare il pulsante SET BUTTON Ruotare FUNCTION TENS UNIT su 0 chiudere il tamper Fine della procedura 3 2 1 1 Assegnazione automatica del number device Posizionare il commutatore delle funzioni sul...

Page 16: ...r di Sioux CU un breve suono Impostando il valore 00 sui commutatori decine e unit e premendo il pulsante SET BUTTON la Sioux CU Pro2 cancella il number device di tutte le schede Master Pro2 del ramo...

Page 17: ...lpito Al termine della procedura la nuova configurazione viene salvata nella Sioux CU Pro2 in modo automatico 3 2 1 5 Modifica numero sensori del ramo sinistro L impostazione del numero di sensori del...

Page 18: ...postare l attivazione della cifratura AES128 nella comunicazione verso IB SystemIP Per accedere a questa funzione posizionare il commutatore delle funzioni sulla posizione A Impostando i commutatori d...

Page 19: ...95 102 109 116 123 130 137 La scheda Sioux Master Pro2 acquisisce i segnali prodotti dalla perturbazione della recinzione tramite il suo sensore interno e quelli prodotti da altri sei sensori schede...

Page 20: ...sori presenti sulle schede Slave Pro2 di sua competenza e comunica i segnali ricevuti a Sioux CU Pro2 in formato digitale SiouxPro2 Slave SiouxPro2 Slave 3 5 Terminazione Ogni ramo di Sioux CU Pro2 de...

Page 21: ...CIAS Elettronica S r l Ed 1 1 Manuale di installazione Pagina 21 di 51 Sioux Pro 2 3 6 Descrizione dei collegamenti Nella figura sottostante sono rappresentati i collegamenti di un sistema Sioux Pro 2...

Page 22: ...anco Marrone 8 RS485 Linea alta LH Marrone Marrone Schermo Schermo Schermo Cavo di connessione tra la seriale LINE1 o LINE2 di Sioux CU Pro2 e la prima Sioux Slave Pro2 Interponendo SiouxPro2 Line N B...

Page 23: ...S Elettronica S r l Ed 1 1 Manuale di installazione Pagina 23 di 51 Sioux Pro 2 Connessioni di alimentazione Cavo del tamper Cavo di connessione ethernet Cavo cross modello EL EIA TIA568A B 8pin Cavo...

Page 24: ...debba essere posizionato lontano dai sensori si pu utilizzare una scatola di derivazione in cui sono connessi i due rami dei sensori e un cavo per ciascuna linea lead cable che contiene i segnali e l...

Page 25: ...ermo Schermo Collegare i conduttori Bianco Arancio Arancio e Bianco Verde assieme al conduttore BLU a GND cio al morsetto 2 della morsettiera SiouxPro2 Line Verde e Bianco Blu a 27 6 Vcc cio al morset...

Page 26: ...indicatore giallo RX di LINE1 o LINE2 non lampeggia Ramo non connesso Verificare i collegamenti della linea RS485 verso i sensori Assegnazione number device non eseguita Eseguire la procedura di asse...

Page 27: ...34 mA Temperatura di lavoro 40 70 C Grado di protezione dell involucro IP55 5 2 Sioux Pro 2 PoE Caratteristiche tecniche SIOUX PRO 2 PoE Min Nom Max Unit Tensione di alimentazione SiouxPro2 CU V 44 48...

Page 28: ...ing The sensors located along the fence line detect the disturbances caused by an attempted intrusion and convert them into electrical signals that are collected by each Master Pro2 board Each Master...

Page 29: ...respect to the Sioux CU Pro2 2540m 1400m 1140m Calculation of sensors cables plastic boxes with kit conversion The number of cables and plastic boxes is equal to the number of sensors Perimeter senso...

Page 30: ...y part of the line Calculation of RJ45 connectors The lead cable already contains 2 RJ45 connectors Each gate requires two RJ45 connectors It is recommended to provide some extra connectors as a spare...

Page 31: ...Sliding gates Contact CIAS service Wall and or similar material These types of materials are subject to breakthrough and perforation Install the sensor every 3 m considering a coverage radius of 1 5 m...

Page 32: ...RANGE dot The Master Pro2 manages 6 Slave Pro2 boards 3 on its left and 3 on its right See Fig 5 below for correct installation of all sensors Fig 4 4 Assemble the plastic parts as indicated in the as...

Page 33: ...each branch finish the installation as follow Fig 7 indication G 1 Master Pro2 termination line or redundancy 1 2 o 3 Slave Pro2 after the Master Pro2 termination line or redundancy Fig 7 9 Complete...

Page 34: ...d two 2 5 meters cables It is possible to install a maximum of 19 SiouxPro2 LFI for each line refer to the specific installation manual 2 5 SiouxPro2 Redund optional SiouxPro2 Redund is a module to be...

Page 35: ...SiouxPro2 Line modules see the specific installation manual to which line sensor connects with associated power supplies 1 RS485 serial line max 1 2 km for connection to the IB System Rack relay boar...

Page 36: ...LINE 1 3 dip switches to setup LINE 1 see note LINE 2 Sensor line right branch RS485 POWER LINE 2 Power supply presence LINE 2 green colour RX RX data LINE 2 yellow colour TX TX data LINE 2 yellow col...

Page 37: ...V GND Ground LH RS485 High Line LO RS485 Low Line SHLD Shield Description of the rear panel Type Functionality SET BUTTON Button for confirmation and functions settings LINE 3 RS485 serial line for co...

Page 38: ...ated and not polarised ON ON ON Line terminated and polarised LINE3 Description VCC Power supply output 13 8 V GND Ground LH RS485 High Line LO RS485 Low Line SHLD Shield TAMPER Description TAMP Tampe...

Page 39: ...r number 7 change of the right branch sensor number 8 enable disable storage of Cut Prealarm Events 9 reset of Sioux CU Pro2 to default parameters with power on A enable disable encrypted communicatio...

Page 40: ...o2 number Rotate the FUNCTION to position 2 Position the decimal switches tens and unit so that they create the number to be assigned to the Sioux CU Pro2 Push the SET BUTTON to acquire the value 3 2...

Page 41: ...eft of the last hit sensor is hit and this sensor belongs to the same zone of the other sensor the zone dimension is reduced and three short beep will be emitted If a sensor on a previous zone of the...

Page 42: ...You can set whether to enable AES128 encryption in communication to IB SystemIP To access this function set the function switch to position A By setting the tens switches to 0 and unit to 0 the encry...

Page 43: ...d can have the values of 4 11 18 25 32 39 46 53 60 67 74 81 88 95 102 109 116 123 130 and 137 Sioux Master Pro2 board acquires the signals from the internal sensor plus those from the other six boards...

Page 44: ...sensors present on the Slave Pro2 boards and communicates these received signals to the Sioux CU Pro2 in digital format SiouxPro2 Slave SiouxPro2 Slave 3 5 Termination Each branch of the Sioux CU Pro2...

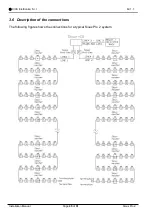
Page 45: ...CIAS Elettronica S r l Ed 1 1 Installation Manual Page 45 of 51 Sioux Pro 2 3 6 Description of the connections The following figure shows the connections for a typical Sioux Pro 2 system...

Page 46: ...hite Brown 8 RS485 High Line LH Brown Brown Shield Shield Shield Connection cable between serial lines LINE1 or LINE2 of the Sioux CU Pro2 and first Sioux Slave Pro2 using SiouxPro2 Line REMARK Using...

Page 47: ...al Page 47 of 51 Sioux Pro 2 Power and battery connections Tamper cable Ethernet connection cable Connector Ethernet Connector Connector Ethernet Connector Cross Cable model EL EIA TIA568A B 8pin USB...

Page 48: ...st be located at long distance away from sensors it is necessary to use a distribution box to which the two sensor branches are connected together with a cable lead cable one for every branch which ca...

Page 49: ...hield Shield REMARKS Connect White Orange Orange White Green and Blue wires together to terminal 2 GND of the SiouxPro2 Line terminal block Connect Green and White Blue wires together to terminal 1 27...

Page 50: ...X for LINE1 or LINE2 not flashing Branch not connected Check the connection of the RS485 line to the sensors Device number assignment not completed Carry out the device number assignment procedure Yel...

Page 51: ...nt SiouxPro2 Line mA 134 mA Working Temperature 40 70 C Box Protection level IP55 5 2 Sioux Pro 2 PoE Technical Characteristics Min Nom Max Unit Power supply Voltage SiouxPro2 CU V 44 48 57 V Power su...

Page 52: ...ttroniche minimizzare l uso delle discariche per lo smaltimento dei prodotti e migliorare la qualit della vita evitando che sostanze potenzialmente pericolose vengano rilasciate nell ambiente This pro...

Reviews: